
User's Manual

TECHNISONIC INDUSTRIES LIMITED
www.til.ca
TFM-550 Installation & Operating Instructions TiL 99RE262 Rev A Issue 8
2-3
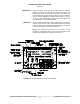
2.2 OPERATING INSTRUCTIONS (See Figure 2-1)
1. Switch power on by turning the VHF volume clockwise. Depending how the radio is
configured, either the last programmed or last displayed frequencies will appear on the
screen. The transceiver is now in normal operating mode.
NOTE: VHF high band will be referred to as “VHF” and VHF low band as “VLO” in these
instructions.
2. Adjust the audio level by adjusting the VHF, UHF and VLO volume knobs.
3. Pressing the squelch defeat button will open all receivers to confirm they work.
4. Read the display. The top line will indicate which VHF memory is selected followed by a
"+" if the memory position is included in a scan list, an alphanumeric message, and the
frequency of the VHF receiver. A small "n" before the frequency indicates 12.5 kHz
narrowband channel spacing is in effect on this memory position. In the receive mode,
the frequency is followed by an "RT" if an RX CTCSS tone or RX DPL code is
programmed, or an "RX" if no receive tone/code is programmed. Similarity, in the
transmit mode either a "TT" or "TX" is shown after the frequency. The second line shows
the same information for the UHF band. The third line indicates the same information
about the VHF LOW band.
5. Set the VHF/UHF/VLO (BS) switch to the desired band.
6. The VHF/PRI switch is spring loaded and is normally in the VHF position. Pressing this
switch down will result in channel 001 being loaded on the VHF band.
7. Set the HI/LO switch to the desired RF output power.
8. Select the desired memory by using the M.UP and M.DN buttons, or the RCL button and
a three digit number followed by ENTER.
9. To transmit DTMF tones, use the keyboard keys while holding the PTT button on the
microphone. There is a 5 second PTT delay after pressing a key so that you may press
several DTMF keys in sequence without having to hold the PTT. The keyboard returns to
its normal function when the PTT is released.
The display always shows the status of both receivers and the transmitter. The light at the left of
each line indicates which receiver is receiving. The display also indicates the memory channel is
in use. A "TX" (no TX tone/codes programmed) or "TT"(either TX tone or code programmed) on
the right side of the display indicates which band is active when transmitting. The transmit
frequency is also shown. In the receive mode the display shows “RX” beside the receive
frequency if no RX tone or DPL code is programmed and “RT” if a CTCSS tone or DPL code is
programmed.
While in any programming mode, all receivers continue to function. When the transceiver is in
either of the operating frequency or CTCSS tone/DPL code programming modes and you must
respond to a call, click the microphone PTT once (the radio will not transmit during this click). This
will cause the transceiver to revert back to the normal operating mode and communications with
the caller can proceed in the usual fashion. Pressing the FUNC key has the same effect.