
User's Manual


2-8
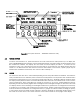
2.15 CONFIGURATION MENU
Some features of the TDFM-600/6000 transceiver can be configured to the user’s preference. To enter the
configuration menu, turn the unit on while simultaneously pressing the F4, ESW and TSW keys. Hold the
keys until the display reads ‘Configuration Menu’. The first menu item to show will be
‘Knob Default’
.
Rotating the left knob will toggle back and forth between ‘volume’ and ‘channel’. This will select which
mode the knobs will be in when you select a band or when the radio is first turned on. Press the left knob
to accept the desired setting. The next menu item is
‘Recall Mode’
. Rotating the left knob will enable and
disable this feature. When enabled, a recall mode is added to the available knob functions. Press the left
knob to accept the desired setting. The last menu item is the
‘Auto reset’
function. Rotating the left knob
will toggle the function ‘enabled’ or ‘disabled’. This function should be left enabled. However, if a module
has failed or has been removed from the radio, this feature should be disabled to prevent the radio from
continuously trying to establish communication with the missing or failed module. Press the left knob to
accept the setting. The radio will then power up normally. The radio will keep these settings until they are
changed again by the configuration menu.
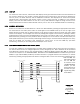
2.16 FLASH UPGRADE MODE
On occasion it may be required to flash upgrade one or more of the modules in the radio to change or add
new features. This can be done using the Motorola RIB box and software supplied in a Motorola flash
upgrade kit. The transceiver must be put into flash upgrade mode by turning on the radio while holding the
HOME key. Select the band to be upgraded by pressing the desired band knob. Follow the software
instructions. During the flash procedure, the software will ask you to turn off and on the radio, use the
RESET soft key, do not turn off the transceiver.
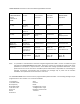
2.17 FRONT PANEL PROGRAMMING (FPP) MODE
One of the bands may have the capability to program channel information such as frequencies, PL tones,
modulation types, etc from the front panel. ‘FPP’ will show up as one of the soft menu items at the bottom
of the screen. When the FPP soft key is pressed, you will be prompt for channel information. Wait until the
cursor is flashing then press ‘OK’ for the next input or press ‘QUIT’ to finish and get out of the
programming mode. All changes up to that point will be saved. The prompts are as follows:
TX Frequency – Enter the desired transmit frequency using the numeric key pad. If the
frequency entered is not within band limits or not on proper channel spacing, the
frequency will automatically be changed to the closest valid channel.
RX Frequency – Enter the desired receive frequency.
TX PL – Enter the desired transmit PL tone frequency. After the last digit is pressed the radio will
verify that it is a valid frequency and flash the first cursor again. Press ‘OK’ at this time.
The transceiver supports all standard PL tones. (Also known as CTCSS tones) TXPL tones
are generally used to open repeaters or in talk groups where the receivers are squelch
protected by PL tones. Enter ‘000.0’ for no tone. PL tones are used by analog mode only.
RX PL – Enter the desired receive PL tone frequency. Enter ‘000.0’ no tone – carrier squelch
operation.
TX DPL – Enter the desired DPL code. You can not have both a PL and a DPL at the same time.
The one that is entered last will turn the other off. A DPL of 000 means off.
DPL codes are also known as DCS codes.
RX DPL – Enter the receive DPL code as above.
TX NAC – Enter the desired transmit P25 NAC code if using digital, otherwise just press ‘OK’.
The code is hexadecimal therefore the letters A to F could also be used. Press the ‘A-F’
soft key to use buttons 1-6 as A-F. A NAC or Network Access Code is used like PL
tones but are only used by P25 (digital) mode. A value of 293 is considered to be the
standard code for open channel.