
User's Manual
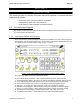
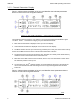

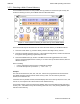
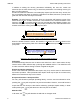
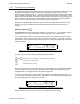
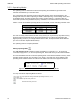
Table Of Contents
- OPERATING INSTRUCTIONS
- 1.1 Controls and Display
- 1.2 Transceiver Basic Operation
- 1.3 About Commands
- SECTION 2
- 2.1 Channel Operating Parameters
- 2.2 Editing Channel Operating Parameters
- 2.3 Scan and Multi-Mode Operation
- 2.4 Controlling User Access
- 2.5 Encrypted Operation
- 3.1 Operator Level 1 Commands
- 3.1.1 Select the Operating Memory for the Main Channel
- 3.1.2 Increase Display Brightness
- 3.1.3 Edit Channel Operating Mode
- 3.1.4 Scroll Backwards through Available Memories
- 3.1.5 Start/Stop Scan
- 3.1.6 Scroll Forewards through Available Memories
- 3.1.7 Edit Channel Operating Frequency
- 3.1.8 Decrease Display Brightness
- 3.1.9 Edit Channel Squelch Mode
- 3.1.10 Command Level Up
- 3.1.11 Toggle memory: current/home
- 3.1.12 Toggle Talk Around
- 3.1.13 Erase Encryption Keys
- 3.2 Operator Level 2 Commands
- 3.2.1 Create/Edit All Channel Information
- L2-1.1. Entering a Memory Number (refer to L1-1 for details)
- L2-1.2. Enter a Scan List & Enabling/Disabling Scan (refer to L2-5 for details)
- L2-1.3. Enter a Text Description (refer to L2-6 for details)
- L2-1.4. Enter an Operating Mode (refer to L1-3 for details)
- L2-1.5. Enter a Frequency (refer to L1-7 for details)
- L2-1.6. Enter the Squelch Parameters (refer to L1-9 for details)
- 3.2.2 Copy Guard to Main
- 3.2.3 Lock Keypad
- 3.2.4 L2-4 not used.
- 3.2.5 Edit Scan List & Enable/Disable Scan
- 3.2.6 Edit Memory Text Description
- 3.2.7 Create Shadow Memory
- 3.2.8 Copy Main to Guard
- 3.2.9 Encryption ON/OFF
- 3.2.10 Command Level Up
- 3.2.11 Command Level Down
- 3.2.12 L2–#. Not Used.
- 3.2.1 Create/Edit All Channel Information
- 3.3 Operator Level 3 Commands
- 3.3.1 Select Boot Channel
- 3.3.2 Assign Key by KeyTag
- 3.3.3 Set Numeric Edit Mode: Decimal or Hexadecimal
- 3.3.4 Display Firmware Release and Version Information
- 3.3.5 Edit Scan Parameters
- 3.3.6 Configure PTT Timer
- 3.3.7 Side Tone Audio Level Adjust
- 3.3.8 PC Data Upload/Download
- 3.3.9 Display Channel Squelch Parameters
- 3.3.10 Command Level Up
- 3.3.11 Command Level Down
- 3.3.12 Unused
- 3.4 Maintenance Commands (Level 4)
- 3.4.1 Set Default Record
- 3.4.2 Set Restricted Level Access Mode
- 3.4.3 Set Command Permissions
- 3.4.4 Set Memory Edit
- 3.4.5 L4-5. not used
- 3.4.6 L4-6. not used
- 3.4.7 Set Frequency Display
- 3.4.8 Assign KeyTags to Encryption Keys
- 3.4.9 Set Squelch Restrictions
- 3.4.10 Command Level Up
- 3.4.11 Command Level Down
- 3.4.12 L4-# not used
- 3.5 Supervisor Commands (Level 5)
- 4.1 Appendix A. Installing the Jumper for Restricted Level Access.
- 4.2 Appendix B. CTCSS Tone and DCS Code Tables
- 4.3 Appendix C. Programming Channel data using TDP and a PC.
- 4.4 Appendix C. 2.5 kHz & 6.25 kHz Valid Frequencies
- 4.5 Appendix D. Default Tables

08RE399 TDFM-136B Operating Instructions
In addition to editing the memory parameters individually, the user can create new
memories (for the main channel only) or edit all the parameters of an existing memory (for
Main or Guard channels).
All edit commands are interactive commands (they expect input from the user), as such, the
line on the display that does not have the parameter to be edited, becomes a prompt line to
guide the user as to the valid keys for that edit.
Example: The edit frequency command, figure 2-1 shows the edit frequency screen if the
active memory is 001 on Main. Note that a cursor flashes on the second character in the
frequency field , on the Main display (top row) and that the Guard Display (bottom row)
has been changed to a prompt line . This prompt provides the user with information such
as what command is running, and what keys are valid.
Figure 2-1. The user screen to edit the Main frequency
When the Guard Channel is active, the situation is reversed: the cursor is placed on the
second digit in the frequency field on the Guard line, and the top line becomes the
prompt line.
Figure 2-2. The user screen to edit the Guard frequency
Calling Key.
Some editors simply allow the user to select a set value from a list; in these cases, the key
used to 'call' the editor will also step up through the available choices. This allows the user
to make a selection without having to further navigate the keypad.
Simplex and duplex parameters.
Some of the transceiver parameters are simplex only: they are the same for both transmit
and receive operation. Other parameters are duplex: these may be (but do not have to be)
different for transmit than they are for receive.
Accept and Continue / Accept and Exit
For many edit functions (example Operating Mode), once the user has selected a value,
pressing the key will accept the entry and exit the editor. However, some edit functions
require that the user accept a value before advancing (example Squelch Mode), in these
cases pressing the key will advance to the next point in the editor.
Abandon Edit
In all cases, the key will abandon the edit with no changes made.
8 Technisonic Industries Ltd
!"#$%&'
1
2
1
2
!"#$%&'
2
1
21