
Installation and Operating Instructions

TECHNISONIC INDUSTRIES LIMITED
T6 Multiband Transceiver Module Operating Instructions
TiL 22RE638 Revision A
4
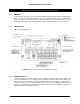
2.9 DISPLAY
The transceiver has a three line 72 character LED display. The zone name, channel name,
condition symbols (scan, direct, call, secure, monitor, etc.), and switch settings will be displayed
for each module. The active band is indicated by a pointer on the left side of the display. The
bottom line displays the menu items associated with the module selected and the mode of the
knob.
2.10 GENERAL OPERATION
Switch on the transceiver by pressing and holding the knob until the display lights up. Select the
desired band by pressing the BAND key. As mentioned in 2.6, the bands are divided up into 3
display pages assuming all bands are activated in the maintenance menu. Select the TDFM-9100
on the aircraft audio panel. Press the knob again so that CHAN shows up on the bottom right of
the display. Rotate the knob until the desired channel or talk group is selected. Press the knob
until VOL is again shown on the display. Adjust the volume by waiting until a signal is received or
by pressing F1 (factory programmed for monitor function) and adjusting the rotary knob. The radio
is ready to use. If the radio is installed in separate mode, remember that the band selected by the
soft keys is the menu displayed on the screen but the band selected by the audio panel is the
band transmitting and receiving. To use the DTMF keypad while transmitting, the band in use
must be selected on the display.
2.11 FRONT PANEL PROGRAMMING
Band 3 (T6) is an analog multiband module that covers the following bands:
30 – 50 MHz FM
108 – 118 MHz AM receive only (navigational VORs, ILS, etc)
118 – 138 MHz AM (aviation band)
225 – 400 MHz AM (military aviation band)
Selecting the FPP menu will initiate the following process:
RX Frequency The receive frequency of the current channel will be displayed with the first
digit blinking. Type in the desired frequency or just press the ‘Next’ menu key
for no changes. The frequency must be in one of the ranges listed above. If an
invalid frequency is entered, the radio will revert back to the previously
programmed frequency. Pressing ‘Exit’ menu key or the HOME key at any time
will escape the programming process and bring the radio back into normal
operating mode. Press ‘Next’ or the knob to go to the next item.
TX Frequency The transmit frequency can be edited in the same fashion as the RX frequency.
RX CTCSS VHF LO and UHF bands only. Receive CTCSS tone (also known as a PL or
TPL tone) will be displayed. Rotate the knob for the desired tone or ‘OFF.’
Press the knob or ‘Next’ menu key.
RX DCS VHF LO and UHF bands only. RX DCS will only appear if the RX CTCSS was
set to ‘OFF.’ The receive DCS code (also known as a DPL code) will be
displayed. Rotate the knob to the desired code or ‘OFF.’ Selecting OFF will set
the channel to carrier squelch only. Press the knob or ‘Next’ menu key.
TX CTCSS VHF LO and UHF bands only. Transmit CTCSS tone will be displayed. Rotate
the knob for the desired tone or ‘OFF.’ Press the knob or ‘Next’ menu key.