
User's Manual


2-6
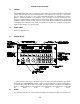
Switch on the transceiver as described in 2.3. Select the desired band by pressing the appropriate
knob. Select the same band on the audio panel. Press the knob again so that MODE shows up on the
top right of the display. Rotate the knob until the desired mode, channel or talk group is selected. Press
the knob until VOL is again shown on the display. You can adjust the volume by waiting until a signal
is received or by pressing F1 (factory programmed for monitor function) and adjusting the rotary knob.
The radio is ready to use. Remember that the band selected by pressing the rotary knobs is what is
displayed on the screen but the band selected by the audio panel is band that you are actually
transmitting and receiving on. If another band is displayed, the rotary knob for the band you are using
is still operating the volume level. To use the DTMF key pad while transmitting, the band you are using
must be displayed on the screen.
2.14 RADIO SERVICE SOFTWARE (RSS for DOS or CPS for Windows)
To make any changes to the programming in the radio, RSS software must be used. There is no
provision in the radio to allow the user to change frequencies, zones, talk groups, etc. RSS software
can be purchased from your local Motorola dealer. Along with the RSS, a Motorola Radio Interface Box
(RIB) is required to connect the computer to the TDFM-600/6000. Each band in the TDFM-600/6000
is considered an XTS-3000 portable by the RSS software. To program a band in the transceiver, it must
be selected by pressing the appropriate knob before running the RSS. Follow the instructions supplied
with the RSS and RIB. The radio cable supplied with the RIB will not connect to the TDFM-600/6000,
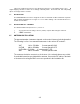
therefore you will need to fabricate or purchase the cable shown below.
FIGURE 2-2 Programming Cable
SECTION 3
INSTALLATION INSTRUCTIONS
3.1 GENERAL
This section contains information and instructions for the correct installation of the TDFM-600/6000
Transceiver.
3.2 EQUIPMENT PACKING LOG