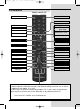
Bed_anl_.qxd 20.02.04 16:28 Seite 1 Operating Manual DigiCorder S1 Digital receiver with integrated hard disk drive Integrated video recorder PVR with integrated Premiere decoding system and PCMCIA interface for a CI Module. Operating Manual With integrated Premiere decoding system and PCMCIA interface for installing a CI module. For the reception of free-to-air and encrypted programmes broadcast via satellite, (e.g.. VIACCESS, IRDETO, SECA ,etc. ) DiSEqC 1.
Bed_anl_.qxd 20.02.04 16:28 Seite 2 1 Contents 1 Contents . . . . . . . . . . . . . . . . . . . . .2 2 Illustrations . . . . . . . . . . . . . . . . . . .5 3 Please read this first . . . . . . . . . . .8 Safety notes . . . . . . . . . . . . . . . . . . . . . . . . .9 4 4.1 4.2 4.3 4.4 4.5 4.6 4.7 Connections . . . . . . . . . . . . . . . . .11 Mains power connection . . . . . . . . . . . . . .11 External unit . . . . . . . . . . . . . . . . . . . . . . . .11 Connecting to a television set . . . .
Bed_anl_.qxd 7.11 7.12 7.13 7.14 7.14.1 7.14.2 7.14.3 7.14.4 7.14.5 7.14.6 7.14.7 7.14.7.1 7.14.7.2 7.14.7.3 7.14.7.4 7.14.8 7.15 7.15.1 7.15.1.1 7.15.1.2 20.02.04 16:28 Seite 3 Freeze frame . . . . . . . . . . . . . . . . . . . . . . .30 Video text . . . . . . . . . . . . . . . . . . . . . . . . . .30 Sub-titles . . . . . . . . . . . . . . . . . . . . . . . . . .31 Electronic Programme Guide SFI . . . . . . .31 Downloading SFI data . . . . . . . . . . . . . . . .
Bed_anl_.qxd 20.02.04 16:28 Seite 4 8.5.2 8.5.3 8.5.4 8.6 8.7 Delete all programmes . . . . . . . . . . . . . . . .59 Updating software . . . . . . . . . . . . . . . . . . .60 Copying settings . . . . . . . . . . . . . . . . . . . .61 System configuration . . . . . . . . . . . . . . . . .61 Encryption system . . . . . . . . . . . . . . . . . . .61 9 9.1 9.1.1 9.1.2 9.1.3 9.2 9.3 9.3.1 9.3.2 9.3.3 9.4 9.4.1 9.5 9.6 Operating a rotating antenna (DiSEqC 1.2) . . . . . . . . . . . . . . . . . .
Bed_anl_.qxd 20.02.
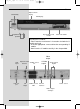
Bed_anl_.qxd 20.02.04 16:28 Seite 6 Index . . . . . . . . . . . . . . . . . . . . . . .79 Alpha-numeric display On/Standby LED display Ein/Standby Eject button for CI module Programme select up/down Slot for CI module Inserting the CI module: > Please note the manufacturer’s instructions for both the CI module and card. > Insert the appropriate smart card into the corresponding CI module. > Now insert the CI module carefully in the slot provided.
Bed_anl_.qxd 20.02.04 16:28 Seite 7 3 Please read this first > > > > > > > > > > Before operating your unit for the first time, please check that you have received all the components. The package should contain: 1 digital receiver, 1 mains power cable, 1 remote control, 1 operating manual, 1 guarantee card, 2 batteries (1,5V microcell). Insert the batteries supplied in the battery compartment of the remote control unit, taking care to observe the correct polarity.
Bed_anl_.qxd 20.02.04 16:28 Seite 8 are shown in emphasized letters in this operating manual. Help: Where available, press the blue function key to display help texts, press again to disable the text display. Disposal information The packaging of this product consists entirely of recyclable materials. Please separate the components accordingly, and dispose of them via the “Dual System” or other local recycling programmes.
Bed_anl_.qxd 20.02.04 16:28 Seite 9 4 Connections The items a b c etc. mentioned below refer to the illustration on page 10. 4.1 Mains power connection The digital receiver should be connected to the mains power supply only once all the other connections with other items of equipment have been made. This will prevent damage to the digital receiver or to other components. a When you have made all the other connections.
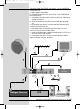
Bed_anl_.qxd 20.02.04 16:28 Seite 10 Connecting the DVB receiver to a satellite installation a. Mains power connection b. Connection from the LNC to the LNC input(LNB IN) of the DVB receiver. c. Connection from the LNC output to the LNC input of an analogue receiver. d. Scart connection of the DVB receiver with the television set. e. Connection from the HF output mto the antenna input socket of the television set. f. Connection from a terrestrial antenna to the Terrest.
Bed_anl_.qxd 20.02.04 16:28 Seite 11 cable. If your television set is appropriately equipped, it will switch automatically to AV when the digital receiver is switched on, and will provide satelliote reception. 4.3.2 Via HF cable If your television set is not equipped with a SCART socket, the digital receiver will have to be connected to the antenna input socket of the television set. If this connection is used, only mono sound reproduction is possible.
Bed_anl_.qxd 20.02.04 16:28 Seite 12 To achieve the best possible sound quality, you may connect the digital receiver to a HiFi amplifier. To do this, use a suitable cable to connect the cinch sockets Audio R and Audio L of the digital receiver with an input on your HiFi amplifier (e.g. CD or AUX; please note that the Phono input is not suitable!). 4.5.
Bed_anl_.qxd 20.02.04 16:28 Seite 13 Operating language: > Press OK to move to the selection window for the operating (menu) language (Fig. 5-2) > Use the up/down arrow keys to select the desired operating language. > Confirm by pressing OK. Audio language > Use the up/down arrow keys to select the preferred audio language. (Fig. 5-3) When the installation assistant has been completed, the programmes in the Favourites list will be sorted accordingly.
Bed_anl_.qxd 20.02.04 16:28 Seite 14 you wish to receive at the DiSEqC setting Position B/Option A, and confirm by pressing OK. (Fig. 5-8) Position A/Option B > Use the arrow up/down keys to mark the satellite you wish to receive at the DiSEqC setting Position A/Option B, and confirm by pressing OK. (Fig. 5-9) (Fig. 5-2) Position B/Option B > Use the arrow up/down keys to mark the satellite you wish to receive at the DiSEqC setting Position B/Option B, and confirm by pressing OK. (Fig.
Bed_anl_.qxd 20.02.04 16:28 Seite 15 you will be prompted (Fig. 5-14) to decide whether you want to automatically include the programmes found in the TV or Radio lists. If you decide to include the programmes automatically, you can then decide whether they should be included in the Favourites list in sorted or unsorted form. If the programmes found are accepted in sorted form,these are sorted into the Favourites list in accordance with a preprogrammed system.
Bed_anl_.qxd (Fig. 5-12) 20.02.04 16:28 Seite 16 should still make some settings related to your individual preferences. > Press the Menu key to call up the Main Menu. > Use the up/down arrow keys to mark the entry Settings. > Confirm by pressing OK. The sub-menu Settings will be displayed. (Fig. 6-2) > Now use the up/down arrow keys to mark the entry Basic Settings. > Confrim by pressing OK. The menu Basic Settings will be displayed. (Fig.
Bed_anl_.qxd 20.02.04 16:28 Seite 17 6.3 Audio/Video settings To optimize your digital receiver in conjunction with your television set, you can make further settings in the menu Audio /Video settings. > Press the Menu key to display the Main Menu. > Use the up/down arrow keys to mark the line Settings. > Confirm by pressing OK. The sub-menu Settings will be displayed. (Fig. 6-4) > Now use the up/down arrow settings to mark the line Audio/Video settings . > Confirm by pressing OK.
Bed_anl_.qxd 20.02.04 16:28 Seite 18 standard for your television set. Use the left/right arrow keys to select PAL BG, PAL I, PAL DK, SECAM BG or SECAM DK. 6.3.6 Dolby Digital (AC3) A number of movie films are broadcast in the Dolby Digital format. This will be indicated by the dolby symbol ( ) in the information window once you have saelected the programme. If you have a Dolby Digital 5.1 channel amplifier, you can enjoy the appropriate films in 5.1 channel Dolby-Digital sound, where broadcast.
Bed_anl_.qxd 20.02.04 16:28 Seite 19 The satellites selected by means of the installation assistant will be displayed in the menu Antenna settings. If the installation assistant was prematurely aborted, the satellite positions ASTRA and EUTELSAT are pre-programmed ex factory. If you would also like to receive other satellites, or if you are using a different type of LNC, you can make the appropriate settings on your digital receiver as follows: > Press Menu to call up the Main Menu. (Fig.
Bed_anl_.qxd 20.02.04 16:28 Seite 20 arrow keys to move forward or back one page at a time. If the satellite you are looking for is not shown in the list, please select one of the reserve slots, marked User 1 to User 14. > Confirm by pressing OK. The selected satellite will now be inserted at the previously selected position in the menu Antenna settings.
Bed_anl_.qxd 20.02.04 16:28 Seite 21 User LNC If you have entered User LNC as the DiSEqC type, you can make additional settings: LOF low band LOF (Local oscillator frequency) is the frequency at which the LNC converts the frequency received into the so-called 1. interim frequency, which can then be received by the digital receiver. So-called Universal LNCs employ 2 LOFs to cover the entire reception range from 10,7 to 11,8 GHz (low-band) and 11,7 to 12,75 GHz (high-band).
Bed_anl_.qxd 20.02.04 16:28 Seite 22 7.2 Programme selection 7.2.1 Using the programme up/down keys > Use the programme up/down keys either on the unit or on the remote control to move up or down by one programme slot at a time. 7.2.2 Using the numeric keys Use the numeric keys to enter the desired programme number. For example: 1 for programme slot 1 1, then 4 for programme slot 14 2, then 3, then 4 for programme slot 234 When entering programme numbers of more than one digit, you have approx.
Bed_anl_.qxd > > > > or > 20.02.04 16:28 Seite 23 (Fig. 7-2) In addition, the entry Hard drive recordings will be shown, allowing you to access the hard drive navigator (Point 7.15.2). Use the up/down arrow keys to select a programme list type, e.g. Total list. Confirm by pressing OK. The alphabetically sorted total list will be displayed, containing all programmes. (Fig. 7-3) Use the up/down arrow keys to select the programme you wish to view or listen to. Confirm by pressing OK.
Bed_anl_.qxd 20.02.04 16:28 Seite 24 > ting in the direction of insertion. If an encrypted programme is now selected, your digital receiver will automatically check the card slot, and will display the programme in unencrypted form, provided a corresponding CI module and a valid smart card for this programme have been inserted. Special functions Some programme slots, e.g. Premiere (can only be viewed with a valid subscription!) offer certain special functions.
Bed_anl_.qxd 20.02.04 16:28 Seite 25 ted starting time, you can enjoy the programme at the desired time. 7.4 Volume control You have the option of adjusting the volume of your digital receiver. This makes using your receiver even more convenient, since all important functions are combined on the receiver remote control, and you will only rarely need to use the remote control of your television set. When you switch on the digital receiver, the volume will be set to the level last selected.
Bed_anl_.qxd (Fig. 7-5) 20.02.04 16:28 Seite 26 Dolby Digital. > Confirm by pressing OK. You can now enjoy the programme in Dolby Digital sound. If you would like your receiver to present programmes in Dolby Digital automatically, set the unit to automatic AC3 reproduction as described in Point 6.3.6. 7.6 TV/Radio switching The pre-programming includes radio as well as TV programmes. > Use the TV/Radio key to switch the digital receiver to Radio mode.
Bed_anl_.qxd > > > > 20.02.04 16:28 Seite 27 Use the arrow keys to mark the programme for which you wish to view the data. Press the Option key to display the data of the transponder selected (Fig. 7-14). Use the coloured function keys to also display Audio/Video information, Programme information, and, where appropriate, information on the encryption system used (CA). Press Menu to exit from this display. 7.11 Freeze frame > > (Fig. 7-6) (Fig.
Bed_anl_.qxd 20.02.04 16:28 Seite 28 Press the yellow function key to display the video text group indicated in the yellow field. > Press the blue function key to display the video text group indicated in the blue field. Mixed mode > Press the Videotext key again to switch to mixed mode (simultaneous display of video text information and TV picture). > Press this key again to revert to normal operation. > (Fig. 7-10) (Fig.
Bed_anl_.qxd - 20.02.04 16:28 Seite 29 screen mark selected programmes which will be switched on automatically at the starting time programme timers search for programmes according to type (genre), and to select them for viewing. 7.14.1 Downloading SFI data The programme information is updated at the time set on your receiver in accordance with Point 8.2 (SFI channel. This can only take place when your unit is in standby mode.
Bed_anl_.qxd 20.02.04 16:28 Seite 30 7.14.4 Now (table with current programme contents) Initially, the SFI table “Now” (Fig. 7-16) will be displayed, showing programmes currently being broadcast. The yellow bar to the right of the programme name indicates the elapsed broadcast time of the current programme. The programme currently selected is highlighted. > Use the up/down arrow keys to move the marker one line at a time. Use the left/right arrow keys to move the marker one page at a time (paging).
Bed_anl_.qxd > 20.02.04 16:28 Seite 31 or Press the numeric key “0” to go to the PVR navigator. Press Back to return to the table “Next”. 7.14.7 SFI functions To utilise the following SFI functions, call up the SFI as described in Point 7.14.3. 7.14.7.1 SFI Info The function SFI Info allows you to display a biref information on the programme or channel selected. Where SFI information is available, this will be indicated by the symbol next to the appropriate programme.
Bed_anl_.qxd 20.02.04 16:28 Seite 32 Deleting an SFI timer event > If you wish to delete a timer event programmed via SFI, proceed as described above to mark the selected programme. > Press the red function key Timer to open a selection window. > Use the up/down arrow keys to mark the line Timer delete. > Confirm by pressing OK. > To delete an active timer, switch the digital receiver off by pressing the On/Standby key. > Press this key again to switch the receiver on, and revert to normal operation.
Bed_anl_.qxd > > > > > > > > 20.02.04 16:28 Seite 33 Press the blue function key SFI Menu to open a selection window. Use the up/down arrow keys to mark the line Genres. Confirm by pressing OK. Use the green function key Genres to open a window showing the available programme categories. (Fig. 7-21) Use the arrow keys to select the desired programme category, and confirm by pressing OK. An overview of the day’s programmes will now be displayed, showing only programmes of the selected category. (Fig.
Bed_anl_.qxd 20.02.04 16:28 Seite 34 7.15.1.1 Instant recording Start and end recording manually Option 1: > Switch to the channel that carried the programme you wish to record. > Press the Record key to record the currently broadcast programme. You can continue to watch the programme on screen while the recording is in progress. > To interrupt the viewing of the current programme at a specific point, press the yellow function key Play/Pause.
Bed_anl_.qxd > > > > > > 20.02.04 16:28 Seite 35 Switch to the channel that will broadcast the programme you wish to record. Press the Record key to record the current programme. The programme will continue to be displayed on the screen while the recording is running. Press the On/Standby key A prompt will appear on screen, asking you whether you wish to record the current programme to the end. Use the left/right arrow keys to select Yes in order to record the current programme to the end.
Bed_anl_.qxd 20.02.04 16:29 Seite 36 display. 3. Programme change timer If your receiver is in normal operating mode, it will switch to the pre-selected programme slot at the designated starting time. In contrast to the hard drive or video recorder timers, the full functionality of the unit is not restricted, and the unit will not be switched off at the end of the programme. (Fig. 7-20) Manual timer programming > > > > > To (Fig. 7-21) (Fig. 7-22) Press the Menu key to call up the Main Menu.
Bed_anl_.qxd 20.02.04 16:29 Seite 37 timer). Repeat > Use the arrow keys to mark the column Rep. > Press OK. A selection window will be opened, showing various suggestions for repeats. 1x Timer on once T Daily repeat 1 W Repeat once a week 1-5 Repeat only on workdays 6-7 Repeat only on weekends > Use the up/down arrow keys to select the desired function. > Press OK to accept the setting into memory.
Bed_anl_.qxd 20.02.04 16:29 Seite 38 > > > Press the green function key Delete. A prompt will be displayed:”Do you really want to delete this timer?” Use the left/right arrow keys to select Yes. To delete the timer entry confirm by pressing OK. Programming a new timer event > > > > > > > To programme a new timer event, use the up/down arrow keys to mark a free line in the menu Timer overview. Press the yellow function key New to open a window for the programming of the new timer event.
Bed_anl_.qxd > > 20.02.04 16:29 Seite 39 To facilitate going to a specific point of a recording in progress, you can use the functions Play, Pause as well as Fast Search, as described under Point 7.15.2. Press the Info key to display the information box, showing a progress bar indicating the recording and playing time. 7.15.2 Play You can access your hard drive recordings via either the hard drive or the PVR navigator. 7.15.2.
Bed_anl_.qxd (Fig. 7-23) (Fig. 7-24) 20.02.04 16:29 Seite 40 To locate a specific point in a recording, your PVR is equipped with functions for fast forward and reverse play. > While in Play mode, press the blue function key Forward or the red function key Reverse. The message will be displayed, either “Spool forward uu” or “Spool reverse tt”. The recording will now by played at 4x speed in the direction indicated. > If you press the red resp.
Bed_anl_.qxd > 20.02.04 16:29 Seite 41 A list will be displayed showing all the recordings on the hard drive. Use the up/down arrow keys to mark the desired programme. Delete > To delete the selected recording, press the red function key Delete. > Confirm the following message by pressing OK, to actually delete the recording. Parental control You can block access to recordings that are not suitable for children or adolescents.
Bed_anl_.qxd 20.02.04 16:29 Seite 42 at www.technisat.de. 7.15.3.2Hard drive information > Press OK to display a window showing information on the integrated hard drive. 7.15.3.3 Hard drive management > Press OK to display an overview of the number of recordings made, and of the free space available. (Fig. 7-28) Monitoring the hard drive > To monitor the hard drive, use the left/right arrow keys to mark the field Check.
Bed_anl_.qxd 20.02.04 16:29 Seite 43 This chapter describes how you can change the pre-programExample: playback ming of Timeshift your digital receiver, as well as the Favourites list in You have missed the start of the Formula 1 race - no problem! The PVR will show you the race at a later time (timeshift), while continuing record the event. line with your preferences.
Bed_anl_.qxd 20.02.04 16:29 Seite 44 display all available programmes in the Total list, or All new, to display only the new programmes found during the last scan, or All English, to display only English-language programmes. > Confirm by pressing OK. Now, depending on your selection, a programme list will be displayed showing, for example, all programmes, all new or all English-language programmes. Programmes that are already included in the Favourites list are indicated by a tick sign.
Bed_anl_.qxd 20.02.04 16:29 Seite 45 Confirm by pressing OK. Use the up/down arrow keys to mark a programme that you wish to remove from the list. > Press the yellow function key Remove. The following prompt will be displayed on screen:“Remove programme(s) from list?”. > Use the left/right arrow keys to select Yes or No. > Confirm by pressing OK. > To remove several programmes simultaneously, proceed as described in 8.1.2 (Marking blocks of programmes).
Bed_anl_.qxd 20.02.04 16:29 Seite 46 > > > > (Fig. 7-28) these as described in 8.1.2 (Marking blocks of programmes). Now press the yellow function key Sort. A double arrow will be shown next to the programme block selected. You can now use either the up/down arrow keys or the numeric keys to move the marked block to the desired position in the programme list at which you wish to place it.
Bed_anl_.qxd 20.02.04 16:29 Seite 47 dow. Here you have the option of selecting the desired programme list type. > Use the up/down arrow keys to select the desired programme list type (e.g. Favourites list). > Confirm by pressing OK. The programme list selected will be displayed. > Use the arrow keys to mark a programme that you wish to include in the electronic programme guide. > Press the yellow function key SFI to include the marked programme in the electronic programme guide.
Bed_anl_.qxd 20.02.04 16:29 Seite 48 > me guide is called up. If you select Genres, you can use the arrow keys to additionally select your preferred genre (e.g.. movies, news, shows, etc.). 8.2.3 SFI channel (Fig. 8-3) (Fig. 8-4) Your receiver is equipped to receive a data channel with additional SFI data via the ASTRA satellite Systems (19° East). These allow an SFI preview up to one week ahead. > Press OK to call up the sub-menu SFI channel (Fig. 8-9).
Bed_anl_.qxd > 20.02.04 16:29 Seite 49 8-10) Use the up/down arrow keys to move the marker around within the menu, and change the individual positions. When selecting a menu item please note any additional messages displayed on screen. 8.3.1 Changing the unit PIN The unit PIN code is set at the factory to 0000. > Press OK to display the menu used to change the unit PIN code. (Fig. 8-11) > Now use the numeric keys to enter the current unit PIN code (Default setting 0000).
Bed_anl_.qxd 20.02.04 16:29 Seite 50 > list according to your preferences, press the Menu key to revert to normal operation. To reverse the blockage of individual programmes, proceed as described above. Mark the appropriate programme, and remove the parental lock symbol by pressing the yellow function key. 8.4 Programme scan (Fig. 8-6) As mentioned, your digital receiver has been pre-programmed for reception of the ASTRA and EUTELSAT satellites.
Bed_anl_.qxd > 20.02.04 16:29 Seite 51 programmes) or whether you want to include encrypted programmes (All programmes). Confirm by pressing the red function key Start scan. The scan may take more than 15 minutes. Please note any on-screen messages displayed. 8.4.2 Satellite scan UTo scan a specific satellite for programmes, select the option Satellite scan (Fig. 8-16). You can select whether you wish to scan for all programmes (free-to-air and encrypted) or only for free-to-air programmes.
Bed_anl_.qxd 20.02.04 16:29 Seite 52 > Transponder frequency. In this line, use the numeric keys to enter the appropriate frequency. Symbol rate The symbol rate indicates the volume of data transmitted per second. A typical figure might be, for example, 27500 (27500 symbols per second). > Use the up/down arrow keys to mark the line Symbol rate. > Use the numeric keys to enter the appropriate symbol rate. Polarisation > Use the up/down arrow keys to mark the line Polarisation.
Bed_anl_.qxd 20.02.04 16:29 Seite 53 While the scan is in progress, you can follow this on screen as the various transponders are scanned. When the scan has been completed, the number of transponders found, the number of programmes found as well as the number of new programmes found will be shown on screen. In addition, a prompt will appear (Fig. 8-19), asking whether you wish to include the programmes found automatically in the TV or Radio list.
Bed_anl_.qxd 20.02.04 16:29 Seite 54 > > (Fig. 8-21) Use the up/down arrow keys to mark the menu line Service settings. Confirm by pressing OK. The sub-menu Service settings will be displayed. (Fig. 8-22) 8.5.1 Activate default setting (Fig. 8-11) When this function is selected, the default settings pre-programmed at the factory are activated again, your own settings are deleted, and the installation assistant AutoInstall will be started.
Bed_anl_.qxd 20.02.04 16:29 Seite 55 rected as described under Point 8.3.4 (manual programme scan). The current transponder data may be obtained from your specialist retailer. In the normal course of events you should not make any changes to this menu. Note: This function should not be implemented if you have made changes in the menues “Basic settings” or “LNC configuration”, as these settings will revert to the factory default settings, and the desired changes will have to be entered again.
Bed_anl_.qxd 20.02.04 16:29 Seite 56 This menu item allows you to access the sub-menues of the CI module inserted. By confirming with OK, you can display information relating to the CI module inserted as well as to the smart card being used. Manual initialising of the CI module > You can initialise the CI module manually by pressing the red function key CI Reset. (Fig. 8-15) (Fig. 8-16) 9 Operating a rotary antenna installation (DiSEqC 1.
Bed_anl_.qxd > > > > > > 20.02.04 16:29 Seite 57 Confirm by pressing OK. The menu for setting the motorised antenna will now be displayed. (Fig. 9-4) Press the yellow function key Actions to open an additional window. (Fig. 9-5) Now use the up/down arrow keys to mark the line Delete limits. Confirm by pressing OK to transfer the action selected to the green function key. To delete the limits, press the green function key Delete lim.. Confirm the screen prompt by pressing OK (Fig. 9-6) 9.1.
Bed_anl_.qxd (Fig. 8-18) (Fig. 8-19) 20.02.04 16:29 Seite 58 Note! You should only activate the geo-positioning function if your DiSEqC motor supports this function. > As described above, call up the menu for setting the motorised antenna. > Use the arrow keys to mark the field Geo.Pos. > Confirm by pressing OK. A menu will b e displayed, allowing you to enter your location. (Fig. 9-9) > Use the OK key to select On or Off for the geopositioning function.
Bed_anl_.qxd 20.02.04 16:29 Seite 59 with the most easterly satellite location. Then, continue by adding the other satellite positions, working in a westerly direction, until you have reached the most westerly satellite position. Your digital receiver has been pre-programmed at the factory for the most commonly used satellite positions. In addition, you may enter and configure user-defined (User) satellite positions (User 1 to User 14) for any orbital position. 9.3.1 Selecting a satellite position 9.3.
Bed_anl_.qxd 20.02.04 16:29 Seite 60 If the geo-positioning function is switched on (Point 9.2) you can now turn the antenna to the programmed user satellite position using the function turn to Sat (Point 9.4.1). If the geo-positioning function is switched off (Point 9.3.2.2) you must now turn the antenna manually to the desired satellite position. 9.3.2 Adjusting the satellite antenna (Fig.
Bed_anl_.qxd 20.02.04 16:29 Seite 61 perform the automatic focussing function. This provides a fine adjustment of the antenna to achieve optimum reception. > Press the yellow function key Actions to open a window displaying the actions available. > Now use the up/down arrow keys to mark the line Autofocus. > Confirm by pressing OK. > Press the green key (Autofocus) to start the autofocus procedure. While the automatic adjustment is in progress, the message Autofocus will be displayed. (Fig. 9-13) 9.3.
Bed_anl_.qxd 20.02.04 16:29 Seite 62 While the positioning procedure is in progress, the blinking message “turn” will be displayed in the menu. 9.4.1 Selecting a satellite position In order to turn the dish antenna to the position specified in the satellite list, your digital receiveris equipped with the function turn to Sat. > (Fig. 9-1) > > > Press the yellow function key Actions to open the window displaying the actions available. Use the up/down arrow keys to mark the line turn to Sat.
Bed_anl_.qxd 20.02.04 16:29 Seite 63 Data compression/MPEG1/MPEG2: The current television standard (625 lines and 50 Hz picture repeat frequency) provides a digital data volume of 216 MBit/s. This would require bandwidths simply not available either terrestrially or via satellite. The data volume is thus reduced by means of a data reduction system. For Europe, the internationally determined standard for data compression is MPEG-2.
Bed_anl_.qxd 20.02.04 16:29 Seite 64 the High range Modulator: Switch in the satellite receiver or video recorder used to connect the television set via antenna cable Parabolic dish: Dish, made of metal or coated synthetics, with parabolic shape, used to focus the electro-magnetic waves transmitted by the satellite at a focal point.
Bed_anl_.qxd 20.02.04 16:29 Seite 65 LNCs are supplied with power by means of the coaxial cable, to achieve this the receiver supples either 14 or 18 volt power Interim frequency: The frequency range broadcast by the satellite cannot be transmitted via a cable. Therefore the LNC converts the signal to the interim frequency range of 950 to 2150 MHz. This makes it possible for the digital receiver to receive and process the signal. 1.
Bed_anl_.qxd 20.02.04 16:29 Seite 66 Output impedance THD S/N Crosstalk Input analogue: Input level l/r Input impedance Volume at switch-on Output digital: SP/DIF output (Fig. 9-12) 600 Ohm > 60 dB ( 1 kHz ) > 60 dB < - 65 dB 0,5 V r.m.s. (nominal) > 40 kOhm Automatic use of last volume setting electrical, cinch socket optical, Toslink Dolby Digital AC3 Video parameters: Output: Output level FBAS 1 Vs-s +/- 0.3 dB into 75 Ohms Output level Y 1 Vs-s +/- 0.3 dB into 75 Ohms Output level C 1 Vs-s +/- 0.
Bed_anl_.qxd 20.02.04 16:30 Seite 67 Function Update for operating software and pre-programming LNC power supply: LNC power 400 mA max.; double insula ted LNC voltage vertical <14,0V no load, > 11,5 V at 400 mA LNC voltage horizontal < 20 V no load, > 17,2 V at 400 mA LNC switched off in standby mode 22 kHz modulation: 22 kHz, Amplitude 0.6 V +/- 0.2 V Programme memory/satellite positions: No. of programmes Favourites list TV: 999 TV programmes No.
Bed_anl_.qxd 20.02.04 16:30 Seite 68 Index AC3 . . . . . . . . . . . . . . . . . . . . . . . . . . . . . . .19, 28 Autofocus 67 Automatic scan . . . . . . . . . . . . . . . . . . . . . . . . . . . . . .56 Language, operating . . . . . . . . . . . . . . . . . . . . . . . . . .17 Service breaks . . . . . . . . . . . . . . . . . . . . . . . . . . . . . . .9 DiSEqC . . . . . . . . . . . . . . . . . . . . . . . . . . . . . . . . . .69 DiSEqC 1.2 . . . . . . . . . . . . . . . . . . . . . . . . . . . . . . . .
Bed_anl_.qxd 20.02.04 16:30 Seite 69 SFI . . . . . . . . . . . . . . . . . . . . . . . . . . . . . . . . . .31 SFI channel . . . . . . . . . . . . . . . . . . . . . . . . . . . . . . . . .52 Safety notes . . . . . . . . . . . . . . . . . . . . . . . . . . . . . . . . .9 Sleep timer . . . . . . . . . . . . . . . . . . . . . . . . . . . . . . . . .46 Updating software . . . . . . . . . . . . . . . . . . . . . . . . . . . .60 Special functions . . . . . . . . . . . . . . . . . . . . . . . . . . . . .
Bed_anl_.qxd 20.02.04 16:30 Seite 70 When entering programme numnbers with more than one digit, you have approx. 3 seconds time after pressing a key to complete the entry. If you wish to enter a number with only one or two digits, you can speed up the switching process by keeping your finger pressed down a little longer on the last digit. Using the programme list: > > > > > Press OK. You can now use the up/down arrow keys to mark the programme you wish to view. Press OK to select the marked programme.
Bed_anl_.qxd 20.02.
Bed_anl_.qxd 20.02.
Bed_anl_.qxd 20.02.
Bed_anl_.qxd 20.02.
Bed_anl_.qxd 20.02.04 16:30 Problem Seite 75 Possible cause Solution Various programmes not shown in programme list Wrong programme list selected Select different programme list (see Point 7.2.3.
Bed_anl_.qxd 20.02.04 16:30 Problem Seite 76 Possible cause Solution Current time not displayed while in standby mode Current time not downloaded Switch to major programme, e.g. ZDF, for approx. 30 seconds. Unit cannot be switched on, or cannot be operated Unit blocked Perform flash reset: Note! All personal settings are lost in this process. > Disconnect mains power plug. > Press Standby and Programme Up keys on unit simultaneously, and keep them pressed down.
Bed_anl_.qxd 20.02.
Bed_anl_.qxd 20.02.
Bed_anl_.qxd 20.02.
Bed_anl_.qxd 20.02.
Bed_anl_.qxd 20.02.
Bed_anl_.qxd 20.02.
Bed_anl_.qxd 20.02.
Bed_anl_.qxd 20.02.
Bed_anl_.qxd 20.02.
Bed_anl_.qxd 20.02.
Bed_anl_.qxd 20.02.
Bed_anl_.qxd 20.02.
Bed_anl_.qxd 20.02.
Bed_anl_.qxd 20.02.
Bed_anl_.qxd 20.02.
Bed_anl_.qxd 20.02.
Bed_anl_.qxd 20.02.
Bed_anl_.qxd 20.02.
Bed_anl_.qxd 20.02.
Bed_anl_.qxd 20.02.
Bed_anl_.qxd 20.02.
Bed_anl_.qxd 20.02.
Bed_anl_.qxd 20.02.
Bed_anl_.qxd 20.02.
Bed_anl_.qxd 20.02.
Bed_anl_.qxd 20.02.