
Digital Satellite TV System User Manual


6
Mains connection
The digital receiver should only be connected to the mains supply when all the accompanying
accessories have been properly connected to the device. This will help avoid any risk of damage to
the digital receiver or other components.
a. After you have made all connections in accordance with the following points, connect the
receiver using the enclosed power cable to a mains socket of 230 V / 50-60 Hz.
Please note: The device includes a power switch on the rear to cut off the device from the mains
supply.
External unit
b. Connect the LNB input of the digital receiver using a suitable coaxial cable with your external
unit.
Connection to a television set
c. Connect the receiver (HDMI output) and TV (HDMI input) via an HDMI cable. If your TV is
suitably equipped, it will automatically switch to the HDMI input when the digital receiver is
switched on.
Or:
d. Connect the receiver (component output) and TV (component input) via a component cable.
Alternatively:
e. Use a SCART cable to connect the receiver (SCART socket TV) with the television set
(SCART socket). If your television set is appropriately equipped, it will automatically switch to AV,
and thus to satellite operation, when the digital receiver is switched on. Where applicable, it may
be necessary to adapt the type of signal for your television set.
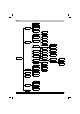
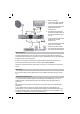
a. Mains connection
b. Connecting LNB 1 with LNB
Input 1 of the DVB receiver.
c. Scart connection between the
DVB receiver and the
television set.
d. Connecting the component
socket of the DVB receiver to
the component socket of the
TV set.
e. Scart connection between the
DVB receiver and the
television set.
f. Scart connection from a video
player to the VCR Scart
socket of the DVB receiver.
g. Connecting the Audio outputs
with a HiFi-/Surround system.
Videorekorder