Digit MF4-T for the reception of DVB-T TV and radio channels Operating Manual
1 Contents 1 Contents . . . . . . . . . . . . . . . . . . . . . . . . . . . . . . . . . . . . . . . . . . . . . . .2 2 3 Illustrations . . . . . . . . . . . . . . . . . . . . . . . . . . . . . . . . . . . . . . . . . . . .5 Important notes on operation . . . . . . . . . . . . . . . . . . . . . . . . . . . . . .8 Note on disposal . . . . . . . . . . . . . . . . . . . . . . . . . . . . . . . . . . . . . . . . . . . . . . . . . . . .8 Safety notes . . . . . . . . . . . . . . . . . . . . . . . . . . . . . .
7.4.1 7.5 7.6 7.7 7.8 7.9 7.10 7.11 7.12 7.12.1 7.12.2 7.13 7.14 7.14.1 7.14.2 7.14.3 7.14.4 7.14.5 7.14.6 7.14.7 7.14.7.1 7.14.7.2 7.14.7.3 7.14.7.4 7.14.7.5 7.14.8 7.15 7.2 Dolby Digital (AC3 mode)* . . . . . . . . . . . . . . . . . . . . . . . . . . . . . . . . . . . . . . . . . . .18 TV/Radio switching . . . . . . . . . . . . . . . . . . . . . . . . . . . . . . . . . . . . . . . . . . . . . . . . .18 Return to last programme selected . . . . . . . . . . . . . . . . . . . . . . . . . . . . . . . . . . .
8.4.3 8.4.4 8.5 8.5.1 8.5.2 8.5.3 8.5.4 8.6 Manual Scan . . . . . . . . . . . . . . . . . . . . . . . . . . . . . . . . . . . . . . . . . . . . . . . . . . . . . .34 After the scan . . . . . . . . . . . . . . . . . . . . . . . . . . . . . . . . . . . . . . . . . . . . . . . . . . . . .34 Service settings . . . . . . . . . . . . . . . . . . . . . . . . . . . . . . . . . . . . . . . . . . . . . . . . . . . .35 Activating default (factory) setting . . . . . . . . . . . . . . . . . . . . . . . . . . . . . . .
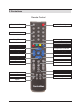
2 Illustrations Remote Control On/Stand-by Sound on/off-mute Numeric keys Language select Sleep-Timer Multi-function keys Arrow key up OK Programme + Programme list on/off Arrow key left Arrow key right Volume - Volume + Arrow key down Back Programme - Info SFI/EPG TV/Radio mode Menu on/off Help EXTERNAL Video text Stop Option 5
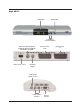
Digit MF4-T LED display On/Standby Programme selection up/down Input terrestrial antenna (antenna feed +5V/30mA/ switchable via OSD) Mains power socket SCART socket VCR Antenna output Audio output digital (electric) Audio outputs analogue 6 RS 232 interface SCART socket TV
Dear customer, congratulations on your decision to buy this digital receiver. This operating manual is designed to assist you in using the comprehensive functions of your new digital receiver to the optimum. We have tried to keep the instructions as brief as possible, while making them as comprehensive, and comprehensible, as necessary. The range of features of your unit is constantly being expanded in the form of software updates.
3 Please read this first > > > > > > > > > Before you set up your unit for operation, please first check that the package contains all the components that should be there. The following are supplied as standard: 1 digital receiver, 1 mains power cable, 1 remote control unit, 1 operating manual, 1 guarantee card, 2 batteries (1,5V AAA size). Insert the batteries provided in the battery compartment of the remote control unit. Note the correct polarity when inserting the batteries.
The manufacturer bears no responsibility for damage caused by non-observance of the safety precautions, or by inappropriate handling. > To ensure adequate circulation of air, place the unit on a smooth horizontal surface and do not place any objects on top of the unit. The top cover contains air slits which permit heat to escape from the interior of the unit. > Do not place any burning items, such as burning candles, on top of the unit.
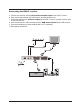
Connecting the DVB-T receiver a. Connect the antenna with the terrestrial antenna input of the DVB-T receiver. b. Scart connection between the DVB receiver and the television set. c. Connection between the antenna output of the DVB-T receiver and the antenna input of the television set. d. Scart connection of a video recorder with the VCR Scart socket of the DVB receiver. e. Connection between the audio outputs and a Hi-Fi installation. f.
4 Connections The references below to items a b c etc. refer to the illustration on page 10. 4.1 Antenna a The cable coming from the terrestrial antenna (roof-mounted or room antenna) should be connected with the terrestrial antenna input of the receiver. Wherever possible please use a roof-mounted antenna. An internal room antenna may be sufficient under very favourable reception conditions. If an active antenna is being used, ensure that the antenna feed is switched on (Point 6.2.4). 4.
4.5 Mains power connection The digital receiver should only be connected to the mains power supply after it has been completely connected with all other components in the system. This serves to avoid the digital receiver or other components being damaged or destroyed. f When you have completed making all the connections, use the mains cable (DigiPal 2) or power adapter (DigitMod T1) supplied to connect the receiver to a mains power outlet 230 V/50-60 Hz. 4.
Searching/scanning for channels/stations When the software version has been checked, and updated if necessary, you can proceed to the programme search. > Use the arrow keys up/down to mark the field All Programmes, if you want to search for both freely available and enrcypted programmes, or All unencrypted Programmes, if you want to search only for free-to-air programmes. > Press the OK key now to confirm, and an automatic programme scan will be carried out.
> Use the arrow keys up/down to move the marker within the menu, and to change the individual positions as indicated. When selecting a menu item, please also note any messages displayed on the screen. The following settings may be made: 6.2.1 Time difference to GMT (hours) Your receiver is equipped with a clock. This is synchronised to Greenwich Mean Time via satellite signals. If you have selected the option None under the heading Country (Point 6.2.
> > > > > > Press the Menu key to call up the Main Menu. Use the arrow keys up/down to select the line Settings. Confirm by pressing OK. The sub-menu Settings will be displayed. Now use the arrow keys up/down to select the line Audio/Video Settings. Confirm by pressing OK. The menu Audio/Video Settings will be displayed. You can use the arrow keys up/down to move the marker around within the menu, and change the individual settings as indicated.
6.4 Antenna adjustment To position the antenna in the optimum direction, the receiver is equipped with a signal strength indicator. > Press the Menu key to display the Main Menu. > Now use the arrow keys up/down to select the entry Settings. > Confirm by pressing OK. The sub-menu Settings will be displayed. > Now use the arrow keys up/down to mark the menu line Antenna adjustment. > Confirm by pressing OK. The menu Antenna adjustment will be displayed.
7.2.3 Using the programme list (Navigator) > > > > > > Press OK. The programme list will now be displayed. In TV mode only the TV programmes will be displayed, and in radio mode only the radio programmes will be displayed. The programme currently selected is marked/highlighted. Use the arrow keys up/down to mark the desired programme. Press the yellow function key Preview to view a preview of the programme highlighted. Press OK to view the highlighted programme.
mes) and for encrypted programmes. Where available from the provider, the recommended age restriction as well as the programme genre will also be indicated. 7.3 Volume control You have the facility to adjust the volume of your digital receiver. This makes operating the receiver even more convenient, since you can access all important functions from a single remote control, and will rarely have to use the remote control of your television set.
7.6 Return to last programme selected > > Press Back on the remote control to return to the last programme viewed previously. Press the key again to return to the programme viewed previously. 7.7 Display time and programme information This function allows you to view programme information related to the current programme. > Press the Info key to display the information related to the current programme (Fig. 7-8).
7.12 Video text 7.12.1 Using the video text decoder of your television set Where broadcast by the provider, video text will be transferred to your television set. To operate the video text function, use the remote control of your television set. Should you experience problems with your television set, such as an overlap of video text and picture content, you should set your digital receiver to FBAS mode (Point 6.3.4).* 7.12.
7.14 Electronic Programme Guide SFI Your digital receiver provides an electronic programme guide. This allows you to view the programme information relating to one or more programmes on your screen. You can very quickly obtain an overview of programmes currently being broadcast, or you can view all the programmes being broadcast today, or on the following days.
> > or > The SFI functions (Point 7.14.7) are now available. Press the yellow function key to move to the SFI table “Next” (See Point 7.14.5) Press the TV/Radio key to return to normal operation. 7.14.5 Next > > or > or > Use the yellow function key to display the table "Next" (following programmes). The SFI functions (Point 7.14.3) are available. Press the yellow function key to move to the SFI table “More” (Point 7.14.
7.14.7.2 Marking a programme > > > Use the arrow keys or the function keys to mark/pre-select the desired . Confirm by pressing OK. The programme will be automatically marked, and will be selected when the broadcast begins. Press Back to return to the previous table. 7.14.7.3 SFI Timer programming Use the electronic programme guide SFI to simplify the programming of timer events.
> To display the programme contents for a specific day, press the numeric key corresponding to the desired day of the week. Displaying SFI overview for other programmes > Press the green function key Programmes. A list of SFI programmes will be displayed. > Now use the arrow keys to mark the desired programme. > Press the OK key to display the SFI overview of the marked programme. 7.14.7.
2. Programme change timer If your unit is in norm,al operating mode, it will switch to the pre-selected programme slot at the selected time. Unlike the video recorder timer mode, all the functions of the unit remain operational, and the unit will not be switched off at the end of the programme. Manual timer programming > > > > Press the Menu key to display the Main Menu. Use the arrow keys up/down to mark the line Timer organizing. Confirm by pressing OK. The sub-menu Timer organizing will be displayed.
Transferring data into memory > When you have completed the programming, press the yellow function key Accept to transfer the data into memory. If under Programme you have selected a programme that is blocked as per Point 8.3, you must first enter the PIN code before the data will be accepted into memory. > Press the TV/Radio key to return to normal operation. Timer overview The timer overview function will display a list of all timer events already programmed.
The time should now be displayed in stand-by mode, if it has been activated as per Point 6.2.5. 7.2 Receiving encrypted programmes Your receiver is equipped with an integrated CONAX decoding system as well as with a Common Interface. This allows you to receive encrypted programmes.
> > Press the red function key to move the marker to the Total list. This is now active. Press the red function key again to open a selection window. You are given the option of sorting the Total list according to various selection criteria (e.g. all programmes, all free-to-air, all newly found, all English-language programmes, etc.) or sorted by Providers. > Use the arrow keys up/down to select the preferred programme listing (e.g. Total list). > Confirm by pressing OK.
> > > Use the arrow keys up/down to mark the line Remove. Confirm by pressing O K. Use the arrow keys up/down to mark a programme that you wish to remove from the list. > Press the yellow function key Remove. The following message will be displayed: “Remove programme(s) from the list?”. > Use the arrow keys right/left to mark Yes or No. > Confirm your entry by pressing OK. > To remove several programmes simultaneously, mark these as described in 8.1.2 (Marking blocks of programmes).
8.2 Programming the electronic programme guide To improve the readability, you can also configure the electronic programme guide SFI to conform to your favourite programmes. To add programmes to the electronic programme guide, or to delete them from the guide, call up the Navigator as described in Point 8.1.1. You are now in the Favourites list.
> appearing briefly in the display, followed by a progressive indication of the percentage of SFI data already downloaded. The updating procedure may be interrupted by switching on the digital receiver (Key On/ Standby). 8.2.2 Start category The electronic programme guide is equipped with various display/presentation modes (categories). Overview This display mode gives you a quick overview of all programmes included in the electronic programme guide.
8.3 Parental control (blocking programmes) Your unit is equipped with a parental control function. This means that important functions (e.g. calling up the main menu) can be protected from unauthorised manipulation. In addition, programmes and recordings that you have specifically blocked can only be accessed after entering a four-digit PIN code (unit PIN). To work with the Parental Control menu proceed as follows: > Press the Menu key to display the Main Menu.
> > > > > > Confirm by pressing OK. The programme list selected will be displayed. Now use the arrow keys to mark the programme which you wish to block. Block access to the programme by pressing the yellow function key. The parental control symbol will be displayed next to the programme selected. To block access to a number of programmes simultaneously, proceed as described in 8.1.2 (Marking Blocks) and block the whole group by pressing the yellow function key.
2. Channel scan When using the channel scan mode, a specific range of channels selected by the user will be scanned for programmes. The channel scan mode is faster than the frequency scan mode. > Press OK to display a selection window showing the available scan mode options. > Use the arrow keys up/down to mark the scanning mode you wish to perform. > Confirm by pressing OK. > Use the arrow keys up/down to mark either the field Start Channel or Start Frequency.
Sorted The programmes found will be sorted into the Favourites list in accordance with a pre-programmed list. The order in which programmes are listed will depend on the audio language selected in Point 6.3.2 resp. the country selected in Point 6.2.2. Unsorted The newly found programmes will be added to the end of the Favourites list in unsorted form. No The newly found programmes will not be added to the Favourites list, and will only be added to the Total list.
8.5.3 Updating Software You also have the facility of updating the operating software of your digital receiver. > Press OK to display the sub-menu Software update. To perform a software update, mark the line Software update. > Set the software update function to on by pressing OK. > In the line Update time, use the numeric keys to set the time when the software update is to be carried out. > To initiate the update for the operating software manually, press the red function key Test.
selecting the Smartcard or the CI interface, by pressing the arrow keys, then confirm by pressing OK. Manual Initialisation of the CI module > You can initialise the CI module manually by pressing the red function key CI Reset. 9 Technical terms Antenna cable: Cable used to connect the modulator of the satellite receiver to the antenna input socket of the television set.
Software Update: Digital television is a new medium that provides improved sound and picture quality as well as the facility to provide interactive services. These new services are constantly being developed and improved by the providers. To utilize the services, it may occasionally be necessary to update the software of the digital receiver.
Video parameters: Output: Output level FBAS Output level RED Output level GREEN Output level BLUE S/N rated Connections: TV SCART: Output: VCR SCART: Output: Input: Audio output digital: S/PDIF output 1 Vs-s +/- 0.3 dB into 75 0,7 Vs-s +/- 0.1Vp-p into 0,7 Vs-s +/- 0.1Vp-p into 0,7 Vs-s +/- 0.
Mains adapter: Power consumption (DigiPal 2): 3,4 VA Stand-by mode (standby clock on) 3,0 VA Stand-by mode (standby clock off) 7 VA in operation Nominal power supply (DigiPal 2): 230 V / 50 Hz alternating current Input power supply (DigiPal 2): 180 V.... 250 V / 47 ... 63 Hz alternating current Input power supply (DigitMod T1): 12 V / 0,5 A Power consumption (DigitMod T1): 3,5 W Stand-by mode 7,5 W in operation General: DigiPal 2: Dimensions (WxDxH): 205 mm x 130 mm x 35 ... 38 mm Weight: approx.
11 Trouble-shooting guide Problem Possible cause Solution Various programmes not shown in the programme list Wrong programme list selected Select another programme list (see Point 7.2.3.1) Sound OK, no TV picture Radio mode selected Switch to TV mode Clock time not shown in stand-by mode* Clock time not downloaded Go to a major channel for 30 secs. Switch on stand-by clock (Point 6.2.
Notes 42
Index AC3 . . . . . . . . . . . . . . . . . . . . . . . . . . . . . . . . . . . . . . . . . . . . . . . . . . . . . . . . . . .18, 21 Antenna adjustment . . . . . . . . . . . . . . . . . . . . . . . . . . . . . . . . . . . . . . . . . . . . . . . . . . . . . . .18 Antenna feed . . . . . . . . . . . . . . . . . . . . . . . . . . . . . . . . . . . . . . . . . . . . . . . . . . . . . . . . . . . .16 Automatic search . . . . . . . . . . . . . . . . . . . . . . . . . . . . . . . . . . . . . . . . . . . . . . . .
For daily use Switching on and off > > > Switch on the digital receiver bypressing the On/Standby key, either on the receiver or on the remote control. Press this key again to switch the receiver off. The receiver is now in standby mode, the display on the receiver shows the time. Programme selection Using the programme up/down keys > Use the programme keys up/down either on the remote control or on the receiver to move up or down one programme slot at a time.