K-BDA_Digit K-BDA_Digit ISIOISIO S2(DVB30)_RC3.qxd S2(DVB30)_RC3.qxd 13.05.2014 13.05.
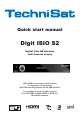
Illustrations Front of TV On/Stand-by Sleep Timer Remote control code Sound on/off Numeric keypad keys TV/Radio mode 0/AV (source selection) Recording Stop/DVR Fast forward Pause/playback Rewind Arrow keys EPG WWW Page up Page down Back Info OK Options selection Channel +/- Volume +/Function selection Function keys Menu Timer Teletext Freeze frame/ Jogshuttle Zoom/Format Audio channel PiP HDMI 2
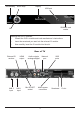
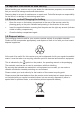
On/Stand-by Display Arrow keys USB port SD/MMC card reader OK Inserting the CI/CI+ modules: > Consult the CI/CI+ module and card manufacturer’s instructions. > Insert the smartcard you want into the relevant CI module. > Now carefully insert the CI module into the slot.
Dear customer, Congratulations on your decision to purchase the Digit ISIO S2 digital receiver. The operating manual supplied is intended to help you to utilise the comprehensive functions of your new digital receiver to the fullest extent. We have kept the operating instructions as brief as possible and have used terminology that everybody can understand. The range of functions of your receiver is constantly being expanded by means of software updates.
3 Please read this first Before connecting and using the device, first check that everything has been supplied and familiarise yourself with the safety instructions. You should have received: 1 digital receiver, 1 quick start manual, 1 CD-ROM, 1 remote control, 1 mains power cable, batteries (2 x 1.5 microcells) 3.1 Safety advice For your own protection you should read the safety precautions carefully before using your new receiver.
- Do not open the TV under any circumstances! You risk receiving an electric shock. Any necessary repairs to the receiver should only be carried out by qualified service personnel. In the following circumstances you should disconnect the device from the mains power and consult an expert: > the power cable or mains plug is damaged > the device has been exposed to moisture or liquid has got into it > there are significant malfunctions > there is severe external damage. 3.
3.4 Important information on data security Before handing your receiver over to your dealer for maintenance purposes, we recommend that you remove all storage media and data carriers. Restoring data is not part of maintenance or repair work. TechniSat accepts no responsibility for the loss of, or damage to, data during repair work. 3.
4 Connecting the DVB receiver a. Mains connection b. LNB 1 connection to the LNB Input 1 on the DVB receiver. (Please note that the LNB must be connected with LNB Input1 when operating with an antenna signal.) c. LNB 2 connection to the LNB Input 2 on the DVB receiver. d. HDMI connection from the DVB receiver to the TV. e. Connecting the audio outputs to a hi-fi/surround sound system. f Connecting the DVB receiver to the network/Internet.
The following references (a b c etc.) relate to the illustration on page 18. 4.1 Mains power connection The digital receiver should only be connected to the mains power supply once you have finished making all the connections to the various other components. This will prevent damage to the digital receiver or other components.
4.4 Hi-fi/surround sound amplifier To achieve the best possible sound quality, you can connect your digital receiver to a hi-fi/ surround sound amplifier. 4.4.1 Digital e If your amplifier has an appropriate electrical or optical input, connect the AUDIO OUT DIGITAL electrical socket to the electrical or optical input on your amplifier. Depending on the signal provided by each individual broadcaster, sampling rates of 32, 44.1 and 48 kHz are available.
5 Initial installation After you have read the safety instructions and connected the device as described in section 4, you can then switch it on as described in section 7. On initial installation of the TV, the AutoInstall installation wizard starts automatically. The installation wizard allows you to make the most important settings for your digital receiver in the simplest way possible. Each step of the installation explains which settings can be made.
Country selection > Use the arrow keys to select the country where the device is to be operated. Automatic setting of the local time as well as changing to summer/winter time will take place based on your selection. Channels will also be automatically sorted in the installation wizard according to this setting as well as following a channel search. > Press the OK key to accept the selection. Picture format > Use the right/left arrow keys to set the picture format for the connected TV.
> Use the right/left arrow keys to select whether you have connected 1 or 2 antenna signals. > Confirm with the OK key to accept the selection. Antenna configuration In this step of the installation you can adapt your digital receiver setup to the configuration of your antenna. > If you want to accept the default antenna setting, press the OK button. > If the configuration of your reception equipment does not conform to the default setting, press the Options key.
Network configuration In this step the TV automatically checks the network configuration. > If you do not want to run the network configuration check, press the Info button. > If you want to check or modify the network settings, press the Options key. > Use the up/down arrow keys to select whether you want to configure a LAN or WLAN network and press the OK button. > Now carry out the network settings as described in section 7.5. > The press the Info button to accept the settings.
Software updates The digital receiver will now check whether a new version of the software is available for the receiver. If a new software version is available, you can carry out an automatic software update. > If you do not want to wait for a search for new software or a software download, you can, if necessary, skip this step by pressing the Info button. If the search for new software or updates is skipped, your device will run another test at the time set in section 17.5.
> To download the available current channel list, use the up/down arrow keys to highlight the ISIPRO - service list update line and start the process by pressing the OK button. The current channel list will now be downloaded via satellite. Please observe subsequent screen displays and notes under section 17.4.
> Press the OK button to open a window with the regional programming available for this programme provider. > Use the up/down arrow buttons to select your preferred regional programming. > Press the OK button to close the window again. > To accept the selected regional programming, use the arrow keys to highlight the Accept field. > Confirming with the OK button takes you to the next step of the installation.
> Enable the watchmi service by using the right/left arrow keys to select the on or off option and then press the OK button. > Select Start tutorial to see a brief introduction. You will need an Internet connection to do so. The general terms and conditions (Ts&Cs) for using the watchmi service will then be displayed. > Use the up/down arrow keys to scroll through the Ts&Cs page by page.
> You can use the up/down arrow keys to move the selection bar over the channels and select the highlighted channels using the OK button. The selected channels appear with a check mark next to them. > Highlight a selected channel again and press the OK button to remove this channel A brief description of the highlighted channel appears on the right hand side. > You can use the yellow function key to select all broadcasters at once. > To confirm your selection, press the green function key.
> If you do not want to wait for the EPG data to download, you can skip the process by pressing the Info button. The EPG data will then be automatically updated the following night, or you can update it manually at any time. If you have skipped the EPG update, your device will automatically download the EPG data at the time set in section 14.2, as long as automatic EPG updating is kept active (section 14.1) and the device is also in standby mode at this time.
6 Basic operation Dear Customer The following section starts by covering basic operation as well as recurrent operating steps for the TV. This should make it easier to read the instruction manual, since it avoids repeated description of identical steps at each individual stage. If a function or setting for the device has to be different from the basic operation, the difference in operation is described in detail at the relevant point in the instruction manual.
> Select the Settings menu item by using the arrow keys to move the highlight to this item. > Press the OK button to open the Settings menu. > Use the up/down arrow keys to highlight the Picture settings item.
> The Picture settings menu is opened by subsequently pressing the OK button. You can also highlight the individual menu items in the same way as you highlight an item on a submenu to open it and alter the respective settings. The menu items in some menus have to be highlighted by moving sideways. This is done by pressing the right/left arrow keys.
6.
6.
Entering numbers 6.4.
> Press one of the numeric pad keys 0 - 9 and select the various letters, numbers, characters and symbols. The first letter of the respective row of characters is highlighted after first pressing a numeric pad key. > The highlight then moves one field to the right for every additional press of the same numeric pad key. Press as often as necessary to reach the desired character. This will be added to the entered term after a short delay.
Some options are selected directly in this window. Other options for a number of subordinate selection options are located in the options groups. Highlighting one of these option groups automatically opens a further window on the left. > You can use the up/down arrow keys within the options group to highlight one of the options listed there.
7.3.2 Using the numeric pad keys > Use the numeric keypad keys to enter the number of the channel you want. For example: 1 for channel slot 1 1, then 4 for channel slot 14 2, then 3, then 4 for channel slot 234 1, then 5, then 6 then 7 for channel slot 1567 When entering channel numbers with multiple digits, you have approx. three seconds after pressing a key to complete the entry.
7.3.4 Calling up blocked channels If a programme is selected that is blocked by the parental control function, the message Device PIN will be displayed on the screen. > or > Use the numeric keys to enter your PIN code. The channel you want will be displayed. Change to an unblocked channel as described in section 8.4. If global parental control is enabled, the device PIN code will be requested again when the blocked channel is switched on.
The progress bars are coloured yellow according to the transmission time amount of already expired for the current programme.
-BDA_Digit ISIO S2(DVB30)_RC3.qxd 13.05.2014 11:20 Seite 31 K-BDA_Digit ISIO S2(DVB30)_RC3.qxd 13.05.2014 11:20 Seite 31 7.6 Freeze frame > Press the Freeze frame key; the current TV picture will be displayed as a still picture.
2: Channel name with the corresponding channel slot within the active channel list. 3: Progress bars or the start/stop time of the programme being shown. 4: The current date and the time. 5: Programmes on the channel being shown. > You can use the right/left arrow keys to switch the display time back and forth. The progress bar in the time line is moved back and forth according to the display time.
7.12 Selecting a function > You can open the Navigation menu (NAV menu) to select the function you want by pressing the Navigator/function selection button. > Use the up/down arrow buttons to highlight the function you want to access. TV: TV mode: playing TV programmes. Radio: Radio mode: playing radio programmes. Internet: Internet mode: calls up the web links available in the Internet list.
> You can now highlight the web link you want using the up/down arrow keys, the page up/down keys and the numeric keypad keys. > Pressing the OK button opens the highlighted web link. The time it takes for the selected site to be displayed depends on the selected site and the bandwidth of your DSL connection. 8 DVR recording The following recording modes are available for DVR recording: 1.
> Select Save to save the recording, or Discard not to save the recording, or Back to continue with the recording. 8.4 Automatically end recording Option 1 > Press the On/Standby button. A request is now displayed asking what should happen to the recording in progress. > Select the line with the option you want. 8.5 DVR playback You can access DVR recordings via the DVR Navigator. 8.5.1 Calling up the DVR Navigator/Starting DVR playback The DVR Navigator can be called up in the following ways.
8.5.2 When in TV mode > or > or > > In TV mode press the Stop/DVR button to switch directly to the DVR Navigator. Open the channel lists navigator by pressing the OK button and switch to the DVR Navigator by pressing the Stop/DVR button. In the function selection select the Films/DVR item. Now call up the My Recordings folder on your attached recording medium (section 10.4.1). 8.5.3 From playback of a running/existing DVR recording > or > Press the OK button to open the DVR Navigator.
8.5.7 Setting tags > Skip as described above to a location in the recording where you want to add a tag. > Pressing the Record button sets a tag at the selected location. Tags can also be set or edited manually or automatically during recording (section 9.1.4) and in the DVR recordings menu (section 10.1.3.2), where this is enabled in automatic programme tagging (section 10.5.4). 8.5.
24 Troubleshooting guide Fault Remote control does not work Various channels not shown in channel list Possible cause Solution Wrong remote control code used Set the correct remote control code (see 7.2.5) Batteries are dead Replace batteries (see section 3.5) Wrong channel list selected Select a different channel list (see section 8.4.3.
Fault Cannot receive channels that were previously being received Possible cause Solution Antenna defective or not correctly adjusted Channel transferred to a different transponder Check antenna Channel no longer being broadcast None Intermittent appearance of square blocks in the picture. Switches to freeze frame intermittently, no sound. Screen black at certain times with the message "no signal".
Fault Receiver cannot be operated, switched on or off Possible cause Defective data stream --> receiver blocked Solution Hold down the On/Stand-by button on the receiver or the remote control for approx. 5 seconds. Disconnect mains plug for approx. 5 seconds, then reconnect receiver Perform Flash-Reset: Warning! All personal settings will be lost. > Remove mains adapter from the receiver > Press and hold Standby and the up arrow key on the device at the same time.
Fault PC will not connect to device; device will not connect to network Possible cause Solution Wrong network settings Check network settings (see section 7.5) Network cable incorrectly connected Check network connection DVR recording no longer possible Selected storage medium is full Delete existing recording(s) Cannot delete DVR recordings File system on storage medium is damaged Check storage medium (section 10.4.2) Selected storage medium is not attached.
Warranty TechniSat Guarantee certificate 3 Years Warranty Dear Customer, You have purchased a high quality TechniSat product that has been put through multiple quality tests and a stringent goods outwards check at every stage. Should you still encounter a problem with your equipment, contrary to expectations, you can always take advantage of a two-year legal warranty claim. This warranty claim can of course be exercised at any time without having registered the product.
Warranty Note on Making a claim under warranty The warranty can only be invoked if: 1. the fully completed registration card has been received by us no later than 4 weeks after purchase, or you have registered the product online during this period. 2. you have first attempted to resolve the issue by contacting your dealer or our technical hotline on +49 (0) 3925 9220 1800 (normal charges will apply for overseas calls). 3.
Service Report ✂ If, contrary to expectations, you encounter a problem with your equipment, despite the ultra-modern manufacturing and constant quality checking, we would ask you to first contact our technical hotline on +49 (0) 3925 9220 1800 (normal charges will apply for overseas calls). If we cannot solve the problem in this manner, we would ask you to contact your dealer or supplier. If you do so, please complete the following Service Report beforehand.
Your TV carries the CE mark and complies with all requisite EU standards. Subject to change for amendments and printing errors. Version 07/14 Duplication and reproduction only with the publisher's approval TechniSat and Digit ISIO S2 are registered trademarks of TechniSat Digital GmbH PO Box 560 54541 Daun Germany www.technisat.de Technical Hotline Mon. - Fri. 8am - 7pm +49 (0) 3925 9220 1806 (0.14 EUR/Min. from a German landline, up to 0.42 Euro/Min. from a mobile phone.