STBHDV2010 Digital TV Receiver For assistance, please call our Tesco Electrical Helpline on 0845 4566767 USER MANUAL
Contents Accessories ............................................................ 2 Introduction ............................................................. 2 Safety Precautions ................................................. 2 Overview of the Remote Control ............................ 4 Viewing Controls and Connections of the Set-TopBox ......................................................................... 5 Front Panel ......................................................... 5 Rear Panel ........
Features • DVB and VBI teletext. • 200 channel.s • DVB 7 days event information (7-days EPG). • TV scart (with RGB and CVBS support). • Before operating the set-top-box, please read this manual thoroughly. Please do keep this manual in a safe place for future references. Read the corresponding instructions of this handbook prior to the rst usage of the device, even when the usage of electronic devices is familiar to you. • Notice especially the chapter SAFETY PRECAUTIONS and INFORMATION.
Important Safety information Mains supply Mains lead Symbols Safe use and care of your equipment Read Protect the mains lead. Avoid harsh conditions Never To save power, Don't Pull This product is designed for domestic use only. Commercial or any other use may invalidate the guarantee and might be dangerous. Ventilation Cleaning Important Safety warnings To prevent electric shock, do not remove any cover.
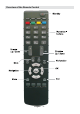
Overview of the Remote Control English - 4 -
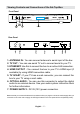
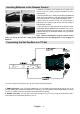
Viewing Controls and Connections of the Set-Top-Box Front Panel Rear Panel 1. ANTENNA IN : You can connect antenna to aerial input of the box. 2. TV OUT : You can use aerial TV out to connect aerial to your TV. 3. ETHERNET: Use this to connect the box to an active LAN connection. 4. HDMI OUTPUT : You connect the box to your TV’s HDMI input (if available) by using HDMI connection cable. 5. TV SCART : If your TV has a scart connector, you can connect the box to your TV using a scart cable. 6.
Inserting Batteries in the Remote Control • Remove the battery cover located on the back of the remote control by gently pulling backwards from the indicated part. • Insert two AAA/R3 (2 X 1.5Volt) or equivalent type batteries inside. Place the batteries in the right directions observing the polarity symbols (+/-) and replace the battery cover. • While using the remote control, you should direct it towards the front panel of the receiver. Remote range is approximately 7m/23ft.
Power Connection IMPORTANT: The set-top box is designed to operate on 12V DC. For this, an adaptor is used which supplies a 12V DC voltage. Connect this adaptor to a mains socket that supplies 220-240V AC,50Hz. • After unpacking, allow the set-top box to reach the ambient room temperature before you plug in to the mains for the rst time. Antenna Connection This illustration shows how to connect an antenna. • Use ANTENNA IN to connect to an antenna system.
First Time Installation IMPORTANT: Ensure that the aerial is connected before switching on the set top box for the rst installation. • When the set-top-box is operated for the rst time, installation wizard will guide you through the process.
Volume Up / Down • You can increase or decrease the volume by using V+ / V- buttons. • To exit from a menu screen, you can press MENU button. • The following items are located in the main menu screen: • The volume level selected will remain set, even when the receiver is turned off and on again, until you change volume again. • The audio volume adjustment for the receiver is independent of the volume control on your TV set.
• If the selected channel is password protected, parental lock password will be asked. If the correct code is entered, selected channel can be watched. Operating the Channel List • Press “ ”/“ ” button to select the channel that will be processed. • Press “ ”/“ ” button to select a function on Channel List menu. • Use P+/P- buttons to move page up or down. • Press BLUE button to view ltering options. current character, i.e., ‘b’ character becomes ‘a’ by pressing “ ” and ‘c’ by pressing “ ”.
Viewing Electronic Programme Guide (EPG) Event Options In EPG menu, press the OK button to enter the “Programme Options” menu. You can view the electronic programme guide (EPG) to view information about available programmes. Select Programme Guide from the main menu by using “ ”/“ ” buttons. Press OK to continue. HINT: You can also press GUIDE button to view the EPG menu. • Press “ ”/“ ” buttons to navigate through channels. • Press “ ”/“ ” buttons to navigate through the programme list.
Active channels TV Out • You can select broadcasts to be listed in the channel list. To display specic types of broadcast, you should use Active channel list setting. • The set-top-box can output RGB and CVBS signal via the TV SCART connector located on the rear panel. • Select Active Channels by using “ ”/“ ” button. • Although the RGB format provides a better picture quality, some devices might not support it. • You can select a broadcast type option from the list by using “ ”/“ ” button.
Receiver Upgrade Guidance • When set, this option gets the maturity information from the broadcast and if this maturity level is disabled, the TV will not display the related videoaudio. Set Pin • Press OK to display the “Set PIN” window. Use numeric buttons to enter the new pin number. You will need to input your new pin a second time for verication purposes. • The factory default pin number is 0000. If you change the pin number make sure you write it down and keep it safe.
IP Settings Preferred Language (Optional) By pressing the “ ” or “ ” buttons, preferred audio description language is changed (if available). Relative Volume (Optional) Using this option, Audio Description volume level can be increased or decrased relatively, according to the general volume. Auto Sleep • Press “ ” or “ ” button to select Auto Sleep. Use “ ” or “ ” button to set the Auto Sleep to Active, Off or set to a customised time period. • You can set the timeout value of auto off feature.
No Signal • When the box receives no signal (e.g. the antenna cable is disconnected), “NO SIGNAL” message will be displayed on the screen. • Highlight Yes or No by using “ ” or “ ” buttons and press OK button to conrm. • If Yes is selected, automatic search starts. • Selecting No cancels automatic search. • After the scanning is completed, your set-top-box will store all the available channels. Manual Channel Scan • This feature can be used for direct broadcast entry.
Troubleshooting Problem Possible Reasons What To Do The LED indicator does not glow. Power Adaptor is not connected. Check if the mains cable is plugged into the power socket. No picture or sound. No signal or weak signal. Check the aerial and video connections (scart/HDMI). The set-top-box was unplugged Make sure that the box is in Changes in the settings have not without rst switching to standby standby mode before unplugging taken effect. it from the mains. mode. • Press the STANDBY button.
General Characteristics Supply Voltage for set-top box: 12 V DC Supply Voltage for DC Adaptor : 220 - 240 V AC ~ 50Hz Input Frequency 470Mhz-862Mhz Maximum Power consumption 15 W Typical Power consumption 8W Standby Low Power Consumption <1 W USB (optional) Current Limit 500mA Operating temperature 5ºC to +40ºC Storage temperature -20ºC to +70ºC Humidity 25 to 75 % rel Physical dimensions 295 x 170 x 40 mm Weight 900 g Hardware Conguration Main Processor MPEG Decoder NEC EMMA3SL/HD
Audio Output 2 Vrms, 0 dBfs / Z = 10 kohm Digital Audio Output Optical SPDIF A / V & Data In / Out Scart TV scart RGB Video Output TV scart CVBS Video Output TV scart Analog Audio Output TV scart Digital Audio Output Optical output HDMI Output HDMI USB Input USB 2.0 High Speed (Optional) (For service use only.) NOTE: The USB port is used for software upgrading only. USB connector does not have any other functions such as playing audio or picture les.
Following information is only for EU-member states: The use of the symbol indicates that this product may not be treated as household waste. By ensuring this product is disposed of correctly, you will help prevent potential negative consequences for the environment and human health, which could otherwise be caused by inappropriate waste handling of this product.