OPERATING INSTRUCTIONS LCD32-209V COLOUR TELEVISION WITH REMOTE CONTROL For assistance, please call our Tesco Electrical Helpline on 0845 4566767
Contents Features ................................................................. 2 Accessories ............................................................ 2 Introduction ............................................................. 2 Preparation ............................................................. 2 Safety Precautions ................................................. 3 Power Source ..................................................... 3 Power Cord ...............................................
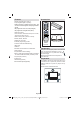
Features Accessories • Remote controlled colour LCD TV. • Fully integrated digital TV (DVB-T). ABC • HDMI connectors for digital video and audio. This connection is also designed to accept high definition signals. DEF GHI 1 2 3 JKL MNO PQR 4 5 6 STU VWX YZ 7 8 9 0 AV SOURCE -/-EXIT INFO I-II • 200 programmes from VHF, UHF(analogue). P/CH • 300 programmes for digital mode (IDTV). Batteries: 2 X AAA OK SELECT • OSD menu system.
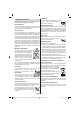
Lightning Safety Precautions Please read the following recommended safety precautions carefully for your safety. Power Source The TV set should be operated only from a 220-240 V AC, 50 Hz outlet. Ensure that you select the correct voltage setting for your convenience. Power Cord Do not place the set, a piece of furniture, etc. on the power cord (mains lead) or pinch the cord. Handle the power cord by the plug.
Headphone Volume Excessive sound pressure from earphones and headphones can cause hearing loss. Installation To prevent injury, this device must be securely attached to the wall in accordance with the installation instructions when mounted to the wall (if the option is available). LCD Screen The LCD panel is a very high technology product with about a million thin film transistors, giving you fine picture details.
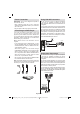
Overview of the Remote Control 1. Mute 2. No function / Exit (in DTV mode) 3. Volume up / down 4. Mono / Stereo - Dual I-II 5. TV / Digital TV 6. Yellow (Feature) 7. Blue (Install) 8. Hold (in TXT mode) 9. Update (in TXT mode) ABC DEF 1 2 3 JKL MNO PQR 4 5 6 STU VWX YZ 7 8 9 0 AV 10. Index page / Guide (in DTV mode) GHI SOURCE -/-EXIT INFO 11. Reveal (in TXT mode) I-II P/CH 12. Personal preferences 13. Swap / Previous program 14. Expand (in TXT mode) / Image Size 15.
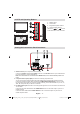
LCD TV and Operating Buttons 1. Standby button 2. TV/AV button 3. Programme Up/Down buttons TV/AV 4. Volume Up/Down buttons Note: Press “ ”/“ ” buttons at the same time to view main menu. P/CH TV/AV MENU MENU P/CH Viewing the Connections- Back Connectors 1. SCART socket inputs or outputs for external devices. Connect the SCART cable between SCART socket on TV and SCART socket on your external device (such as a decoder, a VCR or a DVD player).
4. S/PDIF Out outputs digital audio signals of the currently watched source. Use an S/PDIF coaxial cable to transfer audio signals to a device that has S/PDIF input.You should also set SPDIF Out option in the Sound Menu as On. 5. RF Input connects to an antenna or a cable. Note that if you use a decoder or a media recorder, you should connect the aerial cable through the device to the television with an appropriate antenna cable, as shown in the illustrationin the following pages. 6.
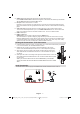
Power Connection Using Side AV Connectors IMPORTANT: The TV set is designed to operate on 220-240V AC, 50 Hz. • After unpacking, allow the TV set to reach the ambient room temperature before you connect the set to the mains. • Plug the power cable to the mains socket outlet. Connecting to a DVD Player If you want to connect a DVD player to your LCD TV, you can use connectors of the TV set. DVD players may have different connectors.
Connecting Other Equipment via Scart Most devices support SCART connection. You can connect a; DVD recorder, a VCR or a decoder to your LCD TV by using the SCART socket. Note that cables shown in the illustration are not supplied. Power off both the TV and the devices before making any connections. For more information, refer to your device’s own instruction book. • Press the “ ” button, P+ / P- or a numeric button on the remote control. • Press the -P/CH or P/CH+ button on the TV.
Basic Operations Initial Settings You can operate your TV using both the remote control and onset buttons. Operation with the Buttons on the TV Volume Setting • Press “ ” button to decrease volume or button to increase volume, so a volume level scale (slider) will be displayed on the screen. Programme Selection • Press “P/CH +” button to select the next programme or “P/CH -” button to select the previous programme.
at the bottom of the screen (available only in DTV mode). This will remain on the screen for a few seconds. • The information banner can also be displayed at any time while watching TV by pressing the INFO button on the remote control: After Automatic Search is completed, the following message asking for analogue channel search appears on the screen: To search for analogue channels, select “Yes”. TV switches to the analogue TV mode. Analogue search menu will be displayed.
RED button (Shrink) : makes the info boxes smaller. the normal broadcasting, there are also channels with just digital teletext broadcasting. GREEN button (Expand): makes the info boxes larger. YELLOW button (Prev. Day) : displays the programmes of previous day. • The aspect ratio (picture shape) when watching a channel with just digital teletext broadcasting is the same as the aspect ratio of the picture viewed previously. BLUE button (Next day): displays the programmes of the next day.
Navigating the Entire Channel List Press “ ” or “ ” button for selecting the previous or next channel. You can press RED or GREEN button to move page up or page down. • Press the OK button to delete the highlighted channel in the channel list. Then the message below appears on the screen: To watch a specific channel, highlight it using “ ” or “ ” button and then press “OK” button, while the “Select” item on Channel List menu is highlighted by using “ ” or “ ” button.
lock a channel you should know the parental lock password (default value is set to 0000 in the factory and can only be changed from the Configuration menu). • To activate Favourites, go to the Configuration menu and select Favourite mode. Use “ ” / “ ” to set Favourite mode as on. To cancel Favourites, set Favourite Mode to Off. Select the channel to be locked by highlighting it and select the Lock option by pressing “ ” or “ ” button.
Some Digital Terrestrial channels operate on a Pay Per View basis. These require a subscription and a hardware decoder. Obtain the Conditional Access Module (CAM) and the viewing card by subscribing to a pay channel company, then insert those to the TV using the following procedure. You can find detailed information for all menu items in “Analogue TV Menu System” section. Setup The adjustments in this menu are given as the following: • Switch off the TV and unplug from the mains.
Channel List Use “ ” or “ ” buttons to go to Channel List option. Use “ ” or “ ” buttons to toggle Channel List Mode. If you select “TV Only”, with the “ ” or “ ” buttons, you navigate through only TV channels. If you select “Radio Only”, with the “ ” or “ ” buttons, you navigate through only radio channels. If you select “Text Only”, with the “ ” or “ ” buttons, you navigate through only text channels. Active Antenna Use “ ” or “ ” buttons to highlight Active Antenna option.
Set PIN Relative Volume (Optional) Use “ ” or “ ” buttons to go to “Set PIN” option. Press OK to display the “Set PIN” window. Use numeric buttons to enter new pin number you will need to input your new pin a second time for verification purposes. The factory default pin number is 0000, if you change the pin number make sure you write it down and keep it safe. Using this option, the Audio Description volume level can be increased or decrased relatively, according to the general volume.
Note: If the Country option is set to Denmark, Sweden, Norway or Finland, the Language Settings menu will function as described below: Language Settings Highlight Yes or No by using “ ” or “ ” buttons and press OK button to confirm. If Yes is selected, automatic search starts. Selecting No cancels automatic search. In the configuration menu, highlight the Language Settings item by pressing “ ” or “ ” buttons.
In both manual and auto search any existing channel in the database is not re-stored to avoid redundant duplicates of that channel. Clear Service List (*) (*) This setting is visible only when the Country option is set to Denmark, Sweden, Norway or Finland. Use this setting to clear channels stored. Press “ ” or “ ” button to select Clear Service List and then press OK. The following OSD message will be displayed on the screen: Press the OK button to start installation.
Sound Menu Noise Reduction If the broadcast signal is weak and the picture is noisy, use Noise Reduction setting to reduce the noise amount. Press “ ” or “ ” button to select Noise Reduction. Press “ ” or “ ” to choose from one of these options: Low, Medium, High or Off. Film Mode Films are recorded at a different number of frames per second to normal television programmes. Press “ ” or “ ” button to select Film Mode. Press “ ” or “ ” button to set this feature On or Off.
Feature Menu Headphone Press “ ” or “ ” button to select Headphone. Press “ ” button to view the headphone menu. Note: Headphone will be disabled when SPDIF option is set to on. Headphone sub-menu options are described below: Volume Press “ ” or “ ” button to select Volume. Press “ ” button to increase headphone volume level. Press “ ” button to decrease headphone volume level. Headphone volume level can be adjusted between 0 and 63. Sound Mode (optional) Press “ ” or “ ” button to select Sound Mode.
Menu Background Program Press “ ” or “ ” button to select Menu Background. You can set menu background level by pressing “ ” or “ ” button. Press “ ” or “ ” button to select Program. Use “ ” or “ ” button to select the program number. You can also enter a number using the numeric buttons on the remote control. There are 200 programme storage between 0 and 199. Backlight This setting controls the backlight level. Select Backlight by pressing “ ” or “ ” button.
Colour System APS (Auto Programming System) Press “ ” or “ ” button to select Colour System. Use “ ” or “ ” button to change the colour system to PAL, SECAM, PAL60, AUTO, NTSC 4,43 or NTSC 3,58. When you press the BLUE button for starting automatic tuning, Auto Programming System menu will appear on the screen: Store Press “ ” or “ ” button to select Store Programme. Press “ ” or OK button to store the settings. “Stored...” will be displayed on the screen.
In YPbPr and HDMI modes, while in 720p-1080i resolutions, only 16:9 mode is available. Auto When a WSS (Wide Screen Signalling) signal, which shows the aspect ratio of the picture, is included in the broadcast signal or the signal from an external device, the TV automatically changes the ZOOM mode according to the WSS signal. • When the AUTO mode does not function correctly due to poor WSS signal quality or when you want to change the ZOOM mode, change to another ZOOM mode manually.
Cinema This zooms up the wide picture (16:9 aspect ratio) to the full screen. Holds a text page when convenient. Press again to resume. “ ” Subcode Pages / Time Selects subcode pages if available when the teletext is activated. When the teletext is not activated, displays time info if the programme has teletext transmission. P+ / P- and numbers (0-9) Subtitle Press to select a page. This zooms up the wide picture (16:9 aspect ratio) with subtitles to the full screen.
Mountains or high buildings can cause double pictures or ghost images. Sometimes you can improve the picture quality by changing the direction of the aerial. Appendix A: AV and HDMI Signal Compatibility (Input Signal Types) Is the picture or teletext unrecognisable? Check if you have entered the correct frequency. Please retune the channels. Source The picture quality may degrade when two peripherals are connected to the TV at the same time. In such a case, disconnect one of the peripherals.
Specifications TV BROADCASTING PAL/SECAM B/G D/K K’ I/I’ L/L’ RECEIVING CHANNELS VHF (BAND I/III) UHF (BAND U) HYPERBAND MHEG-5 ENGINE compliant with ISO/IEC 13522-5 UK engine Profile 1 Object carousel support compliant with ISO/IEC 135818-6 and UK DTT profile for UK Frequency range: 474-850 MHz for UK models Digital Reception 170-862 MHz for EU models Transmission standard: DVB-T. MPEG-2 Demodulation: COFDM with 2K/8K FFT mode FEC: all DVB modes Video: MP@ML, PAL, 4:3/16:9 Audio: MPEG Layer I&II 32/44.
Important Instruction For your own safety read following instruction carefully before attempting to connect this unit to the mains supply.
50153024