
Instruction Manual
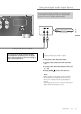
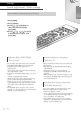
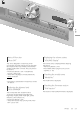
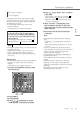

Table Of Contents

24
Settings
Using output correction function (LAPC)
(24)
Measuring the output signal of the
amplifier and correcting its output
(LAPC)
■ Preparation
• Disconnect the headphones.
Test tone emitted during measurement
To ensure the measurement accuracy,
the speakers output a test tone at regular
intervals. (For approximately 3 minutes)
It is not possible to change the volume of the
audio being output while the measurement is
in progress.
1 Press [AMP
] to turn this unit on.
2 Press and hold [LAPC] until “Please
Wait” is displayed.
“LAPC Measuring” is displayed and this unit
will start measuring the output signal of the
amplifier. Check that a test tone is output from
both the left and right speakers.
When the measurement is complete, amplifier
output correction will be automatically turned
on.
• The amplifier signal measurement is cancelled
in the following condition.
- Pressing [MUTE]/[LAPC]
- Switching the input source
• If you connect headphones during amplifier
signal measurement or amplifier output
correction, it will be cancelled.
■ Turning on/off the output correction
function
Press [LAPC] to select “On”/“Off”.
• LAPC indicator lights and “LAPC : On” is
displayed while the output correction function
is in progress.
Note
• Set to “Off” when using output correction
function for the connected speakers because
the correction function (LAPC) effects on the
audio output from PRE OUT terminal. ( 20)
• Depending on the type of the connected
speakers, the effect of the output correction
function may be minimal.
• The corrected output remains in effect until you
measure the output signal again. When you use
other speakers, redo the measurement.
You can make the optimum adjustment according to your own speakers.