
Instruction Manual
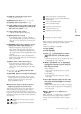

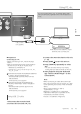

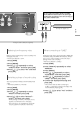
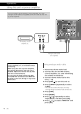
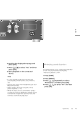
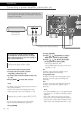
Table Of Contents

11
English
Control reference guide
(11)
03 [>INPUT<]: Switch the input source
( 14, 15, 16, 17, 18)
04 [MENU]: Enter menu ( 16, 17, 18, 19)
*
05 [SETUP]: Enter setup menu ( 22)
*
06 [LAPC]: Measure the output signal of the
amplifier when speakers are connected,
and correct its output ( 24)
07 [+VOL-]: Adjust the volume
• -- dB (min), -88.0 dB to 0 dB (max)
08 [MUTE]: Mute the sound
• Press [MUTE] again to cancel. “MUTE” is
also cancelled when you adjust the volume
with this unit or when you turn the unit to
standby.
09 [DIMMER]: Adjust the brightness of the
peak power meter light, display, etc.
• When the display is turned off, it will
light up for a few seconds only when you
operate this unit. Before the display turns
off, “Display Off” will be displayed for a few
seconds.
• Press repeatedly to switch the brightness.
• Peak power meter does not work while the
light is turned off.
10 [INFO]: View content information
*
• Press this button to display sampling
frequency and other information. (The
information varies depending on the input
source.)
11 [
], [ ], [ ], [ ]/[OK]: Selection/OK
*
12 [RETURN]: Return to the previous display
*
*
: Press [AMP] first to operate this unit. (The
remote control may work for other Technics
devices and may not for this unit when
pressing [NWP] or [CD].)
■ Buttons that work for Technics devices
supporting system control function
The remote control of this unit also works for
Technics devices supporting system control
function (Network Audio Player, Compact Disc
Player, etc.). For information on the operations of
the devices, please also refer to their operating
instructions.
01
[ ] Standby/on switch for the Compact
Disc Player
02
[ ] Standby/on switch for the Network
Audio Player
03
Select the device to be operated
04
Select the input source of the Network
Audio Player
05
Turn on/off Direct mode
06
Turn on/off Re-master
07
Playback control buttons
08
Numeric buttons, etc.
09
Playback control buttons
Remote control mode
When other equipment responds to the supplied
remote control, change the remote control
mode.
• The factory default is “Mode 1”.
1 Press [AMP].
2 Press [SETUP].
3 Press [
], [ ] repeatedly to select
“Remote Control” and then press
[OK].
• The current remote control mode of this unit
is displayed for a few seconds.
4 When “Set Mode 1/2” is displayed,
change the remote control mode of
the remote control.
To set “Mode 1”:
Press and hold [OK] and [1] for at least
4 seconds.
To set “Mode 2”:
Press and hold [OK] and [2] for at least
4 seconds.
5 Point the remote control at this unit,
and press and hold [OK] for at least
4 seconds.
• When the remote control mode is changed,
the new mode will appear on the display for
a few seconds.
■ When “Remote 1” or “Remote 2” is
displayed
When “Remote 1” or “Remote 2” is displayed,
the remote control modes of this unit and
remote control are different. Perform step 4
above.