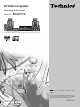
DVD Stereo System Operating Instructions Model No. SC-DV170 The illustrations show the model for United Kingdom and Continental Europe. Note “EB” on the outer packaging indicates the United Kingdom. Before connecting, operating or adjusting this product, please read these instructions completely. Please keep this manual for future reference.
Dear customer Supplied accessories Thank you for purchasing this product. For optimum performance and safety, please read these instructions carefully. These operating instructions are applicable to the following system. System SC-DV170 Sound processor SH-DV170 Stereo tuner/amplifier SA-DV170 DVD/Video CD/CD changer SL-DV170 Stereo cassette deck RS-DV170 Speaker Front SB-EH760 Center SB-PC75 Surround Subwoofer ¤ SB-PS75 ¤ Please check and identify the supplied accessories.
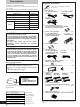
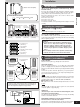
Table of contents Safety precautions Placement Safety precautions . . . . . . . . . . . . . . . . . . . . . . . 13 Caution for AC Mains Lead . . . . . . . . . . . . . . . . . 14 Installation . . . . . . . . . . . . . . . . . . . . . . . . . . . . . . 15 Basic connections . . . . . . . . . . . . . . . . . . . . . . . . 16 Optional antenna connections . . . . . . . . . . . . . . 17 Television settings . . . . . . . . . . . . . . . . . . . . . . . 18 Front panel controls . . . . . . . . . . . . . . . . . . .
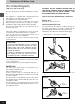
Caution for AC Mains Lead (For United Kingdom) (“EB” area code model only) Before use For your safety, please read the following text carefully. This appliance is supplied with a moulded three pin mains plug for your safety and convenience. A 5-ampere fuse is fitted in this plug. Should the fuse need to be replaced please ensure that the replacement fuse has a rating of 5-ampere and that it is approved by ASTA or BSI to BS1362. Check for the ASTA mark m or the BSI mark o on the body of the fuse.
Installation a (Bottom of tuner/amplifier) VOLTAGE ADJUST SWITCH 127V 110V 220–230V 240V B b DVD/Video CD/ c Sound CD changer processor (SL-DV170) (SH-DV170) A » Set the voltage (Except for the United Kingdom, Continental Europe, Russia, Australia and N.Z.) Be sure to disconnect the AC mains lead before setting the voltage. Use a flat-head screwdriver to turn the voltage selector to the appropriate position for the area in which this system is to be used.
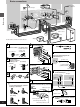
Basic connections 2 e To your television Adhesive tape 3 B1 Before use A1 B2 1 1 6 5 (Left) 1 4 (Right) 3 f To household mains socket 4 7 (Left) 5 (Right) The illustrations show the model for Russia. 5 1 4 A Tuner/amplifier side 2 a To connect cables d To unplug cables Hold the connector on both ends b Connector and pull it out.
Optional antenna connections ³Do not connect the AC mains lead until all other connections are complete. ³To prepare the AM loop antenna and speaker cords (and FM antenna for areas other than the United Kingdom, Continental Europe, and Russia), twist the vinyl tip and pull off ([A]). 1 Flat cables. Keep the cables as flat as possible against the back of the unit. Use outdoor antennas if radio reception is poor. FM outdoor antenna Note ³Disconnect the FM indoor antenna.
Television settings SUBTITLE 1 H SLEEP DISC a Numbered buttons 1 2 6 4, 5 Set the screen size to suit your television. The initial setting is for a regular television with an aspect ratio of 4:3. You do not have to change the setting if you have this kind of television. The menu language has been factory preset to English. You can change the language by going to “3 Menu Language” of the initial settings screen (á page 46).
Front panel controls A 1 2 3 4 5 67 8 9 : ; < = œPLAY/œREC MODE CLOCK/TIMER FM AUTO/ @ DEMO MONO INPUT SELECTOR TUNER/BAND ECHO MIC EFFECT LOUNGE CHORUS KEY CON DOWN ? TUNING @ TUNING MODE PHONES SET KARAOKE V.MUTE MIC VOL 1 > ? @ A B MIC MIN 2 MAX C D B E FGH I J K DIRECT OPEN DISC 1 DISC 2 DISC 3 DISC 4 DISC 5 OPEN/CLOSE E DISC 1 A-B RANDOM REPEAT REPEAT CD EDIT EDIT CINEMA 1 DISC/ALL SLOW/SEARCH SKIP 2 M N 3 » » 4 g 5 L M NO P Q R 1 Standby/on switch (ê/I) .
A Front panel controls S T U V W A » F G EOPEN COUNTER Before use RESET DECK 1/2 S T U V W X @ DOLBY NR REV MODE TAPE EDIT HREC PAUSE EOPEN DISPLAY Y Z X Y Z [ \] ^ _ [ \ ] ^ _ B ` a Cassette deck Deck 1 cassette holder open button (< OPEN) . . . . . . . . . 26 Deck 1 cassette holder Fast forward/rewind buttons (6, 5) . . . . . . . . . . . . . . . 27 Deck 2 cassette holder Deck 2 cassette holder open button (< OPEN) . . . . . . . . .
The remote control k y SUBTITLE H SLEEP SETUP TOP MENU DISPLAY 1 z DISC 1 2 3 4 5 6 7 8 9 { j/-/-- l 0 MENU RETURN | } m EQ n o d r t v x p 3D AI EQ/ M.EQ BAND AV EFFECT MARKER ANGLE ~ VCR(EXT)/ VDP(AUX) s PLAY MODE w DIGITAL S.
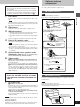
A Setting the time » This is a 24-hour clock. The example shows how to set the clock for 16:25 (4:25 p.m.). 1 2 2 3 Before use 1 1 2 Press [ê/I] to turn the unit on. 1 Press [CLOCK/TIMER, –DEMO] to display “CLOCK”. 2 Each time you press the button: CLOCK>FPLAY>FREC>Original display ^-------------------------------------------------------------------} Within 7 seconds Press [SET]. 3 CLOCK/TIMER —DEMO 1 Press [TUNING (X or W)] to set the time.
[A] Region numbers a DVD/Video CD/CD changer (Back of product) b (For example) 2 c 2 1 2 Region numbers are allocated to DVD players and software according to where they are sold. DVDs can be played on this unit if their region number is the same or includes the same number, or if the DVD is marked “ALL”. Confirm the region number for this unit before choosing discs. The number for this unit is indicated on the rear panel of the DVD/Video CD/CD changer.
Discs Screens illustrated are examples. Normal play 4 H/I 3 1 2 [DVD] [V-CD] [CD] Preparation: ³Press [ê/I] to turn the unit on. ³If you are going to play a DVD or Video CD, turn on the television and switch the video input mode of the television to suit the type of connection you have made (e.g., VIDEO 1). Basic operations » 1 DIRECT OPEN DISC 1 DISC 2 DISC 3 DISC 4 DISC 5 a Label must face upward. 1 Press [DIRECT OPEN] ([DISC 1]– [DISC 5]) to open a tray and set a disc.
Discs 1 DISC/ALL A » Selecting ALL-DISC/1-DISC [V-CD] [CD] You can play up to 5 discs in succession to the “final disc”. ALLDISC skips trays that are empty or contain DVDs. If the disc is a Video CD with PBC, menu play is automatically canceled. Preparation: A 1 DISC/ALL ALL DISC Before play Press [1 DISC/ALL] to select the desired method while stopped.
Discs A » SLOW/SEARCH SKIP 6, 5 :, 9 Skip function [DVD] [V-CD] [CD] You can skip chapters on DVDs and tracks on Video CDs and CDs. Press [SKIP (: or 9)] during play. :: Backward 9: Forward Each press increases the number of skips. Note If pressed while playing a Video CD with PBC, you may return to a menu screen. B » Basic operations g A Search function [DVD] [V-CD] [CD] SKIP Press [SLOW/SEARCH (6 or 5)] during play. 6: Backward 5: Forward ³Each press increases the speed of the search.
Discs SLEEP 1 2 3 4 5 6 7 8 9 SETUP DISC 1 A » RETURN EQ ENTER 3D AI EQ/ M.EQ BAND AV EFFECT MARKER ANGLE TEST UPRO LOGIC CH SELECT VCR(EXT)/ VDP(AUX) DIGITAL S.WOOFER SUPER SRND DVD TUNER/ BAND » ¤ TAPE/ DECK 1/2 CANCEL PLAY MODE AUDIO Remote control only 0 MENU ANGLE [DVD] j/-/-- a Numbered buttons 2, 1, 3, 4 ENTER 1 TOP MENU DISPLAY ⁄/g 2 Some DVDs have multiple soundtracks, subtitle languages and camera angles. You can change these during play.
Discs CINEMA A » Changing the picture quality for movie viewing [DVD] [V-CD] You can enjoy better pictures by changing the picture quality. Press [CINEMA]. SUBTITLE H SLEEP 1 2 The CINEMA display appears on the TV screen. Each time you press the button: C (CINEMA is on)bN (CINEMA is off) SETUP TOP MENU DISPLAY DISC 3 j/-/-- 4 5 6 7 8 9 Basic operations MENU ENTER 3D AI EQ/ M.EQ BAND AV EFFECT MARKER ANGLE DIGITAL S.
Discs Repeat function A-B REPEAT REPEAT ! [DVD] [V-CD] [CD] A » Repeating chapters, titles and tracks A a (On the TV screen) DVD only REPEAT b C c T d OFF Each time you press the button: DVD b ` C: Current chapter is repeated. c ` T: Current title is repeated. d ` OFF: Repeat mode is canceled. Video CD, CD f “`” is displayed: All tracks on the disc(s) are repeated. g “`” is cleared: Repeat mode is canceled.
Discs SUBTITLE H SLEEP 1 2 SETUP TOP MENU DISPLAY DISC 2 j/-/-4 5 6 7 8 9 0 MENU RETURN EQ AV EFFECT MARKER ANGLE DIGITAL S.WOOFER SUPER SRND TAPE/ DECK 1/2 DVD TUNER/ BAND ⁄/g » ¤ TEST UPRO LOGIC CH SELECT 1 CANCEL CANCEL PLAY MODE Preparation: DVD AUDIO 4 SLOW/SEARCH MUTING » : SKIP 9 SKIP SHIFT Basic operations ∂ 1 2 VOLUME PLAY MODE 1 2 4 5 ³Press [DVD] to select “DVD” as the source. ³Ensure a Video CD or CD is in the play position tray.
Discs A SUBTITLE H SLEEP 1 2 [V-CD] [CD] SETUP TOP MENU DISPLAY Remote control only DISC 3 Preparation: j/-/-4 5 6 7 8 9 Press [DVD] to select “DVD” as the source. 0 RETURN A » EQ 3D AI EQ/ M.EQ BAND AV EFFECT MARKER ANGLE DIGITAL S.WOOFER SUPER SRND TAPE/ DECK 1/2 DVD TUNER/ BAND 2/; ∫ 1 TEST UPRO LOGIC CH SELECT VCR(EXT)/ VDP(AUX) CANCEL 1 PLAY MODE MIX 2CH AUDIO SHIFT SLOW/SEARCH MUTING 1 Plays all discs once each in random order.
Using GUI screens SUBTITLE H SLEEP 1 2 SETUP TOP MENU DISPLAY DISC a Numbered buttons 1 [DVD] 3 j/-/-- 4 5 6 7 8 9 GUI (Graphic User Interface) are icons which appear on the TV screen to allow you to interact with the unit. GUI screens show information about the unit and discs. You can perform various operations by changing the information shown in these screens. 0 MENU RETURN RETURN EQ ENTER 3D AI EQ/ M.EQ BAND AV EFFECT MARKER ANGLE DIGITAL S.
Disc GUI descriptions Unit GUI descriptions Operation Content Content Operation [G] A-B repeat (start and finish points for A-B repeat) [ENTER] (at the start point) Ð [ENTER] (at the finish point) ³To cancel A-B repeat: [ENTER] [3], [4] or numbered buttons Ð [ENTER] [H] Repeat play (select a repeat play mode) C (chapter), T (title), OFF [3] or [4] [C] Time (select a position to start play by specifying a time) Numbered buttons Ð [ENTER] [I] Mark a position [ENTER] (to highlight the first marke
The radio: manual tuning AUTO/ 2 FMMONO 13 H/I Radio stations can be tuned manually by selecting the station’s frequency or they can be preset into channels to make it easy to tune with the tuner/amplifier or the remote control (á page 25). Preparation: Press [ê/I] to turn the unit on. 4 1 Press [TUNER/BAND] to select “FM” or “AM”. Each time you press the button: FMbAM 2 Press [TUNING “MANUAL”.
The radio: preset tuning You can choose either automatic presetting, which presets all the stations the tuner/amplifier can receive, or manual presetting, which allows you to select the stations to preset and the order they are to be preset in. There are 39 channels available for presetting. SET A » Automatic presetting Do the following once each for FM and AM. (á page 24). Hold down [SET]. SET MHz Release the button when “AUTO MEMORY” appears.
Cassette tapes Preparation: Press [ê/I] to turn the unit on. 1 4 23 1 1 Press [< OPEN] on deck 1 or deck 2 and insert the cassette. 2 Press [DOLBY NR] to select Dolby NR on (“ëNR” appears) or off. (á “Dolby noise reduction”, page 27) 3 DECK 1/2 Basic operations Each time you press the button: h: One side is played. d: Both sides are played. f: Both sides are played 8 times each. @ 5 H/I Press [REV MODE] to select the reverse mode. 4 Press ["] (reverse side) or [!] (forward side).
Cassette tapes A » F, G Fast-forwarding and rewinding Press [6] or [5] while the tape is stopped. Tape direction rewind fast-forward ! 6 5 " 5 6 DECK 1/2 A F G ³Each deck’s play direction is stored in the system’s memory. ³You can fast-forward or rewind the tape while you are playing or recording a tape in the other deck. Press [DECK 1/2] to switch to the non-playing deck, and then press [6] or [5].
Changing sound field and quality Changes to sound field and quality have no effect on recordings. MULTI JOG 2 A Each time you turn [MULTI JOG]: HEAVY: Adds power to rock. CLEAR: Clarifies higher sounds. HALL: Expands sound. AI-EQ: Adjust sound with the acoustic image equalizer (á page 29). M.EQ: Create your own effects (á see below). FLAT: Canceled (no effect is added). 1, 3 a (On the tuner/amplifier) On the remote control MULTI JOG Press [SHIFT] i [EQ].
Changing sound field and quality A » 2 1, 3 A Achieve subtle sound quality settings with the soft, sharp, heavy, and light coordinates. Select one of the two 3D settings for a surround effect. 1 2 3 2 Press [3D AI EQ/M.EQ BAND] to select the surround level. Each time you press the button: AI EQ>3D AI 1>3D AI 2 ^__-----------------__} a (On the tuner/amplifier) MULTI JOG Turn [MULTI JOG] to select “AI-EQ”. Change the sound quality with [", !, #, $]. 1 Adjust softness and sharpness with [", !].
Enjoying surround sound The following chart gives a summary of this unit’s surround features. It also shows additional features that can be used to enhance your listening enjoyment. Note ³None of the features are effective when headphones are used or when radio is selected as the source. ³You may experience a reduction in sound quality when these surround systems and effects are used with some sources. If this occurs, either turn the surround system or effect off or reduce the level of the effect.
See pages 34 and 35 for operation. A Seat position Maintains the sound position even if the listening position is changed. Additional effects Seat position Center focus Virtual rear surround Multi rear surround 3D enhanced surround B Center focus ³The sound from the center speaker appears to come from within the television. You can select one of two levels. ³The center speaker should be placed on top of the television.
Enjoying surround sound A DVD Î DIGITAL DOLBY DIGITAL B SUBTITLE H SETUP TOP MENU DISPLAY SLEEP Play a DVD encoded with Dolby Digital. DISC 1 2 3 4 5 6 7 8 9 [A] j/-/-- MENU [B] To down-mix Dolby Digital (5.1ch) signals to 2 channels RETURN EQ KARAOKE EFFECT ENTER 3D AI EQ/ M.EQ BAND Press [SHIFT] i [MIX 2CH]. AV EFFECT MARKER ANGLE DIGITAL S.
Enjoying surround sound DOLBY PRO LOGIC 1 1 Press [ëPRO LOGIC, OFF/ON]. The indicator turns green. 2 Play a Dolby Surround source. To cancel Press [ëPRO LOGIC, OFF/ON] so the indicator goes out. 1 Note Turn Dolby Pro Logic off when playing a DVD recorded with 5.1channel Dolby Digital. The surround effects will not be reproduced correctly if this is left on.
Enjoying surround sound SUPER SURROUND 1 Note Turn SUPER SURROUND or SIMULATED STEREO off when playing a DVD recorded with 5.1-channel Dolby Digital. The surround effects will not be reproduced correctly if this is left on. 2 A » SUPER SURROUND Press [SUPER SURROUND] and select “MOVIE” or “MUSIC”. A The indicator turns green.
Surround effects These effects are available when the corresponding indicators are lit. A » CENTER MULTI REAR FOCUS SURROUND CENTER FOCUS Press [CENTER FOCUS]. The indicator turns green. Each time you press the button: CENTER FOCUS 1>CENTER FOCUS 2>(off) ^_____----------------------------------------__-_} To cancel 3D ENHANCED SURROUND SUBTITLE H SLEEP 1 2 3 4 5 6 7 8 9 DISC j/-/-- 0 RETURN EQ 2, 3 ENTER 3D AI EQ/ M.
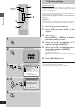
Before recording (Deck 2 only) Selection of tapes for recording COUNTER RESET DISPLAY A The unit automatically identifies the type of tape. Normal position/TYPE I 4 High position/TYPE II 4 Metal position/TYPE IV 4 A » DECK 1/2 To display the tape counter while recording Press [COUNTER DISPLAY]. COUNTER The counter is displayed for about 5 seconds. DISPLAY To reset the tape counter COUNTER ³To display or reset the tape counter for deck 1, first press [DECK 1/2]. Press [COUNTER RESET].
Before recording (Deck 2 only) Preparatory steps 23 1 Do these steps before each recording. Wind up the leader tape in deck 2 so recording can begin immediately. 1 Press [< OPEN] on deck 2 and insert the cassette. Insert the cassettes in both decks for tape-to-tape recording (á page 39). DECK 1: For playback DECK 2: For recording 2 Press [DOLBY NR] to select Dolby NR on (“ëNR” appears) or off.
Recording discs Preparation: INPUT SELECTOR 1 ³Do the preparatory steps (á page 37). ³Insert the disc(s) you want to record (á page 14). ³Press [DISC 1]–[DISC 5] to select the disc you want to start recording, then press [º] twice to stop the disc. 2 A » Normal recording [DVD] [V-CD] [CD] 3 CD EDIT 1 Press ["] (reverse side) or [!] (forward then [º] to set the tape direction. 2 3 Press [´ REC PAUSE]. side) Press [!] on the changer. Recording starts automatically.
[A] Recording the radio Preparation: Do the preparatory steps (á page 37). 1 3 2 ∫ Tune to the required station. (á page 24 or 25) 2 Press [´ REC PAUSE]. The deck goes into the recording standby mode and the play indicator “"” or “!” starts flashing. 3 Press ["] (reverse side) or [!] start recording. (forward side) to To stop recording Press [º]. A To pause recording HREC PAUSE 2 2 REC Press [´ REC PAUSE]. The deck goes into recording standby mode.
Enjoying KARAOKE (Except for the United Kingdom, Continental Europe, Australia and N.Z.) KARAOKE Í/I [DVD] [V-CD] [CD] V.MUTE Preparation: ³Press [ê/I] to turn the unit on. ³Turn on the television and switch the video input mode of the television to suit the type of connection you have made (e.g., VIDEO 1). ³Lower volume with [MIC VOL], then connect the microphone(s) to the microphone jack(s). (Plug type 6.3 mm monaural) 3 1 2 Start the source. 3 Adjust the main volume and microphone volume.
Enjoying KARAOKE (Except for the United Kingdom, Continental Europe, Australia and N.Z.) 2 1 LOUNGE ECHO A » Using the echo effect Press [ECHO]. Each time you press the button: ECHO 1>ECHO 2>ECHO 3 ^---------- ECHO OFF ------------} B » 1 CHORUS 2 ECHO ECHO B 1 Press [KEY CON]. “KEY 0” appears on the display. a (On the tuner/amplifier) A Changing the key (up to 6 steps) Press [TUNING (Ý or ß)] to change the key.
Using the timers The play timer 6 This timer starts play of a selected source at a selected time. The example shows settings for preset radio channel 8 to play between 6:30 and 7:40 at j40 dB. 1 2–5 Preparation: Turn the unit on, set the time (á page 12), preset radio stations if you want the timer to start playing the radio (á page 25). 1 1 Press [CLOCK/TIMER, –DEMO] to select “FPLAY.
Using the timers The record timer 6 This timer records the radio at a set time. The example shows settings for recording preset channel 8 from 18:30 to 19:30. 1 2–4 Preparation: Turn the unit on, set the time (á page 12), preset radio stations (á page 25). 1 œPLAY/œREC 1 Press [CLOCK/TIMER, –DEMO] to select “FREC”. Each time you press the button: CLOCK>FPLAY>FREC>Original display ^-------------------------------------------------------------------} 2 Press [SET] within 3 seconds.
Using the timers A » The play and record timers Checking the timers A Press [CLOCK/TIMER, –DEMO] to select “FPLAY” (or “FREC”). The timer settings are shown in the following order: Play timer: Start time>Finish time>Source>Volume Record timer: Start time>Finish time>Broadcast station you select œPLAY/œREC The timers can be checked even if the unit is off. Playing the unit after the timers are set The unit can be used after the timers are set, but ensure the unit is off before the set start time.
Initial settings 1 SUBTITLE H SLEEP 1 2 SETUP TOP MENU DISPLAY Changing the initial settings DISC 3 j/-/-- a Numbered buttons 4 5 6 7 8 9 Remote control only 0 MENU RETURN RETURN EQ ENTER 3D AI EQ/ M.EQ BAND AV EFFECT MARKER ANGLE VCR(EXT)/ VDP(AUX) Preparation: Press [DVD] to select “DVD” as the source. DIGITAL S.
Initial settings Summary of initial settings This chart shows the initial settings for this unit. See page 45 for details on menu operation. ³The menu and on-screen message language has been factory preset to English. You can change the language by going to “3 Menu Language”. ³There is no item 7 or 8. Item 1 Disc Languages 2 Ratings Function Options Select the soundtrack language. 1 Audio Select the subtitle language.
³Shaded items are the factory settings. ³Changes to the initial settings remain intact after the unit is turned off. Do the setting procedures again to restore to the original settings. Remarks 1 English 2 French 3 German 4 Italian 5 Spanish 6 Original 7 Other ¢¢¢¢ 1 Automatic 2 English 3 French 4 German 5 Italian 6 Spanish 7 Other ¢¢¢¢ 1 English 2 French 3 German 4 Italian 5 Spanish 6 Other ¢¢¢¢ ³Some discs are designed to start in a certain language despite any changes you make here.
Initial settings SUBTITLE H SLEEP 1 2 SETUP TOP MENU DISPLAY A » DISC a Numbered buttons 3 j/-/-- 4 5 6 7 8 9 0 MENU RETURN RETURN EQ 2, 1, 3, 4 ENTER ENTER 3D AI EQ/ M.EQ BAND AV EFFECT MARKER ANGLE DIGITAL S.WOOFER SUPER SRND TAPE/ DECK 1/2 DVD TUNER/ BAND 2/; ∫ 1 TEST UPRO LOGIC CH SELECT VCR(EXT)/ VDP(AUX) CANCEL PLAY MODE AUDIO 1 Select “2 Ratings”. The password screen is shown. 2 Input the password with the numbered buttons and press [ENTER].
How different kinds of software appear on your television DVD software is recorded in a variety of picture formats, and how they appear on your television depends on the software, the kind of television you have, and the picture mode your television is set to. ³Letterbox refers to pictures where black bands appear at the top and bottom. ³Pan and Scan refers to pictures where part of the picture is cut off so it fills the whole screen.
Changing the sound range A » display The sound processor shows the level of each sound range with the three types of displays described below. A Press [DISPLAY MODE]. DISPLAY MODE Each time you press the button, the spectrum display will change as follows. [a] Normal display This display indicates the strength of the sound in each tonal range. [b] Peak-hold display The peak sound value of each sound range is held on the display for about one second after it occurs.
A External unit connections a Television ³Turn off all units before making connections. ³Refer to the manuals of the other units for details. (Cords and equipment not included.) b DVD/Video CD/CD changer f S-video cord (not included) S-VIDEO OUT B g Video cord (1 pc. included for the United Kingdom and Continental Europe 2 pcs. included for others) c Laser Disc player, etc.
Using other equipment A » 1 1 A Listening to an external source Press [INPUT SELECTOR] to select the external source. Each time you press the button: TUNER>DVD>TAPE>VCR (EXT)>VDP (AUX) ^----------------------------------------------------------------------------} On the remote control Press [VCR (EXT)/VDP (AUX)]. 2 Operate the unit. See the unit’s manual for details on connection and operation.
Technical specifications º EQ/SFP section MANUAL GEQ 3-Band parametric EQ Center frequency High band 3.5 kHz, 5.3 kHz, 8 kHz, 12.5 kHz Mid band 240 Hz, 390 Hz, 630 Hz, 1 kHz, 1.5 kHz, 2.3 kHz, 3.5 kHz Low band 70 Hz, 90 Hz, 143 Hz, 240 Hz Level control n1.2, 2.4, 3.6, 4.8, 6 dB EQ SPACE mode 3 modes HEAVY, CLEAR, HALL 3D acoustic image EQ 3 modes AI EQ, 3D AI 1, 3D AI 2 º Pre-amplifier section Input sensitivity/impedance VCR (EXT) 250 mV/15 k VDP (AUX) 250 mV/15 k Output level VCR REC OUT 150 mV/1.
Troubleshooting guide Before requesting service, make the below checks. If you can’t fix the system as described below, or if something not listed h ere occurs, refer to the enclosed directory to locate an Authorized Service Center convenient to you or contact your dealer. Reference pages are shown as black circled numbers 6. Common Problems No sound. Turn the volume up. The speaker cords may be shorted. Turn the unit off, check and correct the connections and turn the unit on.
Enjoying discs Display is wrong or play won’t start. The disc may be upside down. > Wipe the disc. Replace the disc if it is scratched, warped, or nonstandard. Condensation may have formed inside the changer due to a sudden change in temperature. Wait about an hour for it to clear and try again. “TAKE OUT/DISC” appears on display. There is a problem with the disc mechanism. (A power failure may have occurred.) The tray will open automatically.
This product incorporates copyright protection technology that is protected by method claims of certain U.S. patents and other intellectual property rights owned by Macrovision Corporation and other rights owners. Use of this copyright protection technology must be authorized by Macrovision Corporation, and is intended for home and other limited viewing uses only unless otherwise authorized by Macrovision Corporation. Reverse engineering or disassembly is prohibited. Matsushita Electric Industrial Co.