TD5130 Setup & User Guide Copyright © 2012 Technicolor. All rights reserved. DMS-CTC-20120508-0000 v1.0.
SETUP & USER GUIDE Table of Contents 1 2 PRODUCT OVERVIEW ....................................................................................... 4 1.1 Features ................................................................................................... 4 1.2 Hardware Overview ..................................................................................... 5 1.2.1 Front Panel ............................................................................................ 5 1.2.
SETUP & USER GUIDE 7.2 7.2.1 Assign a Game or Application .................................................................... 27 7.2.2 Modify Assigned Game or Application ........................................................... 28 7.2.3 Create a New Game or Application .............................................................. 28 7.2.4 Modify a Game or Application ..................................................................... 29 7.3 Parental Control ................................
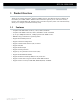
SETUP & USER GUIDE 1 Product Overview Thank you for choosing Technicolor Wireless n ADSL2+ Gateway. This Wireless Gateway combines the functionality of an ADSL / ADSL2 / ADSL2+ modem and Internet gateway in one. The various security features, such as WPS, WPA2, SPI, and NAT, protect your data and privacy online. The web-based utility allows you to configure your Wireless Gateway easily. 1.1 Features ▪ Compliant with ADSL G.dmt (G.992.1), G.lite (G.992.2) standards ▪ Compliant with ADSL2 G.dmt.bis (G.
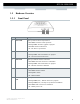
SETUP & USER GUIDE 1.2 1.2.1 Hardware Overview Front Panel 1 2 3 4 5 6 No. LED Description 1 Power LED Lights up when the device is powered on. ▪ Solid GREEN – Indicates normal operation. ▪ Flashing GREEN – Firmware upgrade in progress. ▪ Solid RED – Indicates malfunction. ▪ Off – The device is powered off. 2 Ethernet LED ▪ Solid GREEN – A wired connection is established. ▪ Flashing GREEN – Data transmission is in progress. ▪ Off – No wired connection detected.
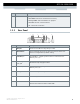
SETUP & USER GUIDE No. LED Description 6 Internet LED Lights up to indicate Internet connection status. ▪ Solid GREEN – Internet is connected but no activity. ▪ Flashing GREEN – Data transmission is in progress. ▪ Solid RED – Internet connection failed. ▪ Off – No internet connection. 1.2.2 Rear Panel 1 23 4 5 6 7 8 No. Ports / Buttons Description 1 DSL port Connects to the DSL line using the RJ-11 cable.
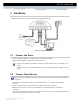
SETUP & USER GUIDE 2 Installation Make sure that all devices are powered off before starting installation. Installation Diagram 2.1 Connect the Power 1 Connect the power adapter to the DC In jack of your Wireless Gateway. 2 Plug the power adapter to a wall outlet or a power strip. ▪ Use only the supplied power adapter. Using other power adapters may cause damage to the device. ▪ Connect all devices to your Wireless Gateway before connecting the power adapter to a wall outlet. 2.
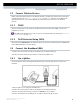
SETUP & USER GUIDE 2.3 Connect Wireless Devices Before connecting wireless devices to the Wireless Gateway, configure the wireless security settings of your Wireless Gateway (see “To Set up Security Settings on page 41”). Take note of the SSID and the password you have set, you need the SSID and the password to connect devices to your Wireless Gateway. 2.3.1 WLAN From the wireless device end, search for the Wireless Gateway network name (SSID), and enter the passphrase to connect.
SETUP & USER GUIDE 2.5 Check the Installation To ensure that all devices are properly connected, check the LED indicators on the front of your Wireless Gateway. For basic installation, the following LEDs must be lit: ▪ Power LED ▪ Ethernet LED ▪ DSL LED The lighted LED indicators vary depending on the type of connection that you make. See “Front Panel” on page 5 for more information about the LED indicators. Copyright © 2012 Technicolor. All rights reserved. DMS-CTC-20120508-0000 v1.0.
SETUP & USER GUIDE 3 Configure the Computer This chapter will guide you on how to configure your computer according to the operating system you are using. ▪ Windows XP, see below. ▪ Windows Vista, see page 10. ▪ Windows 7, see page 11. 3.1 Windows XP If you are using Windows XP, follow the instructions below to configure your computer. 1 Click Start > Control Panel > Network Connections. 2 Right-click Local Area Connection, then click Properties.
SETUP & USER GUIDE 3.3 Windows 7 If you are using Windows 7, follow the instructions below to configure your computer. 1 Click Start > Control Panel > Network & Sharing Center. 2 Click Local Area Connection. 3 Click Properties. 4 On the network components list, make sure that Internet Protocol (TCP/IP) is checked. If not, check it to enable the Properties button. 5 Select Internet Protocol (TCP/IP), and then click Properties.
SETUP & USER GUIDE 4 Access the Wireless Gateway Use the Web Configurations utility to configure your Wireless Gateway. 4.1 Login For more advanced configuration, access the Technicolor web configuration utility. 1 Launch the web browser. 2 On the address bar, type http://192.168.1.1, and then press Enter. 3 Type the Username and Password, default values are “admin”.
SETUP & USER GUIDE 4.2 The Interface Once logged in, the Home screen appears. The Home screen provides quick access to the most common functions of your Wireless Gateway. Click an option to access the function. To quickly change passwords or switch users, click the user name on the top-left corner of the screen (in the above example, “admin”). To change the menu language, click es for Spanish or en for English. In some screens, shortcut items are available on the bottom of the screen.
SETUP & USER GUIDE 4.3 Using the Menu For more advanced users, use the main menu, located on the left panel of the screen, to configure your Wireless Gateway. Click a menu item, then a submenu to display the page. The following menu items are available: ▪ Home — Displays the Home screen. ▪ Technicolor Gateway — Allows you to configure your Wireless Gateway, such as system date and time, and to view event logs.
SETUP & USER GUIDE 3 The Technicolor Wizard screen appears. Click Next to continue. The required information on the succeeding screens must be obtained from your Internet Service Provider (ISP). 4 Select the DSL account service: Bridge, Routed PPP, or Routed IP. Then click Next. If you select Routed PPP, skip to step 6. If you select Routed IP, skip to step 7. Copyright © 2012 Technicolor. All rights reserved. DMS-CTC-20120508-0000 v1.0.
SETUP & USER GUIDE 5 If you select, Bridge, do the following: a Select the VPI/VCI, and then click Next. b If your network is using a DHCP server, keep the DHCP Server box checked, if not, remove it. c Click Next to continue. Then, skip to step 8. Copyright © 2012 Technicolor. All rights reserved. DMS-CTC-20120508-0000 v1.0.
SETUP & USER GUIDE 6 If you select Routed PPP, do the following: a Select the VPI/VCI and Connection Type, and then click Next. b The Internet Account Settings screen appears. Obtain the necessary information from your ISP. c Type your Internet account user name in User Name. d Type your account password in Password and Confirm Password. e Click Next to continue. Copyright © 2012 Technicolor. All rights reserved. DMS-CTC-20120508-0000 v1.0.
SETUP & USER GUIDE 7 If you select Routed IP, do the following: a Select the VPI/VCI and Connection Type, and then click Next. b The Internet Account Settings screen appears. Obtain the necessary information from your ISP. c Type External IP Address, Subnet Mask, and Default Gateway. d Click Next to continue. Then, skip to step 8. Copyright © 2012 Technicolor. All rights reserved. DMS-CTC-20120508-0000 v1.0.
SETUP & USER GUIDE e Type the IP address of the DNS servers, and then click Next. 8 Review your Wireless Gateway settings, and then click Start to apply the settings. Bridge Connection Routed PPP Connection Routed IP Connection 9 The configuration may take a while to finish. When complete, click Finish. 10 Close the web browser. Copyright © 2012 Technicolor. All rights reserved. DMS-CTC-20120508-0000 v1.0.
SETUP & USER GUIDE 5 Technicolor Gateway The Technicolor Gateway menu allows you to view the system information and configure the Wireless Gateway. This menu is divided into three sections: Information, Configuration, and Event Logs. 5.1 System Information The System Information page displays the product name, device serial number, and software release information. To view the System Information page, do one of the following: 1 On the main menu, click Technicolor Gateway > Information.
SETUP & USER GUIDE 5.2 System Configuration The System Configuration page allows you to configure the Internet service and the system date and time, and enable web browsing interception. To view the System Configuration page, click Technicolor Gateway > Configuration. To modify the system configuration, click Configure. 5.2.1 DSL Service Configuration To modify the DSL service configuration, click Configuration Wizard and then follow the instructions on the screen.
SETUP & USER GUIDE 5.2.3 Web Browsing Interception 1 On the Web Browsing Interception box, select one of the following: Enabled (default) — To enable web browsing interception. Disabled — To disable web browsing interception. When disabled, address based filtering is also disabled. 2 Click Apply to save changes. 5.3 Event Logs The Event Logs page allows you to view and clear system logs. To access the Event Logs page, click Technicolor Gateway > Event Logs.
SETUP & USER GUIDE 6 Broadband Connection The Broadband Connection menu allows you to view and modify the Internet service configuration of your Wireless Gateway. This menu is divided into two sections: DSL Connection and Internet Services. To view the Broadband Connection page, click Broadband Connection. 6.1 DSL Connection To view the DSL connection status, do one of the following: ▪ On the Broadband Connection page, click View more under DSL Connection.
SETUP & USER GUIDE 6.2 Internet Services Use the Internet Services page to configure the settings and connect to the Internet. To view the Internet page, do one of the following: ▪ From the Home screen, click Internet ▪ On the Broadband Connection page, click View more under Internet. ▪ On the main menu, click Broadband Connection > Internet Services > View More To connect to the Internet, click Connect.
SETUP & USER GUIDE 7 Toolbox The Toolbox menu allows you to protect your network, share games and applications with other people on the Internet, and manage your local network. This menu is divided into eight sections: Remote Assistance, Game & Application Sharing, Parental Control, Firewall, Intrusion Detection, Dynamic DNS, User Management, and DMZ. To view the Toolbox page, click Toolbox on the main menu. 7.1 Remote Assistance To enable remote assistance, you must be connected to the Internet.
SETUP & USER GUIDE 7.1.2 Disable Remote Assistance Click Disable Remote Assistance to disable this function. 7.2 Game & Application Sharing The Game & Application Sharing page allows you to create new games and applications and assign games or applications to the network devices. To view the Game & Application Sharing page, do one of the following: ▪ From the Home screen, click Game & Application Sharing under Toolbox. ▪ On the main menu, click Toolbox > Game & Application Sharing.
SETUP & USER GUIDE 7.2.1 Assign a Game or Application Your Wireless Gateway comes with predefined games and applications. Each game or application can be assigned to a network device. 1 To assign a game or application, do one of the following: Click Configure on the upper-right corner of the screen. Click the Assign a game or application to a local network device shortcut at the bottom of the screen. 2 To enable Universal Plug and Play (UPnP) function, check the Use UPnP box, then click Apply.
SETUP & USER GUIDE 7.2.2 Modify Assigned Game or Application 1 On the main menu, click Toolbox > Game & Application Sharing. 2 From the Game & Application page, click Configure on the upper-right corner of the screen. 3 On the Assigned Games & Applications table, click the Edit button of the game or application you want to modify. 4 Modify the necessary info. 5 Click Apply to save changes. 7.2.
SETUP & USER GUIDE 4 Select how you want to define the new game or application: Clone Exiting Game or Application — Select an existing game or application to clone its protocol and TCP/UDP port range settings. Manual Entry of Port Maps — To manually select the protocol and enter the port range of the new game or application. 5 Click Next to continue. 6 If Clone Exiting Game or Application is selected on step 4, skip to step 8.
SETUP & USER GUIDE 7.3 Parental Control The Parental Control page allows you to filter web sites that a network device may access or be denied access. To view the Parental Control page, do one of the following: ▪ From the Home screen, click Parental Control under Toolbox. ▪ On the main menu, click Toolbox > Parental Control. To configure parental control, click Configure on the upper-right corner of the screen. ▪ Use Address Based Filter — Check to filter web sites by address.
SETUP & USER GUIDE 7.4 Firewall The Firewall page allows you to set the firewall security of your Wireless Gateway. To view the Firewall page, do one of the following: ▪ From the Home screen, click Firewall under Toolbox. ▪ On the main menu, click Toolbox > Firewall. 7.4.1 Change Firewall Security Level 1 On the Firewall page, click Configure on the upper-right corner of the screen. 2 Select the desired security level: Block All — Block all traffic from and to the Internet.
SETUP & USER GUIDE 7.4.3 Set Filter Rules After you create a new security level, you can set firewall rules. 1 On the Firewall page, click Configure on the upper-right corner of the screen. 2 Click Edit. The Firewall Settings appears. 3 On the Firewall Settings table, click Add. 4 Enter the necessary parameters: Name — Enter desired firewall rule name Enabled — Check this box to enable this firewall rule. Source Interface — Select the interface to apply the firewall rule.
SETUP & USER GUIDE 7.5 Intrusion Detection Your Wireless Gateway protects your network against malicious intrusions. The Intrusion Detection page shows you the intrusions that you are protected against. The Protected Intrusions table shows the number of times the Wireless Gateway actively protected your network against each intrusions. To view the Intrusion Detection page, on the main menu, click Toolbox > Intrusion Detection. 7.
SETUP & USER GUIDE ▪ Confirm Password — Re-type the password to confirm. ▪ Service — Select the DDNS service provider where your account is registered. ▪ Host — Type the host name. Click Apply to save changes. To use multiple hosts, click the Use multiple hosts shortcut at the bottom of the screen. Then click Add to add host name. 7.7 User Management The User Management page allows you to configure the users who can access the Wireless Gateway web configuration utility.
SETUP & USER GUIDE 7.8 DMZ The DMZ page allows you to configure a computer, called the DMZ host, on your network to have unrestricted Internet access. This function is useful for gaming purposes. However, this places the DMZ outside the firewall and is exposed to security risks. To assign a DMZ host, do the following: 1 On the main menu, click Toolbox > DMZ. 2 Click Configure on the upper-right corner of the screen. 3 Check the Status box to enable the DMZ host function.
SETUP & USER GUIDE 8 Home Network The Home Network menu displays the network configuration of your Wireless Gateway, along with interfaces and connected devices. This menu is divided into two sections: Devices and Interfaces. To view the Home Network page, click Home Network on the main menu. 8.1 Devices This page displays the devices connected on your network via the Wireless Gateway Ethernet ports.
SETUP & USER GUIDE 8.1.2 Assign Game or Application to Device 1 Click the device name. The device information is displayed on screen. 2 Click Configure on the upper-right corner of the screen. 3 On the Connection Sharing section, select the game or application on the table. 4 Click Add. 8.1.3 Remove a Shared Game or Application 1 Click the device name. The device information is displayed on screen. 2 Click Configure on the upper-right corner of the screen.
SETUP & USER GUIDE 8.2 Interfaces The Interfaces page allows you to configure the network device TCP/IP settings such as IP address subnet mask, assign a DHCP server, and configure the wireless network security settings. To view the Interfaces page, click Home Network > Interfaces. 8.2.1 Local Network Interface Click Home Network > Interfaces > LocalNetwork to open the Local Network page. This page displays the interface information including the TCP/IP configuration, IP Addresses, DHCP pool.
SETUP & USER GUIDE To Modify the DHCP Pool 1 Click the Edit button of the pool you want to modify. The LAN_Private screen appears. Interface — Displays the current network interface. Start Address — Type the starting address of the DHCP pool. End Address — Type the ending address of the DHCP pool. Subnet Mask — Type the subnet mask. Gateway — Type the gateway. Primary DNS — Type the primary DNS. Secondary DNS — Type the secondary DNS.
SETUP & USER GUIDE To Configure the Wireless Network 1 Click Configure on the upper-right corner of the screen. 2 Enter or take note of the following information: Interface Enabled — Check to enable the wireless access point. Physical Address — Displays the MAC address of the wireless device. Network Name (SSID) — Enter desired wireless network name. This is the name shown to other wireless devices to connect to your network.
SETUP & USER GUIDE To Set up Security Settings 1 Click Home Network > Interfaces > WLAN to open the Wireless Access Point page. 2 Click Configure on the upper-right corner of the screen. 3 Under the Security section, check the Broadcast Network Name to enable wireless devices to see the SSID of your wireless network. 4 On Encryption, select an encryption method: Disabled — No encryption. Use WEP Encryption — To use WEP encryption. ▪ WEP Key Length — Select the key length.
SETUP & USER GUIDE To Set up MAC Filter 1 Click Home Network > Interfaces > WLAN to open the Wireless Access Point page. 2 Click Configure on the upper-right corner of the screen. 3 Under the MAC Filter section, MAC address field, type the MAC address of a device to add to the MAC filter. 4 Click Add. The MAC address is displayed on the MAC List table below. Repeat step 3 and 4 to add more MAC addresses. 5 On Restrict Mode, select the restriction mode: Disable — To disable the MAC filter.
SETUP & USER GUIDE Appendix A Wireless Considerations Connection Performance A number of factors affect wireless connections. To ensure high-range and stable connectivity, do the following: 1 Keep the Wireless Gateway and other wireless devices away from obstructions, such as walls or buildings. Each obstruction can reduce the range of a wireless device. 2 Keep the Wireless Gateway and other wireless devices away from devices that produce radio frequency (RF) noise, such as microwave ovens or radios.
SETUP & USER GUIDE Appendix B Regulatory & Safety Information Wireless LAN, Health and Authorization Radio frequency electromagnetic energy is emitted from Wireless LAN devices. The energy levels of these emissions however are far much less than the electromagnetic energy emissions from wireless devices like for example mobile phones. Wireless LAN devices are safe for use frequency safety standards and recommendations.
SETUP & USER GUIDE IMPORTANT NOTE: FCC Radiation Exposure Statement: This equipment complies with FCC radiation exposure limits set forth for an uncontrolled environment. This equipment should be installed and operated with minimum distance 20cm between the radiator & your body. This transmitter must not be co-located or operating in conjunction with any other antenna or transmitter.
SETUP & USER GUIDE Appendix C Specifications IC ▪ Main chip: RTL8672-VK ▪ AFE: RTL8271B-VR ▪ Ethernet: RTL8305N-GR ▪ WiFi: RTL8188RE-GR ▪ DDR1: 32MB ▪ Flash: 4 MB Serial User Interface ▪ ADSL2+: POTS ▪ 1x1 11n 2.