MULTIMEDIA MONITOR USER’S MANUAL
Important Information WARNING To reduce the risk of fire or shock hazard, do not expose this TV to rain or moisture. WARNING To reduce the risk of electric shock, do not remove cover (or back). No user serviceable parts inside. RISK OF ELECTRIC SHOCK DO NOT OPEN Refer servicing to qualified service personnel. This symbol indicates "dangerous voltage" inside the product that presents a risk of electric shock or personal injury. This symbol indicates important instructions accompanying the product.
Table of Contents Connections & Setup ....................................................................... 5 Connecting Components to your Monitor .................................................. 6 Antenna/Cable In ............................................................................................. 6 Audio/Video/S-Video Inputs (Input1, Input2, Input3) ........................................ 7 Audio/Component Video Inputs .......................................................................
Table of Contents Using the Remote .......................................................................... 27 Remote Buttons ........................................................................................ 28 Using the INPUT button ................................................................................ 29 Programming the Remote ......................................................................... 29 Testing the Remote ................................................................
Table of Contents Menus and Features ....................................................................... 33 Menus and Control Panels ........................................................................ 34 Menus ........................................................................................................... 34 Exiting a Menu ........................................................................................ 34 Control Panels ...........................................................
Table of Contents Reference ....................................................................................... 51 Troubleshooting ....................................................................................... 52 Monitor will not turn on .......................................................................... 52 Controls don’t work ................................................................................. 52 Problems with remote ........................................................
Connections & Setup GETTING STARTED 1 CONNECTIONS & SETUP 2 USING THE REMOTE 3 MENUS AND FEATURES 4 REFERENCE Get your monitor set up and connected • Set up your monitor • Program the remote ➣ The remaining sections discuss the menus and features, and include a Reference section which contains troubleshooting tips, care and cleaning instructions, accessory ordering information and your warranty. ➣ • ➣ This manual is designed to get you star ted quickly.
Connections & Setup CONNECTING COMPONENTS TO YOUR MONITOR Your monitor has several input and output jacks that you can use with many different types of components. This creates a great number of connection variations. Therefore, the following section shows the different types of jacks and examples of the types of components that can be connected to those jacks. Before you begin, it’s a good idea to read any connection information in other components’ user manuals as well.
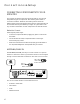
Connections & Setup AUDIO/VIDEO/S-VIDEO INPUTS (INPUT1, INPUT2, INPUT3) The audio jacks provide stereo sound. If your device has only one audio output, you need to connect a “Y” adapter to your component and to both the left and right inputs on the monitor. The video jack provides better picture quality than coaxial cable, because it carries only video signals. If your device has S-Video output, use an S-Video cable to connect the video jacks.
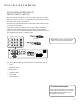
Connections & Setup SELECTED AUDIO/VIDEO OUTPUTS In PC Mode... Provides audio and video output from your last selected source (except component and SVGA jacks). VIDEO provides video output. It gives better picture quality than just a coaxial cable because it carries only video signals. In PC mode, the last selected source (for the selected output) appears. The source is what you were watching on INPUT 1, 2, 3, FRONT, or the tuner channel. AUDIO L and R provide stereo sound.
Connections & Setup AUDIO OUTPUT Audio Output Tips FIXED provides fixed-level audio output from the monitor. This audio output is ideal for connecting to an A/V receiver when you want to control the volume through the A/V receiver. • You may want to adjust the monitor’s tone control and audio processor settings to enhance the audio output when connecting an A/V receiver to the Variable output jacks. VARIABLE provides variable-level audio output.
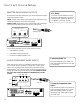
Connections & Setup OPTIONAL COMPONENT CONNECTION EXAMPLES The following examples feature some of the optional components you can connect to your monitor. Refer to the preceding pages for the types of cables used for each connection. Monitor and a VCR 1. Connect the coaxial cable carrying your television signal (off air or cable) to the antenna input on the VCR. 2. Connect a coaxial cable to the VCR’s antenna output and to the ANTENNA/CABLE INPUT jack on the monitor. 3.
Connections & Setup Monitor, VCR, and a Satellite Receiver 1. Connect the coaxial cable carrying your television signal (off air or cable) to the antenna input on the VCR. 2. Connect a coaxial cable to the VCR’s antenna output and to the ANTENNA/CABLE INPUT jack on the monitor. 3. Use RCA cables to connect the VCR’s Audio/Video output INPUT1 on the monitor. 4. Use RCA cables to connect the satellite receiver’s audio/video output to INPUT2 on the monitor.
Connections & Setup Monitor, VCR, Satellite Receiver, and a DVD Player 1. Connect the coaxial cable carrying your television signal (off air or cable) to the antenna input on the VCR. 2. Connect a coaxial cable to the VCR’s antenna output and to the ANTENNA/CABLE INPUT jack on the monitor. 3. Use RCA cables to connect the VCR’s Audio/Video output to INPUT1 on the monitor. 4. Use RCA cables to connect the satellite receiver’s Audio/Video output to INPUT2 on the monitor.
Connections & Setup A/V Receiver & Speakers 1. Use RCA cables to connect either the FIXED or VARIABLE AUDIO OUTPUT from the monitor to an A/V receiver. • FIXED provides fixed-level audio output from the monitor. This audio output is ideal for connecting to an A/V receiver that has its own volume control. • VARIABLE provides variable-level audio output. Volume levels are controlled by the volume controls on the monitor and monitor remote control. 2.
Connections & Setup (S)VGA VIDEO INPUTS –(S)VGA1, (S)VGA2 The (S)VGA (Super Video Graphics Adapter) inputs let you connect your monitor to a personal computer and internet devices. These inputs can provide up to 800 pixel x 600 pixel resolution. How images are displayed, however, depends on other factors such as the type of device connected to the monitor, the media being transmitted, graphics cards and memory allotments.
Connections & Setup (S)VGA 1 Input Connection Examples The (S)VGA 1 input supports DDC2B and VESA DPMS when using an appropriate cable. We recommend using the VGA cable supplied with this monitor. 1. Connect the supplied (S)VGA cable to your computer and to the monitor. 2. Connect the audio: • Connect the stereo mini-jack cable to the computer and to the STEREO INPUT jack on the monitor.
Connections & Setup (S)VGA 2 Input The (S)VGA 2 input can be used to connect an HD receiver so you can receive high definition signals. 1. Connect the supplied (S)VGA cable to your HD receiver and to the monitor. Due to copyright restrictions, you may not be able to view some high definition programs in high definition format using this product. To view material in standard definition instead, you must connect the Audio/Video jacks to the monitor. 2.
Connections & Setup USB INPUTS/OUTPUT NOTE USB (Universal Serial Bus) inputs let you connect PC-type peripheral devices to the monitor. This includes devices such as joysticks, keyboards, and pointing devices (mouse, trackball). There are three USB inputs and one USB output that connects to a PC. The monitor acts as a hub to the PC. The USB port will function even when the monitor is in standby mode (off but plugged in).
Connections & Setup SETTING UP THE MONITOR Follow these steps when setting up the monitor for the first time. STEP 1: PLUG IN THE MONITOR Plug the end of the power cord into an appropriate wall outlet. Be sure to insert the plug completely. STEP 2: PLACE BATTERIES IN REMOTE • Remove the battery compartment cover from the back of the remote by pushing down on and sliding off the cover. • Insert fresh batteries. Make sure that the polarities (+ and -) are aligned correctly. • Replace the cover.
Connections & Setup THE POINT AND SELECT NAVIGATION METHOD You can “get around” in the menu system by using just a few buttons on the remote control. We call this the “Point and Select” method of navigation, and it has two steps. 1. Point to a menu item using the arrows on the remote. To point up or down, press the up or down arrows. To point left or right, press the left or right arrows. 2. Select a menu item by pressing MENU or OK.
Connections & Setup AUTO CHANNEL SEARCH The next step of the setup routine “autoprograms” channels into the channel list. 1. Press MENU bring up the Main menu and then select Channel. MAIN MENU 1 2 3 4 5 6 0 Audio Picture Quality Screen Channel Time Parental Controls Go Back 2. From the Channel menu (shown below), select Auto Channel Search. CHANNEL 1 2 3 4 0 Signal Type Auto Channel Search List and Labels Autotuning Exit The monitor will begin searching for channels and give you a progress report.
Connections & Setup SET THE VCR1 CHANNEL (AUTOTUNING) The next step lets you set the VCR1 channel. When you set the VCR1 channel, the monitor automatically tunes to the correct input channel when press the VCR1 button on the remote. This is called “Autotuning.” If you don’t have a VCR1 component connected to the monitor, skip this step. 1. From the Channel menu (shown below), select Autotuning. CHANNEL 1 2 3 4 0 Signal Type Auto Channel Search List and Labels Autotuning Go Back 2.
Connections & Setup SET THE VCR2 CHANNEL (AUTOTUNING) You can set the VCR2 button on the remote to automatically tune to an input channel as well. If you don’t have a VCR2 component connected to the monitor, skip this step. 1. From the Channel menu (shown below), select Autotuning. CHANNEL 1 2 3 4 0 Signal Type Auto Channel Search List and Labels Autotuning Go Back 2. From the Autotuning menu (shown below), select Set VCR2 Channel. 1 2 3 4 0 AUTOTUNING Set VCR1 Channel... Set VCR2 Channel...
Connections & Setup SET THE DVD CHANNEL (AUTOTUNING) The next step lets you set the DVD channel. When you set the DVD channel, you’re telling the monitor what channel to tune to when you press the DVD button on the remote. Indicate which input you used to connect an DVD player. If you don’t have a DVD player connected to the monitor, skip this step. 1. From the Channel menu (shown below), select Autotuning. CHANNEL 1 2 3 4 0 Signal Type Auto Channel Search List and Labels Autotuning Go Back 2.
Connections & Setup SET THE SAT/CABLE CHANNEL (AUTOTUNING) The next step lets you set the SAT/CABLE channel. When you set the SAT/CABLE channel, you’re telling the monitor what channel to tune to when you press the DIRECTV button on the remote. Indicate which input you used to connect a satellite receiver, a cable box or an HD receiver. If you don’t have one of these components connected to the monitor, skip this step. 1. From the Channel menu (shown below), select Autotuning.
Connections & Setup LABEL THE CHANNELS This last step in the setup routine lets you create your channel list and label your channels. 1. From the Channel menu (shown below), select Lists and Labels. CHANNEL 1 2 3 4 0 Signal Type Auto Channel Search List and Labels Autotuning Go Back The Lists and Labels menu appears (shown below).
Connections & Setup 26
Using the Remote HOW TO USE YOUR UNIVERSAL REMOTE 1 CONNECTIONS & SETUP 2 USING THE REMOTE 3 MENUS AND FEATURES 4 REFERENCE ➣ The universal remote can be programmed to control most brands of remote controllable VCRs, satellite receivers, and cable boxes. If you have an RCA, GE, or PROSCAN component, you probably don’t need to program it at all. ➣ This section defines the buttons of the remote and how to program it to control other components.
Using the Remote REMOTE BUTTONS ON•OFF When in TV mode, turns the monitor on and off. If in another device mode (VCR, DVD, Satellite (DIRECTV), etc.) and programmed, will turn the device on and off. Press twice within two seconds to turn off most ProScan, RCA and GE products at once. VCR1 Puts the remote in VCR mode and if auto tuning is enabled, it will turn on the monitor and tune to the correct channel.
Using the Remote MENU Brings up the Main menu and selects highlighted items. When in VCR mode, it functions as a PROGRAM button. CLEAR Removes any menu or display from the screen and returns you to normal viewing. (0-9) Number Buttons Enters channel numbers and time settings directly though the remote control. To enter a two-digit channel, press the two digits. To enter a three-digit channel, press and hold the first digit until the number and two dashes “– –” appear, then add the second two.
Using the Remote TESTING THE REMOTE To determine whether the universal remote needs to be programmed, turn a device ON, such as a VCR, point the remote at the VCR, and press the VCR1 button. Then press POWER or CH ^ (channel up) or CH v (channel down) to see if the VCR responds to the remote commands. If not, the remote needs to be programmed.
Using the Remote USING THE REMOTE TO CONTROL A DEVICE Once the remote has been programmed successfully, you are ready to use it to control your devices. To operate the device: 1. Press the device button (TV, VCR1, VCR2, DVD, AUX, or DIRECTV) to set the remote to control the device. 2. Press ON•OFF to turn the device ON or OFF. 3. Use the remote buttons that apply to that device. MODES OF OPERATION Because this universal remote can control several different components (DVD player, VCR, Cable Box, etc.
Using the Remote VCR Admiral ......................................................................... 2131 Adventura ..................................................................... 2026 Aiko ............................................................................... 2027 Aiwa .................................................................... 2002, 2026 Akai .... 2003, 2004, 2005, 2007, 2008, 2111,2112, 2113 American High ............................................................ 2021 Asha ...
Menus and Features USING THE MONITOR 1 CONNECTIONS & SETUP 2 USING THE REMOTE 3 MENUS AND FEATURES 4 REFERENCE ➣ Each menu is then outlined and special features are detailed in order to help you get the most from your monitor . ➣ This section explores the features and menus of your monitor beginning with some information on using menus and control panels.
Menus and Features MENUS AND CONTROL PANELS Using the buttons on both the remote and front panel enable you to access and make changes to the Menus and Control Panels. Menus use the point and select rule to navigate, but control panels use a variety of methods to adjust features on your monitor. The following pages detail how to use these controls in order to customize the functions of your monitor. MENUS The first menu is called the Main menu.
Menus and Features CONTROL PANELS ON OFF VCR1 Control Panels allow you to adjust the default settings on many features of your monitor. You can choose a setting, enter a number, or adjust a level such as tint or brightness. There are three types of control panels: sliders, choice lists, and numeric entry. VCR2 DVD TV AUX DIRECTV MUTE SKIP CH + VOL VOL Sliders Sliders are used to make adjustments to a particular control. CH - To use a Slider in a menu: 1.
Menus and Features CHOICE LISTS Choice lists are used to choose a particular setting from a list of settings. CLOSED-CAPTION MODE 1 2 3 4 5 6 7 8 1. Point to a choice from the list and press MENU or OK to select that choice. Now that you know how to access the menus and adjust the control panels the following pages provide a brief explanation of all the menu features. The features are organized in order of their location on the Main Menu.
Menus and Features PICTURE QUALITY MENU Basic Picture Controls Displays the five slider controls for adjusting the way the picture looks. You can adjust and save different settings for each input. Contrast Adjusts the difference between the light and dark areas of the picture. Color Adjusts the richness of the color. Tint Adjusts the balance between the red and green levels. Black Level Adjusts the brightness of the picture.
Menus and Features SCREEN MENU Closed-Caption Display Displays a choice list that lets you choose the way closed captioning information is shown on the screen. Closedcaptioning is not available with the VGA inputs. Off No captioning information displayed. On Always Captioning information shown always, when available. On when sound is muted Displays captioning information, when available, whenever the monitor’s sound is muted by pressing the MUTE button.
Menus and Features CHANNEL MENU Signal Type Displays a choice list that lets you select the current antenna type. UHF/VHF Antenna Choose this if you are currently using an offair antenna for TV signals. Cable TV Choose this if you are currently using cable or a cable box for TV signals. Auto Channel Search Tells the monitor to search automatically for all the channels available through the antenna input.
Menus and Features After you have selected the device button you want to auto tune, you need to select the input you want the monitor to tune to when you press that button. The available options include: Not Connected Choose this if you do not have a component connected to an antenna or video input on the back of the monitor, or if you don’t want the monitor to tune to a channel when the particular component button is pressed.
Menus and Features PARENTAL CONTROLS AND V-CHIP The Parental Controls menu allows you to program your monitor so that children cannot see certain programs, channels, or use the front panel controls. The first three choices in the Parental Controls menu involve software inside your monitor (called V-Chip) which allows you to “block” TV programs and movies based on violence, sex, or other content you may believe children should not view.
Menus and Features V-CHIP TV RATING LIMIT The V-Chip TV Rating Limit lets you decide what TV programs can and cannot be viewed. To set TV programming limits: 1. Choose Parental Controls from the Main menu. If Parental Controls have previously been locked, you must enter your password. If they are not locked, you will get a message reminding you that your limits will not be effective until you lock Parental Controls.
Menus and Features Blocking Age-Based Ratings You can automatically block all program ratings above a specified age-based rating level. For example, if you only want your child to watch programs that have a TV-G rating and lower (in other words, you want the child to watch TV-G, TV-Y7, and TV-Y), then you need to block out other programming with higher ratings. When you change the status of a rating to Block, the system will automatically block higher ratings and all corresponding content themes.
Menus and Features Viewing Age-Based Ratings Rating status field After you block age-based ratings, you have the option of changing some of the ratings back to View. 1. Determine which blocked rating you want to view. 2. Use the left and right arrows to highlight the Rating Field. 3. Use the up and down arrows to select the rating whose status is Block. 4. Press the right arrow to move the yellow highlight to the rating status field. 5.
Menus and Features Rating status field You must remember to Lock Parental Controls for rating limits to take effect. V-CHIP TV RATING LIMIT - - Content - - Rating field 6. Rating TV-PG Status View D L S V FV V B V V ^ Press ^/v to view programs with this content for this rating. Content themes Content status fields Press MENU or OK to return to the menu or exit the screen.
Menus and Features V-CHIP MOVIE RATING LIMIT You set movie rating limits by blocking movies rated above a specified level. Blocking Movie Ratings If you only want your child to watch movies that have a PG rating and lower (in other words, movies rated PG and G), then you could automatically block out all other movies with higher ratings. To block movies: 1. Highlight the rating field and press the up and down arrows to find the rating that is the lowest rating you do not want the child to watch.
Menus and Features V-CHIP UNRATED PROGRAM BLOCK Selecting this option lets you decide if programs that the V-Chip recognizes as “unrated” can be viewed. Note that “unrated” TV programs can include news, sports, political, religious, local, and weather programs, emergency bulletins, public announcements, and programs without a rating.
Menus and Features PIP (PICTURE-IN-PICTURE) OPERATION The PIP (picture-in-picture) feature lets you display a second, smaller picture on top of the main picture. Note that PIP is not available when you are in VGA mode. ON OFF VCR1 VCR2 DVD TV AUX DIRECTV MUTE SKIP CH + VOL VOL PIP BUTTONS CH - There are four remote buttons that control the way the PIP window works: FETCH GO BACK GUIDE INFO OK PIP Brings up the PIP window. Press PIP again to remove the window.
Menus and Features CHANNEL MARKER There are several indicators that come up when you press the TV, INFO, PIP or SWAP button. This display is called the Channel Marker. 12:01 Displays the current time. 12:01 CC VCR1 VID1 Mute SAP PIP 59 Locked CC Displayed when Closed Captioning is available on the current channel. VCR1 Displays the label assigned to the current channel. VID1 Displays the current channel or input channel. Mute (or Stereo) Mute is displayed when you mute the audio.
Menus and Features 50
Reference GOOD INFORMATION TO KNOW CONNECTIONS & SETUP 2 USING THE REMOTE 3 MENUS AND FEATURES 4 REFERENCE ➣ This section contains information that you don’t have to know to use your monitor, but may want to refer to from time to time. It includes a specification sheet, a troubleshooting section, the limited warranty, an accessories order form and an index.
Reference TROUBLESHOOTING Troubles sometimes are caused by simple “faults” that you can correct without the help of a service technician. If you experience any difficulty with your monitor, check a few basic remedies before calling your service technician. Monitor will not turn on • • • • Check to make sure it is plugged in. Check the wall receptacle (or extension cord) to make sure it is “live” by plugging in something else. Maybe batteries in remote control are “dead.
Reference Can’t select certain channel or turns off while playing • • • Channel may be blocked or not approved in the Parental Controls menu. If using a VCR, check to make sure the TV/VCR switch on the VCR is in the correct position. Electronic protection circuit may have been activated because of a power surge. Wait 30 seconds and then turn on again. If this happens frequently, the voltage in your house may be abnormally high or low. Noisy stereo reception • May be a weak station.
Reference PROSCAN DIRECT VIEW MULTIMEDIA MONITOR SPECIFICATIONS* PICTURE MULTI-SYNC SCAN MODES HORIZONTAL RESOLUTION SOUND CONVENIENCE BACK PANEL INPUTS/OUTPUTS GENERAL SPECIFICATIONS Optimum Contrast Screen ................................ Picture Power (Watts) ....................................... Stripe Pitch ....................................................... ........................................................................ Dynamic Focus ..............................................
Reference PROSCAN PROJECTION MULTIMEDIA MONITOR SPECIFICATIONS* PICTURE Optimum Contrast Screen ................................ Picture Power (Watts) ....................................... Stripe Pitch ....................................................... Dynamic Focus ................................................ Scan Velocity Modulation ................................. Aperture Sharpness........................................... Comb Filter ......................................................
Reference Accessory Information Antenna (or cable-TV) connections are made with either coaxial antenna cable or twin-lead cable. Coaxial cables are shielded so they are less susceptible to hum or interference from adjacent cables. The following accessories are available from most dealers and electronics supply stores in case you want to position your components farther apart or need additional cables.
Reference VCR1 ON DVD OFF TV VCR2 AUX MUT E CTV VOL VOL CH FETC H GUID E DIRE SKIP CH + - GO BACK INFO OK MEN U 1 2 4 3 5 7 T ANTE RSE NN A PLAY RECO FORW ARD RD STOP PIP SW AP R 9 0 REVE CLEA 6 8 INPU Remote Control This is the remote control that came packed with your MultiMedia Monitor. Replacements or spares can be ordered as needed. PAUS Accessory Order Form Qty Price $3.99 Description Screw-on antenna cable (3-ft) Part No.
Reference Placing an Order Charge your order on your VISA, MasterCard, or Discover Card by filling in below To place your order by phone, have your Visa, MasterCard or Discover Card ready and call the toll-free number listed below. USE YOUR CREDIT CARD ® IMPORTANT: Copy complete account number from your VISA card Use this number only to place on order for accessory items listed on this order form.
Reference PROSCAN MULTIMEDIA MONITOR LIMITED WARRANTY What your warranty covers: • Any defect in materials or workmanship. For how long after your purchase: • • • One year for labor charges. One year for parts. Two years for the picture tube. The warranty period for rental units begins with the first rental or 45 days from date of shipment to the rental firm, whichever comes first.
Reference A Accessories 56 Adjust Projection TV 38 ANTENNA Button 29 Antenna/Cable In Jack 6 Audio Output 9 Processor 36 Remote Codes 32 Audio Menu 36 Audio Processor 36 Mute 36 Sound Logic Stereo 36 Speakers 36 Tone Controls 36 Mono 36 Second Audio Program 36 SRS Stereo 36 Stereo 36 Audio/Video Inputs 7 Auto Channel Search 39 Color 37 Tuning 24, 39 Tuning the DVD Channel 22 Tuning the SAT/Cable Channel 23, 39 Tuning the VCR1 Channel 20, 39 Tuning the VCR2 Channel 21, 39 Automatic Code Search 30 AUX But
Reference P Parental Controls Channel Block 47 Front Panel Block 47 Locking, Unlocking 47 Menu 41 Second Audio Program (SAP) 36 Select and Point 19 Selected Video Outputs AUDIO L and R 8 Set DVD Channel 22 SAT/CABLE Channel 23, 39 VCR1 Channel 20, 39 VCR2 Channel 21, 39 Picture Mode Settings 14 Position 38 Presets 37 Quality Menu 37 Black Level 37 Color 37 Contrast 37 Sharpness 37 Tint 37 Tilt 38 Size 38 PIP (Picture in Picture) Buttons 29, 48 PIP Chan 49 Point and Select 19 POWER on Front Panel 31 PR
10330 North Meridian Street Indianapolis, IN 46290 ©1999 Thomson Consumer Electronics, Inc.