Mediatune Installation Guide © 2012 Technicolor.
Introduction This document will take you through a typical installation process for Mediatune, a new webbased interface for the COM1000 product enabling switched matrix control capabilities. Mediatune can be used with an HD COM1000 system to direct content from any source tuner to any output QAM channel, or allow for a simple tuning interface for IP installations or systems which don’t utilize the Technicolor integrated EdgeQAM.
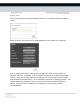
Once this file has been successfully transferred, you will be able to make other transfers including the Mediatune directory. You can quickly test to see if this transfer was successful by opening a browser and typing XXX.XXX.XXX.XXX/info/channels.xml in the address bar where XXX.XXX.XXX.XXX is the IP address of the COM24 card just authorized. In the example above, this would be 10.45.48.5/info/channels.xml.
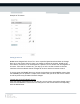
Once uploaded, you will be able to browse to the Mediatune file. On a PC, using Chrome, browse to XXX.XXX.XXX.XXX/mediatune.html where XXX.XXX.XXX.XXX is the IP address of the COM24 card containing the Mediatune files. NOTE: The unzipping process may take 30 seconds to 1 minute to complete, so please allow a little time for the Mediatune files to be accessible. You should see something like this…. Success! Technicolor MCS 101 W. 103rd St Indianapolis, IN 46290 www.technicolor.
Configuring Mediatune Mediatune will utilize all available HD tuners which can be accessed by the COM24 containing the Mediatune files. If the chassis containing Mediatune is to have cards which are not desired to work within the Mediatune interface, it is very important to isolate the IP addresses of these cards so that Mediatune cannot see them. Please contact Technicolor if you need assistance with this configuration.
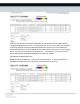
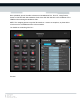
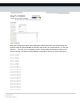
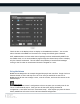
Entering Setup Click on the SETUP link within the Mediatune interface. The default password for SETUP is “1234”. Select TV Mode in the setup screen to assign Mediatune to this mode if not already set. Once TV mode is selected or confirmed, you can add TVs or zones to the interface by selecting “Edit TVs”. Remember, each TV is equal to a zone which is also equal to a QAM channel. If you have 12 zones then you can add up to 12 TVs, each will be tied to a QAM channel based on the table above.
Example of TV names… Setting up the TVs Mediatune is designed such that a TV is set to a specific QAM channel and does not change. Once set to the correct channel, there is no reason to change the channel. Based on the chart above, each zone or can be assigned to a specific TV or to several TVs tied together as one zone. Once the TV has been set, you may try to lock it to that channel via the user interface so that accidental channel changes do not occur with an IR remote control.
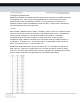
Using the setting shown above and sending the following channel map would change the channel lineup on the DCI401MCS to show RF channel 30-1 as virtual channel “1” with the title TV-1. This way, any TV marked as zone 1 can be easily identified and tuned to the correct channel. Please see the DCI401MCS Command Set Primer for more information.
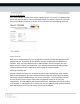
Locking the DCI401MCS Once the DCI401MCS is tuned to the correct channel for each TV or zone, it is good practice to lock the device so that it cannot accidentally change to a different channel or power off. From the DCI401MCS Command Set Primer, this can be done with the following command. Editing Channels Once you’ve configured the TVs, you can edit how and which channels are displayed in the programming list. By default, all the DIRECTV channels are displayed once Mediatune is installed.
Check the box in the Display column to display on the Mediatune interface. You can also select channels to be added to a Favorites list or change the default genre if desired. HINT: Mediatune does not know what channel package has been authorized by DIRECTV for the COM24 cards, so it is recommended to page through the channel setup screen to display only the channels authorized. This will reduce the possibility of unauthorized messages coming to the TVs when an unauthorized channel is dropped on a zone.
Clear All If you’d like to clear all the tuners, simply click the clear all button. You will be prompted to confirm. Tune All If you’d like all the TVs or zones to play the same channel, drag the desired channel to the Tune All button. You will be prompted to confirm, then all TVs will tune to the desired channel. Clear TV If you’d like to clear a specific TV, you can drag that TV to the trash can icon. You will be prompted to confirm.