THOMSON 46, quai Alphonse Le Gallo 92648 Boulogne Cedex FRANCE TOCOM www.thomson.
Safety Information Table of Contents Safety Information Rating Information: At bottom / back of the unit this unit comply with the existing requirements CAUTION RISK OF ELECTRIC SHOCK DO NOT OPEN In accordance with the rating plate of the unit, this unit complies with current standards concerning electrical safety and electromagnetic compatibility. THE LIGHTNING FLASH AND ARROWHEAD WITHIN THE TRIANGLE IS A WA R N I N G S I G N ALERTING YOU OF "DANGEROUS VOLTAGE" INSIDE THE PRODUCT.
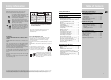
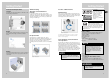
Getting Started Getting Started Unpacking the Receiver Inserting Batteries into Remote Control You should receive the following items: Install batteries as follows: 1. Remove the battery compartment door by applying thumb pressure on battery door and then lift the door out and off the cabinet. 2. Insert 2 “AAA” (R03) batteries into the battery compartment according to the + and - signs in the compartment and replace the compartment door. 3. To use the remote control, point it directly at your receiver.
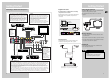
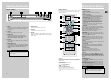
Getting Started Getting Started Digital Connections Connecting to Audio-Visual Components Connecting the Antennas The AM and FM antennas connect to the AM and FM terminals on the system’s back panel. Read instructions carefully when connecting components to the receiver. S-VIDEO If your CD player is equipped with digital optical jacks, use of optical cable is preferred. What you need is just one more digital optical cable (not supplied).
Getting Started Getting Started Connecting the Speakers FRONT SPEAKERS Speaker wires Positioning your speaker One for each speaker, is needed for connection. Press down on the tab to open the terminal and insert the wire. Release tab to lock wire in the terminal.
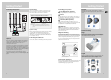
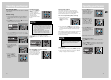
Getting Started Preferred surround placement Location If possible, place surround speakers to either side of the listening area, not behind it. Getting Started Advanced Setting Alternative Surround Placement Test Tone / Channel balance Rear wall Channel balance If rear wall mounting is the only choice, aim the speakers at each other (A), towards the front (B) or even towards the sidewalls (C, D). Experiment with placement until surround sounds seem to envelop you, rather than coming from behind you.
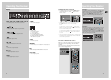
Operating Your Receiver Operating Your Receiver Remote Control Receiver Controls 1 2 ON/ECO 3 SUBWOOFER 4 SOURCE SURROUND 7 6 5 8 Please be sure you have inserted the batteries into the remote control (see relevant section on page 3.) You can test it by pressing any button. PRESET VOLUME 2 1 3 4 5 6 PHONES 1. ON/ECO Turns the unit on and off. When the system is turned on, the unit will go to the mode it was in before powered off. 2. Display Displays current status of the receiver. 3.
Operating Your Receiver Operating Your Receiver Display Switching the unit on and off • To switch on the receiver, press the ON/ECO button on the main unit once, or the button on the remote control. C S R Example 1: If you have connected a DVD player to the DVD input (audio & video) on the receiver, press the SOURCE button on the main unit repeatedly until DVD is selected or press DVD•6CH on the remote control to receive the sounds and images transmitted by the DVD.
Operating your Receiver Operating your Receiver You can connect up to 6 audio/video sources to this amplifier: Using the Remote to Control Additional Components Source button (receiver front panel) Corresponding connector (receiver back panel) - DVD IN (audio / video) VCR IN/OUT (audio / video) SAT IN (audio / video) CD IN (audio only) TAPE IN/OUT (audio only) TV IN (audio only) built-in You can use your remote to control most of Thomson branded VCRs, satellites, cable boxes or TVs.
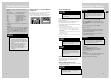
Operating your Receiver Operating your Receiver Operating the Radio Automatic Tuning Storing radio stations The receiver has a built-in tuner that allows for AM/FM radio function. Press and hold TUNER - or TUNER + for about one second to activate the automatic SEARCH function. The receiver will automatically tune frequencies until it finds a station. The receiver can store up to 40 radio stations in memory.
Operating your Receiver RDS (Radio Data System) for FM Only The RDS icon shows on display when RDS data are received. The following information may be available on certain stations: • Frequency station, • Station name, • Program type, • Clock, • Radio text Advanced Sound Control NOTE NO PTY will be displayed if selected kind of program is not broadcasted 3. The search will stop when a station broadcasting the program type you have selected is found.
Advanced Sound Control Advanced Sound Control Dolby 3 Stereo The 3 Stereo mode will redirect the Surround signals to the front left and right speakers when only the front and center speakers are used.. NOTE Night mode is available only with Dolby Digital playback.
Advance Sound Control Fine Setting of the Speakers All the basic settings have already been preset for the speakers included in the box. Also, to make the surround sound more effective and suit the acoustic conditions in your listening room, you may need to delay the signal coming from some of the speakers. Channel delay compensates for center or surround speakers that are closer to the listening position than the front speakers.
Troubleshooting Tips Care and Maintenance Troubleshooting Tips General Receiver/Tuner Operation No audio. ST indicator is off. • Adjust the antenna. • Press GO BACK/ST.MONO button to insure you are not outputting in mono. The signal is Mono. Severe hum or noise. • The signal is too weak. Connect an external antenna. • Adjust Antenna • Reposition Antenna away from any electronics. There is interference to FM reception. • Turn off other electrical units (e.g. DVD, CD player) near the receiver.