DTH7000-EN 23/08/02 10:23 Page 1 About … Important Installation Ensure that the mains supply in your house complies with that indicated on the identification sticker located at the back of your device. Install the device horizontally, on a suitable base (solid unit with a nonslippery surface), with enough space around it for ventilation (7 to 10 cm). Make sure the ventilation slots are not covered. Your device is equipped with a fan which produces a slight hum.
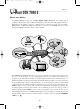
DTH7000-EN 23/08/02 10:23 Page 2 About … Your DTH 7000 E About your device Your DTH 7000 E is classed as a DMR (Digital Media Recorder). In a single unit, it combines a DVD, Audio CD, VCD and CD-R player, a TV tuner and a 40-gigabyte hard disc. Depending on the setting you choose, you’ll have close to 36 hours for your video recordings, JPEG images or MP3 files. With its full range of connectors, your DMR connects to most analog and digital audio/video devices on the market.
DTH7000-EN 23/08/02 10:24 Page 3 Discs you can play About … Digital video discs - 12 cm and 8 cm, single or double sided, single or dual layer. DVDs are high density optical discs on which high quality picture and audio are recorded by means of digital signals. Region code number Your device responds to the regional management information recorded on DVDs. The regional code of your DMR is 2. Before buying a DVD, make sure that it bears the correct logo. ALL means all regions.
DTH7000-EN 23/08/02 10:24 Page 4 About … Contents About … Using your DMR Important.....................................................1 Basic functions .....................................30-31 Your DTH 7000 E........................................2 Repeat playback ........................................32 Discs you can play.......................................3 Zoom / Angle /Video CD...........................33 Contents .......................................................4 DISC menu .
DTH7000-EN 23/08/02 10:24 Page 5 About … Functions index INDEX Display Page Banners . . . . . . . . . . . . . . . . . . . . . . . . . . . . . . . . . . . . . . . . . . 28-29 Menu . . . . . . . . . . . . . . . . . . . . . . . . . . . . . . . . . . . . . . . . . . . . 26-27 Playback control menu . . . . . . . . . . . . . . . . . . . . . . . . . . . . . . . . . 33 DISC menu . . . . . . . . . . . . . . . . . . . . . . . . . . . . . . . . . . . . . . . 34-35 DVD menu . . . . . . . . . . . . . . . . . . . .
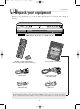
DTH7000-EN 23/08/02 10:24 Page 6 Unpack your equipment Installation Thank you for purchasing one of our products. Unpack the box and check that nothing is missing. DMR (Digital Media Recorder DTH 7000 E) Remote control and batteries (non-rechargeable batteries AA type) Set up and user manuals Mains lead Scart/peritel cable (21 cabled pins) IR Controller R.F. lead This manual will enable you to install your DMR by connecting it correctly and setting up the channels.
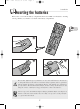
DTH7000-EN 23/08/02 10:24 Page 7 Inserting the batteries Installation Remove the cover from the battery compartment. Insert two LR06 or AA batteries, ensuring correct polarities (+/-). Put the cover back on the battery compartment. EN 1 2 3 Do not mix different types of batteries or new and old batteries. Do not use rechargeable batteries. In order to avoid any risk of explosion, observe polarities indicated inside the battery compartment. Replace only with the type of batteries specified above.
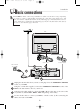
DTH7000-EN 23/08/02 10:24 Page 8 Installation Basic connections Your DMR has many connection possibilities to allow it to fit into a setup comprising several devices. We recommend that you follow the connection setup on this page, and then carry out the adjustments shown on the following pages. You will first need to set up the channels as explained in the following pages before the final interconnection of the devices, described on pages 14 to 20.
DTH7000-EN 23/08/02 10:24 Page 9 Installation Initial installation To take full advantage of your DMR’s TV functions, you must carry out initial installation settings. These settings are explained on pages 9 to 13. Prior reading of that section will make this easier. Follow each stage step by step. 1. Turn on your TV set. 2. Turn on your DMR by pressing the STANDBY / ON button (on the front panel).
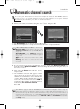
DTH7000-EN 23/08/02 10:24 Page 10 Automatic channel search Installation In each region, TV stations are broadcast on different channels. Your DMR cannot be factory-set to receive the TV channels of your area. You will have to set up the channels by following the automatic procedure recommended below. 5. Select your country of residence using the ˆ or ‡, keys, and press ok. ð The Automatic line is already selected. Press ok.
DTH7000-EN 23/08/02 10:24 Page 11 Installation Sorting the channels 8. A channel sorting window will appear. The picture of the selected channel is shown in the background. The automatic channel search has assigned numbers to the channels is a predefined order. These numbers may not be the numbers you would have chosen. Should this be the case, you can change these numbers by following the instructions at the bottom of the screen.
DTH7000-EN 23/08/02 10:24 Page 12 Installation Manual channel search If you want to set up a new channel, use the manual search procedure which will enable you to add a channel to the ones already set-up on your DMR. The channels already stored will not be deleted. 1. If the main menu is not displayed, press the menu key. 2. Select the Setup line using the ‡ or ˆ, keys, and press ok to validate. 3. Select the Installation line using the ‡ or ˆ, keys, and press ok to validate. 4.
DTH7000-EN 23/08/02 10:24 Page 13 Installation Channel update If new channels make their way into the audiovisual scene, you will have to update your DMR’s list of channels. In such a case, start a new channel search from the installation menu. This set-up deletes all stored channels and resets all the channels that your DMR can receive. If you only want to set-up a single channel, refer to the manual search on page 12. 1. If the main menu is not displayed, press the menu key. 2.
DTH7000-EN 23/08/02 10:24 Page 14 Satellite or cable receiver Satellite set-up Your DMR is designed to control a satellite receiver. For this purpose, the satellite receiver must be connected to the AV2 and IR SAT/CABL sockets of the DMR. Before you connect your satellite receiver to your DMR, you need to set up all the channels on the satellite receiver (receiver directly connected to the TV set) and check that you can view them on your TV set. Then connect the devices as described below.
DTH7000-EN 23/08/02 10:24 Page 15 Satellite set-up DMR / satellite or cable receiver settings 1. Switch on your TV set, your DMR, then your satellite or cable receiver. 2. Place the receiver on channel 002. With your DMR’s remote control, carry out the following settings: 3. If the main menu is not displayed, press the menu key on the remote control. 4. Select the Setup line using the ˆ or ‡, keys, and press ok to validate. 5.
DTH7000-EN 23/08/02 10:24 Page 16 Satellite set-up 10. Deactivating the programming of the Yes is selected to deactivate the programmer. In that case, all your satellite recordings will have to be programmed from your satellite or cable receiver (this is the recommended setting). Leave Yes selected and press ok. 11.IR controller connection • Follow on-screen instructions and press ok. satellite or cable receiver 12.
DTH7000-EN 23/08/02 10:24 Page 17 Satellite set-up The list of codes is given as a guide. The codes given are generally those which are recognised by the receivers of the makes quoted. However, they may not correspond to your device if it is an older or more recent model. In such a case, contact your retailer. List of satellite codes NETWORK . . . . . . . . . . . . . . . . . . . . . . . . . . . 31 NIKKO . . . . . . . . . . . . . . . . . . . . . . . . . . . . . . 32 NOKIA . . . . . . . . . . . . . . . .
DTH7000-EN 23/08/02 10:24 Page 18 Installation Rear connectors The connection setup shown on page 8 provides rapid connection of your DMR. This setup gives standard-quality sound reproduction and an optimum-quality picture (RGB). Depending on the connectors available on your other devices or to get maximum performance out of your DMR, you may need to use other connection setups. Your DMR has other sockets for these purposes. 1 1. 2. 3. 4. 5. 6. 7.
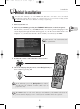
DTH7000-EN 23/08/02 10:24 Page 19 Installation Other connections Connections recommended through Scart sockets (Audio-Video connections) TV EN VCR (the SCART sockets must transmit RGB signals) Your DTH 7000 E Sat/Cable decoder For the interconnection of the devices, if is preferable to use Scart cables with 21 pins connected (the cable between the sockets is bigger).
DTH7000-EN 23/08/02 10:24 Page 20 Installation Connections through the S-Video (picture) and RCA (sound) sockets Camcorder TV VHS or S-VHS video cassette recorder Plasma Screen Sat/Cable decoder Your DMR - DTH 7000 E Video Projector Audio/Video amplifier 20
DTH7000-EN 23/08/02 10:24 Page 21 Occasional use Front connectors The sockets located behind the flap on the front of your DMR allow easy connection for occasional use. File or video transfer to your DMR EN DMR DTH 7000 E Pull here to open flap. Camcorder Card reader HiFi headphones • USB: The USB socket enables you to read and/or copy JPEG images from a memory card reader (1), or MP3 files stored through a digital camera or MP3 recorder (k page 38).
DTH7000-EN 23/08/02 10:24 Page 22 Overview of main functions Remote control Your DMR’s remote control is a 3-in-1 device which enables you to control the operation of 3 units (1): your DMR, a TV set, a HiFi system or a satellite receiver. To control your DMR, place the function selector on the dvd position. For the other devices, you have to program the remote control to match the code of the device to be controlled (k page 52). • To switch your machine on or off (stand-by).
DTH7000-EN 23/08/02 10:24 Page 23 Overview of main functions Remote control Main functions • To blow up the picture during playback, slow motion or pause mode (k page 33). • To view the program being broadcast in real time (k page 40). • To remove the information banners. • To skip forward about 30 seconds with each press. • To play the last scene again. Each press steps back 10 seconds during playback of a DVD or recorded program. • To skip chapters (DVD) or tracks (CD) forward or backward.
DTH7000-EN 23/08/02 10:24 Page 24 Operating principles Front panel The buttons on your DMR 1 2 3 4 5 6 7 8 9 10 PULL HERE to open flap. 11 12 13 14 1. STANDBY/ON: To switch your DMR on or off. 2. AV: To select the audiovisual sources (channels or devices connected to the AV sockets). PR 1 ,22 ,33: Channel 1, 2, 3. AV 1: Device connected on AV1 (TV set). AV 2: Device connected on AV2 (satellite receiver). AV 3: Rear AV sockets (S-VIDEO or AUDIO/VIDEO). AV 4: Front AUDIO/VIDEO socket. 3.
DTH7000-EN 23/08/02 10:24 Page 25 Operating principles Display panel TV Functions Main menu displayed on screen (device stopped). MENU k No function selected. LIVE PR 1 PAUSE -00:38 -00:39 Real-time viewing. k TV mode activated; channel 1 being watched. Pause of the channel being watched. k TIME SHIFT mode activated: the program is frozen while the rest of the TV program continues to be recorded. Delayed viewing of the selected channel.
DTH7000-EN 23/08/02 10:24 Page 26 How to use the menus Operating principles The basic functions of your DMR are accessible directly through the remote control or front panel buttons. Many functions are only accessible through menus displayed on your TV screen. This page shows you how to use these menus. The layout of your DMR’s menus is shown on the next page. Main menu of the DMR (1) Automatic playback: Off (k page 34). Automatic playback: On (k page 34). Disc Menu (2) 1.
DTH7000-EN 23/08/02 10:24 Page 27 Operating principles Menu layout From the Main Menu, you access the various sub-menus of your DMR using the Navigation keys. Other menus are accessible through the sub-menus shown on this page. Main menu of the DMR Channels To access your DMR’s TV channels (k page 40). Disc To choose the disc options and play mode (k page 34).
DTH7000-EN 23/08/02 10:24 Page 28 Operating principles Interactive banners In addition to menus, your DMR has interactive information banners with icons representing functions or information. Some banners provide access to disc playback functions (for DVDs, CDs, VCDs, etc.) while others give you information on the channels and related functions (selection, pause, recording a program, etc.). In TELEVISION mode (Operating principle) 1. Turn on your TV set and your DMR. 2.
DTH7000-EN 23/08/02 10:24 Page 29 Operating principles In DISC PLAYING mode (Operating principle) 1. 2. 3. 4. Load a disc and press PLAY to start playback. To display the banner, press the yellow info key. Choose an icon using the Navigation keys or enter a number using the number keys to access a chapter or a title (when the corresponding icon is selected). To remove the banner, press the yellow info key or the clear key. EN With a DVD Chapter 2 currently being played (k page 31).
DTH7000-EN 23/08/02 10:24 Page 30 Player function Basic functions Loading a disc Loading a “single-sided” disc. 1. Open the DMR’s disc tray by pressing the OPEN / CLOSE button. 2. Insert a disc. The disc label must face upwards (Audio CD, Video CD, singlesided DVD (1), etc.) 3. Close the disc tray by pressing the OPEN / CLOSE key. 1. Double-sided discs have a small label on both sides near the centre. With most DVDs, a disc-specific menu appears. In that case, follow the instructions.
DTH7000-EN 23/08/02 10:24 Page 31 Player function Some DVDs contain several titles. These titles correspond to films, documentaries or other programs. As a general rule, each title is divided into numbered chapters. Most DVDs have chapters only. On audio CDs, the music tracks can be accessed directly. Video CDs may also contain Indexes. Still picture and frame advance (DVD and Video CD) Press once on PAUSE to put the device on pause (1), and press repeatedly to view the images one frame at a time. 1.
DTH7000-EN 23/08/02 10:24 Page 32 Player function Repeat playback To repeat the playback of a title, chapter, track, scene, selected A-B segment (except on Video CDs) or entire disc. Your DMR enables you to mark your favourite DVD scenes or music tracks on audio CDs thanks to a marking function accessible through the banner. Repeat play During disc playback, press the yellow info key to display the banner. Select the Play Mode icon in the banner using the Navigation keys.
DTH7000-EN 23/08/02 10:24 Page 33 Player function Zoom / Angle /Video CD Zoom - (DVD / Video CD) To blow up the picture (1.5x - 2x - 4x) during playback of a DVD, video sequence or JPEG images, press the zoom key on the remote control several times. When the image is blown up, you can move it using the Navigation keys. Press once more to return to normal size (1x). Camera angles (DVD) On certain DVDs, scenes may be recorded under various angles (up to 9 viewing angles).
DTH7000-EN 23/08/02 10:24 Page 34 Player function Disc menu The Disc menu is only accessible if a disc has been loaded into the DMR. This menu enables you to customise certain settings or actions for disc playback. In the MAIN MENU select the Disc, line and press ok to validate. Start To start disc playback from the beginning. • Select Start, then press ok to validate.
DTH7000-EN 23/08/02 10:24 Page 35 Player function Aspect ratios of the TV screen Images which appear on the TV screen differ depending on the type of software and the TV set connected. Picture format on the DVD disc. TV set connected to the DMR EN 16:9 4:3 For wide-screen (foreseen in Pan and Scan) For wide-screen (not in Pan and Scan) Right and left edges are cut off. ✓ Letterbox ✓ (with black bands at top and bottom).
DTH7000-EN 23/08/02 10:24 Page 36 Displaying digital photos Player function Your DMR can read CD-Rs containing JPEG files whose image size does not exceed 2.1 million pixels. Displaying image files in JPEG format Open the disc tray and insert a disc containing JPEG images. Close the disc tray. The disc contents may or may not appear, depending on the play mode selected (automatic or manual k page 34). If it does not appear, press the PLAY button.
DTH7000-EN 23/08/02 10:24 Page 37 Player function Playing audio files Your DMR can play CD-Rs containing audio files in MP3 format. What’s MP3? MP3 is the audio file format allowing you to easily compress music recordings, and was codeveloped by . The main advantage of MP3 is that it enables storage of CD-quality music tracks on a home computer in manageable, compressed files.
DTH7000-EN 23/08/02 10:24 Page 38 Recording (music and images) Recording functions Your DMR enables you to copy JPEG images and MP3 files to your hard disc. You can record those files from a CD-ROM or memory card read in a device connected to the USB socket at the front of your DMR. All files present on the CD-R or memory card will be recorded on your DMR’s hard disc. You can then rename them and/or delete any of them (Managing your recordings k page 45).
DTH7000-EN 23/08/02 10:24 Page 39 Playing the recordings IMAGES and MUSIC menus PICTURES Menu This menu gives you access to the JPEG images that you copied from a CD-R or memory card read in an external reader connected to the USB socket on the front of your DMR. In the Main Menu select the Pictures line and press ok to confirm. 1.
DTH7000-EN 23/08/02 10:24 Page 40 TV Function Your DMR in TV mode To take full advantage of the TV functions and TV program recording features, your DMR must be used as if it were at the centre of your TV setup. The connection shown on page 8 will allow you to do this. Consider your DMR as a television set without a screen and your TV set as a screen only. The channels will therefore have to be selected from the DMR and its remote control.
DTH7000-EN 23/08/02 10:24 Page 41 TV Function Your DMR has the same recording functions as a VCR. Only the recording medium is different (a hard disc instead of a video cassette). The capacity of your hard disc depends on the quality you set for your recordings. Refer to page 45. Replaying what you missed When you watch a TV program in real time, you can at any time go back a few minutes to replay a scene.
DTH7000-EN 23/08/02 10:24 Page 42 Recording functions Programming a TV recording Like a VCR, your DMR allows you to program recordings. You can do this through either of your DMR’s two programming systems: the programmer or the NAVICLICK TV guide. Recording with the programmer In the Main Menu, select the Recording, menu and press ok to access the Timer menu. Select the New line and press ok to validate. ð The programming menu appears. Your DMR has a programming monitoring system.
DTH7000-EN 23/08/02 10:24 Page 43 Recording functions TV guide (NAVICLICK) The Naviclick function allows the storage of the TV guide broadcast by certain channels. This guide is updated every 24 hours through Teletext (electronic text information) or NexTView. NAVICLICK provides on-screen display of the TV guide of the channels that broadcast them and allows you to choose the programs you want to record just by clicking on them. Consulting the TV guide with NAVICLICK 1.
DTH7000-EN 23/08/02 10:24 Page 44 Playing the recordings VIDEO menu This menu gives you access to all the recordings you made from TV channels or devices connected to your DMR’s front or rear AV sockets. In the Main Menu, select the Video line and press ok to confirm. Time remaining on the hard disc for other recordings. The menu which appears displays the list of recordings (up to 6 titles) along with the name of the program (Pr1, Pr2, etc.), the time and day of the recording.
DTH7000-EN 23/08/02 10:24 Page 45 Playing the recordings Managing your recordings You can customise your recordings by giving a name to your video sequences, JPEG images and MP3 files saved on your DMR’s hard disc. Renaming the recordings From the Rename function in the Video, Pictures or Music, menus, press ok to access the character grid. With the Navigation keys: • Enter the name by selecting the letters one by one. Press ok to validate. • To erase a letter, press DEL. Press ok to validate.
DTH7000-EN 23/08/02 10:24 Page 46 Preferred languages Player function Your DMR gives you a selection of languages to choose from. You can change the language of the DMR menus, the language of the disc menus, the language of the dialogues and that of the subtitles. In the menu, choose your preferred language for dialogues and subtitles. If it is available on the DVD you will be playing, it will be selected automatically. The default language is the one which is selected in the main menu.
DTH7000-EN 23/08/02 10:24 Page 47 Player function Subtitles - Language of DVD subtitles Some discs offer a selection of subtitle languages. The default language is the one you selected during installation (k page 5) or the one you set according to the instructions on the previous page, provided this language is available on the disc being played.
DTH7000-EN 23/08/02 10:24 Page 48 Player function Child (lock) Your DMR has a child lock function which enables you to restrict access to certain DVDs. The discs whose content may be deemed unsuitable for your children will therefore not be visible unless a code that you have previously chosen is entered. In the Main Menu display the Setup menu. The Parental Control, line is already selected. Press ok to validate. • The padlock tells you whether or not the DMR is locked.
DTH7000-EN 23/08/02 10:24 Page 49 Player function Rating limits The Rating limits function enables you to control the type of discs that your children can watch. If certain discs contain information or scenes that exceed the rating limit you’ve set, they will not be played. There are 8 ratings ranging from 1 to 8. Level 1 is the least restrictive. In the Main Menu, then the Setup menu, select parental Control, and press ok to validate.
DTH7000-EN 23/08/02 10:24 Page 50 The OPTIONS menu Settings The Options menu in the Setup menu offers you settings to configure certain useful functions and optimise the performances of your DMR to match those of the devices connected to it. In the Main Menu, then the Setup menu, select the Options, line and press ok to validate.
DTH7000-EN 23/08/02 10:24 Page 51 Settings Black level Adjust the contrast (Light / Dark) according to the brightness of the room in which you are viewing your DMR images. Display panel brightness Depending on the brightness of the room where you’ve installed your DMR, select one of the 3 available settings (Automatic / Bright / Dim) to adapt the brightness of the display panel to suit its environment.
DTH7000-EN 23/08/02 10:24 Page 52 Universal remote control Appendix The remote control supplied with your DMR enables you to control other devices such as a TV set, a satellite receiver or a hifi system. To do this, you must program your remote control using one of the 3-digit codes given at the end of this manual. Programming the remote control 1. Look for the 3-digit code number(s) that correspond(s) to your device in the list of makes below (Circle the code(s) with a pencil, for instance). 2.
DTH7000-EN 23/08/02 10:24 Page 53 Appendix Controlling the other devices TV Satellite Receiver Set the switch to tv Hi-fi system or amplifier Set the switch to hifi/sat Standby / On To display the menu Horizontal and vertical scrolling through the menus and validation of an action - Exit the menus Direct access to the programmes or enter the numeric values To select a radio station using its number To change channels To change stations Select the AV input.
DTH7000-EN 23/08/02 10:24 Page 54 Recording functions settings Naviclick guide downloading time The programs are downloaded either at 3 AM or 8 AM. To choose the downloading time, follow the instructions below: 1. If the main menu is not displayed, press the menu key on the remote control. 2. With the navigation keys, select Setup then Installation followed by Naviclick. Each time, press ok to validate. 3. The line Update Time is already selected, press ok. 4. Choose 3:00 or 8:00 AM.
DTH7000-EN 23/08/02 10:24 Page 55 Channel identification Recording functions Here is the list of the main channels broadcasting TV guides. Names Abbreviations 3Sat . . . . . . . . . . . . . . . .3SAT Anglia TV . . . . . . . . . .ANGL ANIM . . . . . . . . . . . . .ANIM Antena3 . . . . . . . . . . . .ANT3 ARD . . . . . . . . . . . . . . .ARD Arte . . . . . . . . . . . . . . .ARTE ARTE . . . . . . . . . . . . . .ARTE BBC World . . . . . . . . .BBCW BBC1 . . . . . . . . . . . . . .BBC1 BBC2 . . . . . .
DTH7000-EN 23/08/02 10:24 Page 56 Troubleshooting guide • The image format is adjustable. Refer to pages 34 and 35. With certain discs, the format is preset and cannot be changed. Nothing works Your DMR doesn’t switch on. • Did you move the DMR ? Check the power plug: is it well plugged into the mains socket? Also check the power cable jack at the rear of the DMR; is it well pushed in.
DTH7000-EN 23/08/02 10:24 Page 57 If you have a problem - Video is only accessible once you have recorded a TV program or video sequence (from an external device). - Music is only accessible if you have copied an audio file in MP3 format. - Pictures is only accessible once you have copied an image in JPEG format. - Card is only accessible once you have connected a card reader to the front USB socket and inserted a card in it. Your DMR menu disappears.
DTH7000-EN 23/08/02 10:24 Page 58 Additional info CD-Rs and MP3 files - (Recommendations) (1) About CD-R discs This unit can play most CD-R discs. However, depending on the condition of the CD-recorder, computer and the disc used, you may find that not all discs will play successfully. When playing a CD-R disc, it is completely normal for the unit to take up to 20 seconds to recognize the disc before starting to play.
DTH7000-EN 23/08/02 10:24 Page 59 Additional info Remote control - Code A-B With certain devices (TV/DVD combos or other DVD players) the remote control of your DMR may control the DVD player of the other device. If such is the case, you can program the DMR’s remote control and the DMR on another code called code B (1) . • The Code A-B function is only available for the dvd position on the selector of the remote control.
DTH7000-EN 23/08/02 10:24 Page 60 Additional info Technical data Mains supply Consumed power Dimensions Weight Functioning conditions Playback system Audio signal to noise ratio (DVD) Wow and flutter Total harmonic distortion 220 to 240 V - 50/60 Hz 36 W when ON (approx.) < 3 W in the ECO MODE. 430 x 99 x 367 mm approx. 5,9 kg +5°C to + 35°C Surrounding humidity: 80 % maximum 2 Laser diodes - Wave length: 655 / 780 nm, Laser power CLASSE 2 110 dB (A wtd)* below measurable limits* less than 0.