
User Manual

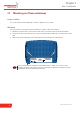


Table Of Contents
- About this Installation and Setup Guide
- 1 Introducing the Thomson Gateway
- 2 Basic Installation
- Before you begin
- ADSL service
- Computer requirements
- Wireless client adapters
- Internet connection details
- 2.1 Mounting your Thomson Gateway
- 2.2 Installing your Thomson Gateway
- 2.3 The Setup CD
- 2.4 Thomson Gateway Connection Essentials
- 2.5 Connections Overview and Powering
- 2.6 Basic Security
- 3 Web-Based User Interface
- 4 Troubleshooting

E-DOC-CTC-20060911-0041- v1.0
Chapter 2
Basic Installation
6
2.1 Mounting your Thomson Gateway
Setup possibilities
You can mount the Thomson Gateway on a wall or simply place it on a desk.
Wall mount
Proceed as follows to mount the Thomson Gateway on a wall or other vertical surface:
1 Drill two holes in the wall or other vertical surface where you want to place the Thomson Gateway.
2 Fasten two screws in the wall holes. The screws should protrude five millimetres from the surface of the
wall.
3 Attach your Thomson Gateway on the wall using the two mounting slots on the bottom.
i
If you install the Thomson Gateway onto plasterboard, use dowels to secure the screws.
Otherwise the strain of the cables connected to the Thomson Gateway rear panel connectors
could pull the Thomson Gateway from the wall.
MODEM ACCESS CODE: 0123456789
MAC: AAABCCCDDEEE
THOMSON TELECOM
*ACCESS CODE 0123456789*
*MACADDRESS AAABCCCDDEEE*
SSID:SoeedTouchVVVVVV
WEP (hex):1234ABCDEF
WPA PSK: 1234ABCDEF
TCM: 12345670
SpeedTouch ZZZ
DSLBSFFFFF RQQI
S/N:CPYYWWPPXXX (CC)
*DSLBSFFFFF RQQI*DSLBSFFFFF RQQI
*MACADDRESS AABCCCDDEEE*
RATED INPUT: 18V~
1000mA
!