
User's Manual
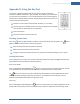
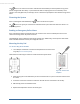
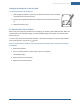

Table Of Contents
- Welcome to the TouchScreen
- Using the TouchScreen
- Managing Your System Security
- Understanding Arming Modes
- Understanding Your Protection Against Smash & Grab Attacks
- Arming and Disarming the System
- Sending an Emergency Alarm
- Testing Your Alarms
- Managing Connectivity Between the TouchScreen and the Central Monitoring Stat...
- Managing the Passcodes in your Security System
- Managing Connectivity between Your Home Devices and the Internet
- View Your Security Account Information
- Managing Sensors
- Managing Cameras
- Adding Cameras to the Security System
- Adding Key Fobs to the Security System
- Editing Key Fobs
- Managing Environmental Devices
- Managing Wi-Fi Repeaters
- Maintaining & Configuring the TouchScreen Device
- Appendix A: TouchScreen Installation and Maintenance
- Appendix B: Using the Key Pad
- Appendix C: Wi-Fi Repeater Placement
- Appendix D: Quick Reference Tables

Appendix B: Using the Key Pad
94
Changing the Batteries in the Key Pad
To replace the batteries in the key pad:
1. With a Phillips screwdriver, remove the screw from the battery cover in the back
of the key pad and remove the cover.
2. Find the two supplied CR2 3-volt lithium batteries and install them positive end
up.
3. Replace the battery cover.
To Reset the Key Pad to Default
When a key pad is originally removed from its packaging, it is already in factory default mode. When you
install the battery as described on page 94, it will immediately begin searching for a TouchScreen with
which it can pair.
To reset a key pad that has already been added to a TouchScreen and place it in Search mode, delete it
from the TouchScreen, then press the button.
In the rare event that you need to reset a key pad to factory default that is not paired to a nearby
TouchScreen:
1. Remove the batteries.
2. Press the 2 and 8 buttons and hold them as you insert a battery.
The LED lights green.
3. Release the buttons immediately.
4. Replace the rest of the batteries.