
User's Manual
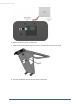
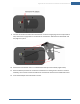
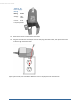
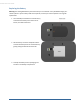

Table Of Contents
- Welcome to the TouchScreen
- Using the TouchScreen
- Managing Your System Security
- Understanding Arming Modes
- Understanding Your Protection Against Smash & Grab Attacks
- Arming and Disarming the System
- Sending an Emergency Alarm
- Testing Your Alarms
- Managing Connectivity Between the TouchScreen and the Central Monitoring Stat...
- Managing the Passcodes in your Security System
- Managing Connectivity between Your Home Devices and the Internet
- View Your Security Account Information
- Managing Sensors
- Managing Cameras
- Adding Cameras to the Security System
- Adding Key Fobs to the Security System
- Editing Key Fobs
- Managing Environmental Devices
- Managing Wi-Fi Repeaters
- Maintaining & Configuring the TouchScreen Device
- Appendix A: TouchScreen Installation and Maintenance
- Appendix B: Using the Key Pad
- Appendix C: Wi-Fi Repeater Placement
- Appendix D: Quick Reference Tables

Appendix A: TouchScreen Installation and Maintenance
83
9. Connect the stand to the back of the TouchScreen. Insert the longest peg into the Tamper Switch
hole, which is the top right hole on the back of the TouchScreen. Slide the stand downward until
the pegs lock in place.
10. Position the TouchScreen near an un-switched wall outlet (not controlled by a light switch).
11. If the installation plan does not involve the TouchScreen connecting to the customer’s network
wirelessly, then connect an Ethernet cable to the TouchScreen and the iControl-dedicated router.
12. Insert the AC adapter into the bracket as shown.