
User's Manual

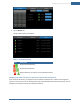

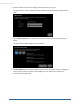
Table Of Contents
- Welcome to the TouchScreen
- Using the TouchScreen
- Managing Your System Security
- Understanding Arming Modes
- Understanding Your Protection Against Smash & Grab Attacks
- Arming and Disarming the System
- Sending an Emergency Alarm
- Testing Your Alarms
- Managing Connectivity Between the TouchScreen and the Central Monitoring Stat...
- Managing the Passcodes in your Security System
- Managing Connectivity between Your Home Devices and the Internet
- View Your Security Account Information
- Managing Sensors
- Managing Cameras
- Adding Cameras to the Security System
- Adding Key Fobs to the Security System
- Editing Key Fobs
- Managing Environmental Devices
- Managing Wi-Fi Repeaters
- Maintaining & Configuring the TouchScreen Device
- Appendix A: TouchScreen Installation and Maintenance
- Appendix B: Using the Key Pad
- Appendix C: Wi-Fi Repeater Placement
- Appendix D: Quick Reference Tables

Managing Your System Security
47
2. Tap the History tab.
The Zone Event History is displayed.
Table 6: Zone Activity Events
Icon Description
/
An Open/Closed doorway
/
An Open/Closed window
/
Motion detected / no motion since last detected motion
Changing the Order that Security Zones are Listed in the TouchScreen
If you have a lot of sensors, you might have to scroll down to see them all in screens that manage and
report on security zones such as the Arm System tab and the Dashboard tab of the Security app. You can
designate more important sensors to always be listed first.