
User's Manual

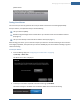
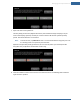


Table Of Contents
- Welcome to the TouchScreen
- Using the TouchScreen
- Managing Your System Security
- Understanding Arming Modes
- Understanding Your Protection Against Smash & Grab Attacks
- Arming and Disarming the System
- Sending an Emergency Alarm
- Testing Your Alarms
- Managing Connectivity Between the TouchScreen and the Central Monitoring Stat...
- Managing the Passcodes in your Security System
- Managing Connectivity between Your Home Devices and the Internet
- View Your Security Account Information
- Managing Sensors
- Managing Cameras
- Adding Cameras to the Security System
- Adding Key Fobs to the Security System
- Editing Key Fobs
- Managing Environmental Devices
- Managing Wi-Fi Repeaters
- Maintaining & Configuring the TouchScreen Device
- Appendix A: TouchScreen Installation and Maintenance
- Appendix B: Using the Key Pad
- Appendix C: Wi-Fi Repeater Placement
- Appendix D: Quick Reference Tables

Managing Your System Security
35
7. Open and close an Entry/Exit door.
The Entry Delay period starts (default 30 seconds). The TouchScreen begins beeping once per
second. The beeping speeds up to twice per second in the last 10 seconds of the Entry Delay
period. The motion detectors are turned on.
Note: To mute the siren, tap Mute Siren. This is not recommended. Ensuring that your siren
is in working order is an important part of the test.
After the end of the Entry Delay period ends, the siren sounds (unless you muted it) and the
Entry/Exit zone you faulted is marked with an alarm tag.
8. Fault each additional alarm and ensure that it is marked as alarm. The following table shows the
types of tests to perform.