
User's Manual

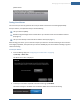
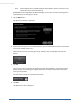
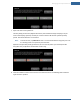


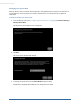
Table Of Contents
- Welcome to the TouchScreen
- Using the TouchScreen
- Managing Your System Security
- Understanding Arming Modes
- Understanding Your Protection Against Smash & Grab Attacks
- Arming and Disarming the System
- Sending an Emergency Alarm
- Testing Your Alarms
- Managing Connectivity Between the TouchScreen and the Central Monitoring Stat...
- Managing the Passcodes in your Security System
- Managing Connectivity between Your Home Devices and the Internet
- View Your Security Account Information
- Managing Sensors
- Managing Cameras
- Adding Cameras to the Security System
- Adding Key Fobs to the Security System
- Editing Key Fobs
- Managing Environmental Devices
- Managing Wi-Fi Repeaters
- Maintaining & Configuring the TouchScreen Device
- Appendix A: TouchScreen Installation and Maintenance
- Appendix B: Using the Key Pad
- Appendix C: Wi-Fi Repeater Placement
- Appendix D: Quick Reference Tables

34
Note: If the Enabled button is already displayed, tap Enabled to choose to have your test
alarms NOT sent to central monitoring.
IMPORTANT: If you enable Send Test Alarm Messages, contact your central monitoring station
and tell them you are testing your system.
3. Tap the Next button.
The Alarm Test Checklist is displayed.
4. Ensure all the security zones are unfaulted (that is, doors and windows are closed, motion detec-
tors are not showing motion, etc.).
When the security zones are ready for testing, “Ready to Arm” is displayed under the Arm
button.
5. Tap Arm.
Your security system is armed in the special Test mode. The Exit Delay is only 10 seconds long.
Motion sensors are turned off (not tripping alarms but recording events) until an Entry/Exit
security zone is faulted.
The Arm button changes to a System Armed notice.
6. Tap Next.
The Alarm Test screen is displayed.
TouchScreen User Guide