
User's Manual

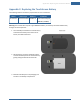
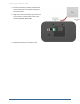
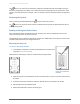
Table Of Contents
- Managing Sensors & Zones
- Maintaining Sensors
- Resetting Sensors to Factory Default
- Managing Cross-Zone Associations
- Managing Sirens
- Managing Cameras
- Managing Thermostats
- Managing Lights
- Managing Key Fobs
- Managing Key Pads
- Managing Panel Interfaces
- Managing Wi-Fi Repeaters
- Replacing a TouchScreen
- Replacing the Security Network Router
- Troubleshooting Router Swapping
- Appendix A: General Concepts of the Security System
- Appendix B: General Info for Sensor Placement
- Appendix C: Replacing the TouchScreen Battery
- Appendix D: Using the Key Pad
- Appendix E: Installer Quick Reference (SIA)

170
The button turns red for three seconds to indicate that the Exit Delay has started (twice as long as
the period configured for Arm Away—up to 120 seconds) with no beeping from the TouchScreen. If the
system is not ready because, for example, a door or window is opened, the button flashes orange seven
times.
Disarming the System
Enter a valid key pad code followed by the button to disarm the system.
The button turns green for three seconds to indicate that the system has been disarmed. There is
no Entry Delay period.
Sending an Emergency Police Alarm
Press and hold the shield and asterisk button for 2.5 seconds to send an audible panic alarm to the
central monitoring station for police assistance.
The LED flashes red to indicate that the alarm has been sent. Additionally, contact persons receive email
and SMS notifications if they are configured to do so.
Mounting the Key Pad
To mount a key pad to the wall:
1. Use a Phillips screwdriver to remove the faceplate from the front of the
key pad (Remove the faceplate).
Behind the circuit board, four holes are visible at the back of the device.
Figure 110: Remove the
faceplate
2. Place the key pad on the wall where you want it located and use a pen to mark the location of the
four holes.
3. Install four screws in the locations marked on the wall. Do not screw them in all the way.
4. Affix the key pad to the installed screws.
5. Replace the faceplate to the front of the key pad.
Home System Installation Guide