
User's Manual
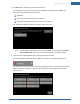
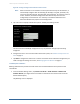
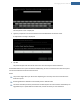

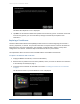
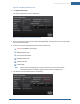
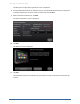
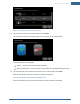
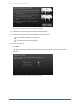
Table Of Contents
- Managing Sensors & Zones
- Maintaining Sensors
- Resetting Sensors to Factory Default
- Managing Cross-Zone Associations
- Managing Sirens
- Managing Cameras
- Managing Thermostats
- Managing Lights
- Managing Key Fobs
- Managing Key Pads
- Managing Panel Interfaces
- Managing Wi-Fi Repeaters
- Replacing a TouchScreen
- Replacing the Security Network Router
- Troubleshooting Router Swapping
- Appendix A: General Concepts of the Security System
- Appendix B: General Info for Sensor Placement
- Appendix C: Replacing the TouchScreen Battery
- Appendix D: Using the Key Pad
- Appendix E: Installer Quick Reference (SIA)

142
Figure 88: Settings: Configure Panel Interface Sensors Screen
Note: When zones that are connected to an alarm panel are found by the TouchScreen, it
automatically configures their functionality (for example, entry/exit, perimeter, etc.)
and sensor type (for example, door/window, motion detector, etc.) based on various
criteria. Section 6, Zone Auto-Configuration describes the way zones are auto-
configured by the TouchScreen. It is necessary to review the added sensors to
determine whether they require manual configuration.
5. Tap a Zone icon to display the Edit Sensor/Zone – Modify Zone Settings screen.
The items that are available for configuration may vary based on the type of sensor being
configured.
6. Configure the sensor. For more information about each option, see Table 2: Security Zone Func-
tions on page 33.
7. Tap Next to configure the next sensor. Continue until all the sensors have been configured. If you
need to change the settings of a sensor, see Managing Sensors & Zones on page 94.
To delete panel interfaces:
Deleting a PIM from the premises removes all the zones associated with the alarm panel from the
TouchScreen.
1. From the Installer Settings menu, tap Sensors and Zones > Panel Interface > Delete Panel
Interface Boards. (You might need to scroll down on the Sensors and Zones screen to see the
Panel Interface option.)
The following screen is displayed.
Home System Installation Guide