
User's Manual

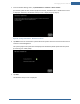
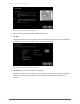
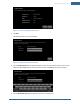
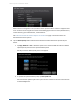
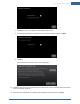
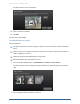
Table Of Contents
- Managing Sensors & Zones
- Maintaining Sensors
- Resetting Sensors to Factory Default
- Managing Cross-Zone Associations
- Managing Sirens
- Managing Cameras
- Managing Thermostats
- Managing Lights
- Managing Key Fobs
- Managing Key Pads
- Managing Panel Interfaces
- Managing Wi-Fi Repeaters
- Replacing a TouchScreen
- Replacing the Security Network Router
- Troubleshooting Router Swapping
- Appendix A: General Concepts of the Security System
- Appendix B: General Info for Sensor Placement
- Appendix C: Replacing the TouchScreen Battery
- Appendix D: Using the Key Pad
- Appendix E: Installer Quick Reference (SIA)

114
Figure 69: Camera: Hardware Setup Screen
4. Perform the steps described on the Hardware Setup screen.
5. Tap Next.
The Locating Camera screen is displayed. The system locates the camera that is connected to the
TouchScreen’s router with an Ethernet cable, and displays its details.
Figure 70: Camera: Locating Camera Screen
6. Tap Accept to pair the camera with the TouchScreen.
After the system finishes, the Configuring Camera field is marked “Done”. During the Configuring
Camera step, the system upgrades the camera firmware if needed. This can take up to 15
minutes.
Home System Installation Guide