
User's Manual

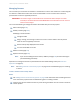
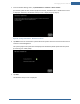
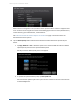
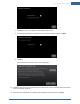
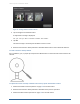
Table Of Contents
- Managing Sensors & Zones
- Maintaining Sensors
- Resetting Sensors to Factory Default
- Managing Cross-Zone Associations
- Managing Sirens
- Managing Cameras
- Managing Thermostats
- Managing Lights
- Managing Key Fobs
- Managing Key Pads
- Managing Panel Interfaces
- Managing Wi-Fi Repeaters
- Replacing a TouchScreen
- Replacing the Security Network Router
- Troubleshooting Router Swapping
- Appendix A: General Concepts of the Security System
- Appendix B: General Info for Sensor Placement
- Appendix C: Replacing the TouchScreen Battery
- Appendix D: Using the Key Pad
- Appendix E: Installer Quick Reference (SIA)

Managing Sensors & Zones
113
1. From the Installer Settings menu, tap Home Devices > Cameras > Add a Camera.
If a network speed test has not been performed recently, the Add Camera – Network Test screen
is displayed. Otherwise, the Hardware Setup screen is displayed (go to step 3).
Figure 68: Settings: Add Camera - Network Test Screen
2. Tap Next to have the TouchScreen upload a file to the system servers to measure the time until it
receives an acknowledgement.
The system performs the speed test and displays the calculated upload speed. Note this speed
for choosing your video quality.
3. Tap Next.
The Hardware Setup screen is displayed.