
User's Manual

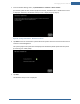
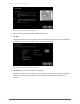
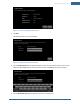
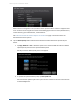
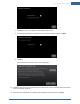
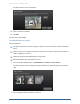
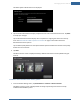
Table Of Contents
- Managing Sensors & Zones
- Maintaining Sensors
- Resetting Sensors to Factory Default
- Managing Cross-Zone Associations
- Managing Sirens
- Managing Cameras
- Managing Thermostats
- Managing Lights
- Managing Key Fobs
- Managing Key Pads
- Managing Panel Interfaces
- Managing Wi-Fi Repeaters
- Replacing a TouchScreen
- Replacing the Security Network Router
- Troubleshooting Router Swapping
- Appendix A: General Concepts of the Security System
- Appendix B: General Info for Sensor Placement
- Appendix C: Replacing the TouchScreen Battery
- Appendix D: Using the Key Pad
- Appendix E: Installer Quick Reference (SIA)

112
Managing Cameras
You can have up to six cameras connected to a TouchScreen at a time. Each camera has a name assigned
to it when it is added. Each camera also can be associated with a sensor so that it takes a series of
pictures when an alarm is tripped by the sensor.
IMPORTANT: The camera images are accessible to the TouchScreen device and (for one of the
cameras) to the Subscriber Portal. NOTHING ELSE. Service Provider tools do not have
access to these images.
You can do the following to manage the cameras associated with your security system:
Add a camera (page 112)
Modify a camera (page 118)
Modifying a camera includes:
Change the label
Assign, reassign, and unassign a camera to a sensor so that it takes a series of pictures
when an alarm is tripped by the sensor
Set the video quality displayed for the camera
Turn the camera LED on and off
Delete a camera (page 119)
Replace a camera (page 120)
Note: If you are reinstalling the same camera, delete it (see page 119) and then add it again
(see the following procedure).
Operations to manage the camera are performed from the Installer Settings menu (see Technician
Operations on page 80).
Note: See Adding Cameras to the Security System on page 38 for troubleshooting tips on installing
a camera.
To add a camera to the security device:
Notes:
See "Adding Cameras to the Security System" on page 38 for information about installing the iCam-
era to the security system and for troubleshooting tips on installing a camera.
Cameras must be connected to the security router during installation. Do not connect a camera to
a Wi-Fi repeater.
Home System Installation Guide