
User's Manual
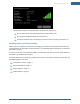
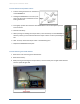
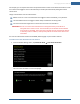
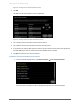
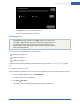
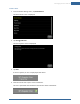
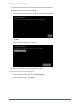
Table Of Contents
- Managing Sensors & Zones
- Maintaining Sensors
- Resetting Sensors to Factory Default
- Managing Cross-Zone Associations
- Managing Sirens
- Managing Cameras
- Managing Thermostats
- Managing Lights
- Managing Key Fobs
- Managing Key Pads
- Managing Panel Interfaces
- Managing Wi-Fi Repeaters
- Replacing a TouchScreen
- Replacing the Security Network Router
- Troubleshooting Router Swapping
- Appendix A: General Concepts of the Security System
- Appendix B: General Info for Sensor Placement
- Appendix C: Replacing the TouchScreen Battery
- Appendix D: Using the Key Pad
- Appendix E: Installer Quick Reference (SIA)

106
Figure 66: Settings: Cross Zone Associations Screen
2. Tap Add.
The Add Cross-Zone Associations screen is displayed.
Figure 67: Settings:Add Cross-Zone Associations screen
3. Tap a sensor/security zone listed in the First Zone column.
4. Tap a different sensor/security listed in the Second Zone column.
5. In the Cross Zone Timeout field, tap the arrows to set the number of seconds that the system will
wait after ONE of the sensors is faulted to see if the OTHER sensor is faulted.
6. Tap Save to create the cross-zone association.
To delete a cross-zone association for two sensors:
1.
From the Installer Settings menu, tap Sensors & Zones ® Cross Zone Association.
The Cross Zone Associations screen is displayed listing each cross-zone association.
Home System Installation Guide