
User's Guide

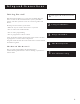

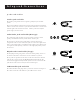


Table Of Contents
- First Things First 3
- First Things First
- What is the DSS® System?
- What’s in the Box
- Using This Manual
- The Point and Select Method
- Connecting Your DSS® Receiver to Your TV
- Things to Know Before Connecting Components
- Jacks and Cables
- Ordering DSS® Programming
- Program Guides
- Anatomy of a Program Guide
- Anatomy of The Channel Banner
- Using the GUIDE Button
- Getting Around in the Guides
- Tuning to a Program
- The Other Program Guides
- Sorting the Guides
- The Menu System
- Using the Menu System
- Exit and Help
- Menu Descriptions
- The Program Guide
- Anatomy of a Program Guide
- _
- The Mailbox
- How to tell when you have mail
- Checking your mail
- Pay-Per-View Programs
- Purchasing and Previewing
- Tuning to a PPV Program
- Using the Program Guide for PPV Programs
- Using the Attractions Guide
- Using the Purchases Menu
- Reviewing and Canceling an Upcoming Purchase
- Spending Limits
- Timers Feature
- Profiles
- Creating a profile Channel List
- Setup and Connections
- Step 1: Unpack the DSS® System
- Step 2: Connect Your Receiver to Your TV and Other Devices
- Things to Know Before Connecting Components
- Jacks and Cables
- Back of the Receiver
- Basic Connection
- Advanced Connection
- Step 3: Connect the VCR Controller
- Locating the VCR’s Infrared Remote Control Sensor
- Selecting a VCR Type
- Step 4: Find the Video Input Channel on Your TV
- Step 5: Interactive Setup
- Step 6: Place Batteries in the Remote Control
- STEP 7: Plug in and Turn on the System
- Step 8: Order DSS® Programming
- Using the Remote
- Remote Control Buttons
- The Point and Select Method
- Programming the Remote Control
- TV Codes
- Cable Box Codes
- Program Guides
- Bringing Up the Program Guides
- Anatomy of a Program Guide
- The Channel Banner
- Using the GUIDE Button
- Getting Around in the Guides
- Tuning to a Program
- Additional Program Guides
- Sorting the Guides

Setup and Connections
6
Back of the Receiver
The diagram below describes each of the back panel jacks found on your
receiver. When connecting A/V cables, be sure to connect corresponding
OUTPUTS and INPUTS (Video to Video, Right Audio to Right Audio, etc.).
SATELLITE IN
OUT
TO
TV
RF REMOTE
S-VIDEO
VIDEO
R
L
AUDIO
HOME CONTROL
VCR CONTROL
IN
FROM
ANT
PHONE JACK
PHONE JACK Use to
connect the receiver
to a phone line. The
DSS
®
system requires
a phone line
connection to
periodically call out
to program
providers.
RF REMOTE Use to
connect an optional
RF antenna for RF
remote signals.
Connecting an
antenna extends the
remote’s range.
VCR CONTROL
Allows the receiver
to control your VCR.
LOW SPEED DATA
PORT This port allows
you to connect the DSS
®
system to accessories,
such as the Home
Control base module.
S-VIDEO Provides the
best picture quality. If
your TV has S-VIDEO
capability, use this jack
along with the audio/
video jacks to connect
the receiver to your TV.
SATELLITE IN
Use to connect
the receiver to
the satellite
dish antenna.
VIDEO Provides better picture
quality than the OUT TO TV jack. If
your TV has audio/video capability,
use this jack to connect the receiver
to your TV. You must also connect
the AUDIO jacks.
AUDIO (R and L) Provide
better sound quality than
the OUT TO TV jack. If your
TV has audio/video
capability, use these jacks
to connect the receiver to
your TV. You must also
connect the VIDEO jack.
IN FROM ANT Use to
connect the DSS
®
system to an off-air
antenna or cable TV
signal.
OUT TO TV Use to
connect the receiver
to your TV. However,
if your TV has audio/
video jacks, you
should use those
jacks to get better
picture and sound
quality.