
User's Guide

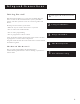

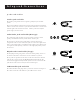

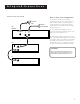

Table Of Contents
- First Things First 3
- First Things First
- What is the DSS® System?
- What’s in the Box
- Using This Manual
- The Point and Select Method
- Connecting Your DSS® Receiver to Your TV
- Things to Know Before Connecting Components
- Jacks and Cables
- Ordering DSS® Programming
- Program Guides
- Anatomy of a Program Guide
- Anatomy of The Channel Banner
- Using the GUIDE Button
- Getting Around in the Guides
- Tuning to a Program
- The Other Program Guides
- Sorting the Guides
- The Menu System
- Using the Menu System
- Exit and Help
- Menu Descriptions
- The Program Guide
- Anatomy of a Program Guide
- _
- The Mailbox
- How to tell when you have mail
- Checking your mail
- Pay-Per-View Programs
- Purchasing and Previewing
- Tuning to a PPV Program
- Using the Program Guide for PPV Programs
- Using the Attractions Guide
- Using the Purchases Menu
- Reviewing and Canceling an Upcoming Purchase
- Spending Limits
- Timers Feature
- Profiles
- Creating a profile Channel List
- Setup and Connections
- Step 1: Unpack the DSS® System
- Step 2: Connect Your Receiver to Your TV and Other Devices
- Things to Know Before Connecting Components
- Jacks and Cables
- Back of the Receiver
- Basic Connection
- Advanced Connection
- Step 3: Connect the VCR Controller
- Locating the VCR’s Infrared Remote Control Sensor
- Selecting a VCR Type
- Step 4: Find the Video Input Channel on Your TV
- Step 5: Interactive Setup
- Step 6: Place Batteries in the Remote Control
- STEP 7: Plug in and Turn on the System
- Step 8: Order DSS® Programming
- Using the Remote
- Remote Control Buttons
- The Point and Select Method
- Programming the Remote Control
- TV Codes
- Cable Box Codes
- Program Guides
- Bringing Up the Program Guides
- Anatomy of a Program Guide
- The Channel Banner
- Using the GUIDE Button
- Getting Around in the Guides
- Tuning to a Program
- Additional Program Guides
- Sorting the Guides

Setup and Connections
4
Step 1: Unpack the DSS
®
System
Make sure to locate the remote control and the VCR controller.
Step 2: Connect Your Receiver to
Your TV and Other Devices
During the satellite dish antenna installation, the receiver may have
been connected to your TV with just a coaxial cable for the system test.
Depending on what components you have, another connection may
provide better picture and audio quality. The following sections provide
cable and connection information to help you decide what connection is
best for you.
Things to Know Before Connecting
Components
Protect Your Components from Power Surges
• Connect all components before plugging any power cords into the
wall outlet.
• Always turn off the receiver, TV and other components before you
connect or disconnect any cables.
Position Cables Correctly to Avoid Audio Hum or
Interference
• Insert all cable plugs firmly into their jacks.
• Place the audio/video cables to the sides of the TV’s back panel
instead of straight down the middle after you connect your
components.
• Try not to coil any twin-lead cables and keep them away from the
audio/video cables as much as possible.
• Make sure all antennas and cables are properly grounded. Refer to
the Safety Tips sheet packed with your unit.
Protect Your Components from Overheating
• Do not block ventilation holes in any of the components. Arrange
the components so that air can circulate freely.
• Do not stack components.
• Allow adequate ventilation when placing your components in a
stand.
• Place an amplifier or receiver on the top shelf of the stand so
heated air rising from it will not flow around other components.
Receiver
Remote Control
VCR Controller