
User's Guide


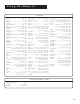


Table Of Contents
- First Things First 3
- First Things First
- What is the DSS® System?
- What’s in the Box
- Using This Manual
- The Point and Select Method
- Connecting Your DSS® Receiver to Your TV
- Things to Know Before Connecting Components
- Jacks and Cables
- Ordering DSS® Programming
- Program Guides
- Anatomy of a Program Guide
- Anatomy of The Channel Banner
- Using the GUIDE Button
- Getting Around in the Guides
- Tuning to a Program
- The Other Program Guides
- Sorting the Guides
- The Menu System
- Using the Menu System
- Exit and Help
- Menu Descriptions
- The Program Guide
- Anatomy of a Program Guide
- _
- The Mailbox
- How to tell when you have mail
- Checking your mail
- Pay-Per-View Programs
- Purchasing and Previewing
- Tuning to a PPV Program
- Using the Program Guide for PPV Programs
- Using the Attractions Guide
- Using the Purchases Menu
- Reviewing and Canceling an Upcoming Purchase
- Spending Limits
- Timers Feature
- Profiles
- Creating a profile Channel List
- Setup and Connections
- Step 1: Unpack the DSS® System
- Step 2: Connect Your Receiver to Your TV and Other Devices
- Things to Know Before Connecting Components
- Jacks and Cables
- Back of the Receiver
- Basic Connection
- Advanced Connection
- Step 3: Connect the VCR Controller
- Locating the VCR’s Infrared Remote Control Sensor
- Selecting a VCR Type
- Step 4: Find the Video Input Channel on Your TV
- Step 5: Interactive Setup
- Step 6: Place Batteries in the Remote Control
- STEP 7: Plug in and Turn on the System
- Step 8: Order DSS® Programming
- Using the Remote
- Remote Control Buttons
- The Point and Select Method
- Programming the Remote Control
- TV Codes
- Cable Box Codes
- Program Guides
- Bringing Up the Program Guides
- Anatomy of a Program Guide
- The Channel Banner
- Using the GUIDE Button
- Getting Around in the Guides
- Tuning to a Program
- Additional Program Guides
- Sorting the Guides

Program Guides
27
The Channel Banner
The channel banner appears whenever you tune to a channel, exit a
guide, or press INFO on the remote. Use the arrow buttons and OK to
choose an item.
On-screen icons represent frequently-used menu items. Some icons also
change appearance to show the item’s status. Some of the items you
select in the guides can also be selected in the channel banner.
Main Menu icon When selected, will take you to the Main Menu.
Green Unlock icon The system is unlocked. Spending, viewing and
other limits can be accessed and changed.
Yellow Unlock icon A password has been entered to override family
or profile limits. No limits can be accessed or changed.
Yellow Unlock icon with a P A password has been entered to
override limits for the current program. After the program ends, limits
are restored.
Red Lock icon No limits can be accessed or changed. A password is
required to override limits or access the system.
AlphaSort icon When selected, allows you to sort program titles
alphabetically.
Highlighted Scout (binoculars) icon A Scout has found program
information.
Highlighted Mail icon Indicates a message in your mailbox.
Home Control or Data Port icons The icon changes appearence
depending on how the Home Control jack on the back panel is used.
Alternate Audio icon When selected, cycles through the alternate
audio choices.
“Family” is one of five
selectable Profiles
Program titles
and information
Takes you to
the Main menu
Locks and unlocks
the system
Use Home Control
or Data Port
Read mail from
program providers
Searches guide for
specific information
Sorts the guide
alphabetically by title
Cycles through the
Alternate Audio choices