
User's Guide
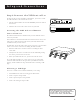

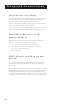


Table Of Contents
- First Things First 3
- First Things First
- What is the DSS® System?
- What’s in the Box
- Using This Manual
- The Point and Select Method
- Connecting Your DSS® Receiver to Your TV
- Things to Know Before Connecting Components
- Jacks and Cables
- Ordering DSS® Programming
- Program Guides
- Anatomy of a Program Guide
- Anatomy of The Channel Banner
- Using the GUIDE Button
- Getting Around in the Guides
- Tuning to a Program
- The Other Program Guides
- Sorting the Guides
- The Menu System
- Using the Menu System
- Exit and Help
- Menu Descriptions
- The Program Guide
- Anatomy of a Program Guide
- _
- The Mailbox
- How to tell when you have mail
- Checking your mail
- Pay-Per-View Programs
- Purchasing and Previewing
- Tuning to a PPV Program
- Using the Program Guide for PPV Programs
- Using the Attractions Guide
- Using the Purchases Menu
- Reviewing and Canceling an Upcoming Purchase
- Spending Limits
- Timers Feature
- Profiles
- Creating a profile Channel List
- Setup and Connections
- Step 1: Unpack the DSS® System
- Step 2: Connect Your Receiver to Your TV and Other Devices
- Things to Know Before Connecting Components
- Jacks and Cables
- Back of the Receiver
- Basic Connection
- Advanced Connection
- Step 3: Connect the VCR Controller
- Locating the VCR’s Infrared Remote Control Sensor
- Selecting a VCR Type
- Step 4: Find the Video Input Channel on Your TV
- Step 5: Interactive Setup
- Step 6: Place Batteries in the Remote Control
- STEP 7: Plug in and Turn on the System
- Step 8: Order DSS® Programming
- Using the Remote
- Remote Control Buttons
- The Point and Select Method
- Programming the Remote Control
- TV Codes
- Cable Box Codes
- Program Guides
- Bringing Up the Program Guides
- Anatomy of a Program Guide
- The Channel Banner
- Using the GUIDE Button
- Getting Around in the Guides
- Tuning to a Program
- Additional Program Guides
- Sorting the Guides

Setup and Connections
11
Step 4: Find the Video Input
Channel on Your TV
• Note: You do not have to complete this step if you used the
basic connection.
If you used the advanced connection, you must tune your TV to the
Video Input Channel to see the DSS
®
screens. Since there are so
many brands and models of TVs, there are just as many ways to
access a TV’s Line Input Channel. Below are some things you can try.
• If your TV brand is RCA, GE, or ProScan, press VCR on the
remote that came with your receiver. Then press the
WHO•INPUT button on the remote.
• If your TV brand is not RCA, GE, or ProScan, consult your TV
Owner’s Manual.
If you cannot find your TV Owner’s Manual, you will have to
investigate. You might access the TV’s Video Input Channel by:
• pressing a button on the remote
• finding it through the TV’s menu system
• tuning directly to it by pressing a specific channel number
• going through all channels in the list by pressing the channel up
or down buttons on the TV
Below are lists of some of the different ways manufacturers label
the Video Input Channel.
Video Channel Variations
Button/switch
on the TV
VIDEO
SIGNAL
VID 1
VID 2
S-VID
S-VIDEO
Button on the
TV Remote
VID 1
LINE
VID
VIDEO
S-VID
INPUT
SOURCE
AUX
Channel #
00
90
91
92
VID 1
VID 2
Signal Flow
The whole idea of choosing a Line Input
Channel or Video Input Channel can be
explained by Signal Flow (the way the
signal flows through your components
and ends up as a picture on your TV
screen).
To learn more about how signal flow
works, see the example in the
Troubleshooting section.