P.1 ASSEMBLY INSTRUCTIONS MODEL RTA-BC19 Thanks for purchasing one of our products. Please read carefully the assembly instructions before the installation. Please save this manual for future reference. P.
RTA-BC19 P.2 P.
P.3 RTA-BC19 P.3 ⚠ ATTENTION: PLEASE READ THESE TIPS AND WARNINGS BEFORE YOU START THE ASSEMBLY. ☛ Do a quick inventory to make sure the product contains all the parts and hardware. ☛ Missing, damaged and defective parts can be replaced at no cost to you. Please refer to the CONTACT and the WARRANTY cards included with the product. ☛ If during assembly you find an issue or need clarification, please contact our Customer Service for assistance. Please refer to the CONTACT card included with the product.
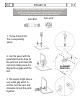
RTA-BC19 P.4 P.4 HOW TO ASSEMBLE PARTS USING CAM BOLTS AND CAM LOCKS. ☛ This is not an assembly step; it is a guide for when you are actually doing the assembly using this kind of hardware. Cam Bolt Cam Lock 1. Screw the bolt into the corresponding panel. 2. Join the panel with the panel that has the hole for the cam lock and insert the cam lock making sure it is aligned to engage with the bolt. 3.
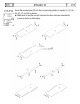
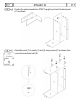
P.5 RTA-BC19 P.5 Insert the wooden pins (D) into the corresponding holes on panels (1), (2), (4), (5), (6), (7) and (8) as shown. ☛ Make sure to use the correct holes as the other holes are intended for screws or bolts on other steps.
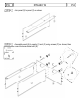
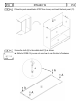
P.6 RTA-BC19 Join panel (5) to panel (1) as shown. Assemble panel (8) to panels (1) and (2) using screws (C) as shown, then cover the screw holes with (G). P.
P.7 RTA-BC19 Position the parts assembled in STEP 3 upright, and insert the back panel (11) as shown. Assemble panel (7) to panels (1) and (2) using screws (C) as shown, then cover the screw holes with (G). P.
P.8 RTA-BC19 P.8 Place the parts assembled in STEP 5 as shown, and insert the back panel (11). Screw the bolts (A) to the middle shelf (3) as shown. ☛ Refer to PAGE 4 if you are not sure how to use this kind of hardware.
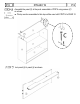
P.9 RTA-BC19 P.9 Assemble the panel (3) to the parts assembled in STEP 6 using screws (C) as shown. ☛ The top section assembled in this step will be used until STEP 14 in PAGE 12. Join panel (6) to panel (4) as shown.
P.10 RTA-BC19 P.10 Assemble the panel (10) to panels (2) and (4) using screws (C) as shown, then cover the screw holes with (G). Place the parts assembled in STEP 10 as shown and insert the panels (11).
P.11 RTA-BC19 P.11 Assemble the panel (9) to panels (2) and (4) using screws (C) as shown, then cover the screw holes with (G). Place the parts assembled in STEP 12 as shown and insert the panel (11).
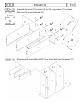
RTA-BC19 P.12 P.12 1ST: Join the 2 sections that were assembled in steps 8 and 13 as shown. 2ND: Align and insert the cam locks (B) into panels (9) and (10), then turn them to lock the 2 sections together as explained in PAGE 4. 3RD: Cover the cam lock holes with (G). 4TH: Attach the nail studs (F) at the bottom of panels (9) and (10) as shown. ☛ KEEP THE UNIT LAYING DOWN ON THE FLOOR FOR THE NEXT STEP.
P.13 RTA-BC19 P.13 Attach the wall brackets ( I) to the top panel (1) using screws (H) as shown. With the help of at least ONE MORE PERSON, carefully lift the unit upright and bring it close to the wall where it will stand.
P.14 RTA-BC19 P.14 ☛ DO NOT CLIMB ON THE UNIT’S SHELVES!!! Use a ladder if necessary. With a power driller (not provided) open the holes on the drywall that match the holes on the brackets. Then insert the wall anchors in the holes. Then place the unit against the wall and secure the brackets with screws (J).
P.15 RTA-BC19 P.15 TIP OVER WARNING ! Please keep your children and yourself safe. Tip-over accidents can result in serious INJURIES or even cause DEATH to small children. PREVENT TIP-OVER ACCIDENTS BY FOLLOWING THESE RECOMMENDATIONS: 1) Secure the unit by anchoring it to the wall. The anchoring device has been provided with the unit, and must be installed by following the instructions shown on PAGES 13 and 14 of this manual.
P.16 RTA-BC19 P.16 CARE, MAINTENANCE AND WARNINGS: ⚠ i ⚠ ⚠ i i Do not expose the surfaces to direct sunlight or to extreme environmental conditions. Damages caused by this kind of exposure is not covered by the product’s warranty. Clean the surfaces preferable with a soft cloth damped with a solution of mild soap and water, then dry with a clean towel. Do not use solvents or abrasive materials to clean any part of the unit. Do not allow children to play inside the unit, nor climb any of the shelves.