3 Prime, 3PrimeX and 3PrimeG OPERATOR’S MANUAL Version 1.
CONTENTS INTRODUCTION BEFORE USE Unpacking SAFETY INFORMATION English Français Deutsch Italiano Español CONTACT INFORMATION 3 PRIME SPECIFICATION INSTALLATION GENERAL SOFTWARE FEATURES Introduction Template programs Incremented/decremented time and temperature 3 Gradient ( PrimeG only) Oligonucleotide Tm calculator PROGRAMMING TEXT, TEMPERATURE AND TIME Text entry Temperature entry Time entry INSTRUMENT SETTINGS AND DEFAULTS User preferences Instrument settings Program defaults Service settings Gradient ca
FAQs TECHNICAL SUPPORT AND SERVICING ADDITIONAL INFORMATION User Maintenance Fault Finding Fuses Insulation Testing ACCESSORIES REPLACEMENT PARTS DECLARATION OF CONFORMITY 49 50 51 51 51 51 51 52 52 53 2
INTRODUCTION 3 The Prime range is a family of personal thermal cyclers designed to accurately control the temperatures of samples between 4ºC and 100°C. They have many scientific applications including 3 PCR, reverse transcription, ligation and sequencing. The basic Prime unit can accommodate 24 x 3 0.2ml tubes in a flexible 8 x 3 array or 15 x 0.5ml tubes. The PrimeX has either a 48 x 0.2ml or 30 x 3 0.
BEFORE USE 3 Before using the Prime please ensure you have read this manual carefully. If there is any doubt relating to the proper use of this equipment, the staff at Bibby Scientific Ltd. or your supplier will be happy to assist you.
SAFETY INFORMATION 3 Please read all the information in this manual before using the Prime. WARNING HIGH TEMPERATURES ARE DANGEROUS: they can cause serious burns to operators and ignite combustible material.
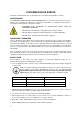
ENVIRONMENTAL CONDITIONS The • • • • • • • 3 Prime is designed operate under the following conditions: Indoor use Ambient temperature range +5ºC to +40ºC Altitude to 2000m Relative humidity not exceeding 80% Mains supply fluctuations not exceeding 10% Over voltage category II IEC 60364-4-443 Pollution degree 2 Note: The control specifications are quoted at an ambient temperature of 20ºC. The specification may deteriorate outside an ambient temperature of between 10ºC and 30ºC.
L'INFORMATION DE SÛRETÉ 3 Veuillez lire attentivement toutes les instructions de ce document avant d’utiliser le Prime. AVERTISSEMENT Les TEMPÉRATURES ÉLEVÉES SONT DANGEREUSES car elles peuvent provoquer de graves brûlures chez l’opérateur et enflammer les matériaux combustibles. Les utilisateurs doivent porter une attention toute particulière aux points suivants : • PROCEDER AVEC PRUDENCE ET PORTER DES GANTS POUR SE PROTEGER LES MAINS • NE PAS utiliser de matériaux combustibles auprès d’objets chauds.
Câble de rechange S’il s’avère nécessaire de remplacer le cordon d’alimentation, utiliser un câble de 1 mm² conforme à la norme H05VV-F relié à une prise IEC320. EN CAS DE DOUTE, CONSULTER UN ELECTRICIEN QUALIFIE.
SICHERHEITS- INFORMATIONEN 3 Lesen Sie diese Anleitung vor Verwendung des Prime bitte sorgfältig durch. ACHTUNG HOHE TEMPERATUREN STELLEN EINE GEFAHRENQUELLE DAR. Sie können schwere Brandverletzung verursachen und brennbare Stoffe entzünden.
Ersatzkabel 2 Bei einem eventuellen Austausch des Netzkabels wird ein Kabel vom Typ H05VV-F mit 1 mm Adernquerschnitt und Europastecker (IEC 320) benötigt. IM ZWEIFELSFALL EINEN ELEKTROFACHMANN HINZUZIEHEN.
INFORMAZIONI DI SICUREZZA 3 Leggere attentamente il presente manuale prima di usare il Prime. AVVERTENZA Le ALTE TEMPERATURE SONO PERICOLOSE in quanto possono provocare serie ustioni agli operatori e dare fuoco al materiale combustibile.
7. Accendere lo strumento per mezzo dell'interruttore situato sulla parte retro dell'unità. Cavo di ricambio 2 Qualora occorra sostituire il cavo di rete, si dovrà utilizzare un cavo di 1mm codice armonizzato H05VV-F collegato ad una spina IEC 320. IN CASO DI DUBBIO, RIVOLGERSI A UN ELETTRICISTA QUALIFICATO. CONDIZIONI AMBIENTALI 3 Il Prime è stato progettato per funzionare nelle seguenti condizioni: • uso interno • range di temperatura ambiente da +5ºC a +40ºC • altitudine massima 2000 m.
INFORMACIÓN DE SEGURIDAD 3 Lea atentamente este manual antes de utilizar el Prime. ADVERTENCIA LAS ALTAS TEMPERATURAS SON PELIGROSAS, ya que pueden ocasionar quemaduras graves a los operarios y prender el material combustible.
7. Encienda el instrumento usando el interruptor situado en la parte posterior de la unidad. Cable de repuesto 2 Si es necesario sustituir el cable de alimentación, se debe utilizar un cable de 1mm de código armonizado H05VV, conectado a un enchufe IEC320. EN CASO DE DUDA, PÓNGASE EN CONTACTO CON UN ELECTRICISTA.
CONTACT INFORMATION For technical, sales or servicing information, contact your local Techne dealer or: UK Bibby Scientific Ltd. Beacon Road Stone Staffordshire ST15 0SA UK Tel: +44 (0)1785 812121 Fax: +44 (0)1785 810405 E-mail: sales@bibby-scientific.com www.techne.com North and South America Bibby Scientific US Inc. t/a Techne Inc. 3 Terri Lane, Suite 10 Burlington, N.J. 08016 USA Toll Free (in NA): 800-225-9243 Tel: +1 609 589 2560 Fax: +1 609 589 2571 E-mail: labproducts@techneusa.com www.techneusa.
3 PRIME SPECIFICATION 3 Sample capacity: 0.2ml Sample capacity: 0.
INSTALLATION See also the Safety Information sections on pages 5 to 14. Front view 1. 2. 3. 4. Rear view 3 Lid adjustment knob ( PrimeX and G only). Lid release latch. 3.5” colour VGA LCD touch screen display. USB port for memory stick. 1. 2. 3. Installation 1. Place the unit on a suitable flat bench, ensuring that the air inlet vents on the sides are free from obstruction. 2. Plug the mains cable into the socket on the back of the instrument. 3.
3 6. 7. With the PrimeX and G, the heated lid has a rotating knob to adjust the lid pressure on the samples, allowing for a variety of consumables to be used. To adjust the pressure: a. Place the samples in the block and place the lid in the down position. b. Adjust the orange rotating knob anticlockwise to give the least pressure then close the lid fully. c. Gently rotate the knob clockwise until you can feel pressure beginning to be applied. d.
GENERAL SOFTWARE FEATURES INTRODUCTION 3 The Prime software allows the user to quickly and easily create thermal cycling programs using a simple and clear touch screen format. The software is structured into three modules which are accessed from the Home Screen. These allow the user to: • Run an existing program, selecting from templates or programs saved on the unit. • Create a new program. • Set the instrument and program defaults and preferences. Includes calculator tools.
INCREMENTED/DECREMENTED TIME AND TEMPERATURE The software allows the user to either increment or decrement the time and/or temperature of a step within a cycling stage. These features are used with applications such as touchdown PCR where the annealing temperature is gradually decreased during the cycling process and long PCR, where due to the size of the product, long annealing/extension times are required and the extension time is increased by 15 to 20s per cycle during the final stages of the reaction.
The Tm is defined as the temperature at which half the DNA strands are single stranded and half are double stranded when base paired to a complimentary strand. Using annealing temperatures that are well below the Tm of the primers can result in mismatching, false priming and may lead to primer-dimer artefacts. Annealing temperatures that are significantly higher than the primer Tm may result in reduced priming or prevent priming altogether.
PROGRAMMING TEXT, TEMPERATURE AND TIME This section gives instructions for the basic programming of text, temperature and time which are required in later sections. TEXT ENTRY When giving a name to a program or stage a text entry screen will be opened. • Touch a character/numerical button repeatedly to cycle through the characters. Touch and hold for numerals. • Touch shift for upper case characters. • Touch the 1/space bar button to enter spaces between characters.
Simple temperature entry • If necessary, first touch the button next to the parameter (e.g. Heated Lid) to turn it ON. • Next touch the Temp button. A screen similar to that shown opposite is opened. The maximum and minimum allowed values are indicated depending on the parameter being set. • Touch the white temperature area to open the temperature entry screen. • Enter the temperature using the numerical keys. The resolution is one decimal place. • Use the arrow key to delete the last character.
Advanced temperature entry • First ensure the number of cycles for the stage has been set then enter the required hold temperature as described above. Note: Increments and Decrements will be inactive unless the number of cycles set is greater than 1. To increase or decrease the step temperature per cycle: • Touch the step Temp button. This will open the temperature screen as shown opposite. • Touch Increments and Decrements. 3 The increment, decrement and gradient ( PrimeG only) screen will open.
The temperature value will now appear orange in the programming screen indicating that it contains a modified function. Note: It is not possible to both increase and decrease the temperature of the same step. 3 To enter a temperature gradient on a step ( PrimeG only): 3 On the PrimeG an additional Temperature Gradient button is available. • Touch the step Temp button to open the temperature screen. • Touch Increments and Decrements. The increment, decrement and gradient screen will open.
The temperature value will now appear orange in the programming screen indicating that it contains a modified function. Note: It is not possible to have both a gradient and an increment or decrement temperature in the same step. TIME ENTRY When touching a time parameter a time entry screen will open. There are two forms of time entry screen: • A simple form for adjusting the time of the program parameters such as initial denaturation and final extension.
• Enter the time using the up and down arrow keys (h, m, s). • Once the time is correct, touch OK to return to the previous screen. This screen will now display the set time. • Touch OK to return to the parameter screen. • Touch Cancel to return to the parameter screen if no changes are required. Advanced time entry • First ensure the number of cycles for the stage has been set then enter the required hold time as described above.
A new screen will open which is similar to the simple time entry screen. • Enter the required value (h, m, s) followed by OK. • If an entered time value is invalid, a prompt will indicate the acceptable range. • Touch Accept to return to the previous screen. • Touch OK to accept the modification and return to the program. • Touch Cancel to return to the programming screen if no changes are required.
INSTRUMENT SETTINGS AND DEFAULTS Touch the Settings button to access the instrument Settings menu. • Touch any of the buttons to view and edit the settings. • Touch More Settings to access further options. • Once all the settings and defaults have been set as required, touch Save to save the changes and return to the Home Screen. • If you do not wish to change any settings, touch Cancel to return to the Home Screen. USER PREFERENCES Language • Touch the language button to set the required language.
If Auto Resume is set to Always and the power is interrupted, on return of the power supply, a message will be displayed on the screen giving details of when the power was lost, when it was restored and the name of the program running at the time. • Touch OK to return to the Run Screen. Date and Time Settings Use these settings to set the current date, time and date format on the unit. • When set, touch Back to return to the Settings menu.
• Touch Back to return to the Instrument Settings main menu. • Touch More Settings for further Instrument Settings. Administrator Settings This allows an administrator to remove passwords from password-protected programs, change the Administrator password and restore the unit to its factory settings. • Touch None and enter the administrator password followed by Back. The default password is 1234. • Touch OK to enter the Administrator Settings menu.
Note: It is recommended that the administrator keeps a record of the new password. • Touch OK to return to the Administrator menu or Cancel to return without making any changes. Restore Factory Settings All changes to the instrument defaults and settings can be removed and the unit returned to its factory settings. • From the Administrator menu touch Restore Factory Settings. • Touch the None button and enter the administrator password followed by Back.
Pause This will cause the unit to pause before the program starts at the ambient temperature of the block (unless Sample Cooling has been set to On when the unit will pause with the block held at 4ºC). The program will not commence until the unit is manually un-paused. • Touch On/Off to toggle between settings. Initial Denaturation Use this to denature the sample and/or activate the enzyme before the thermal cycling program begins. • Touch On/Off to toggle between settings.
SERVICE SETTINGS The service settings are for the use of authorised service engineers only. A service engineer’s password is required to access these settings. GRADIENT CALCULATOR (3PRIMEG ONLY) The Gradient Calculator can be used to calculate the temperature for each column of the block for a user-specified temperature and gradient range. • Touch the Target Temperature button and enter the required temperature. • Touch OK.
• Touch the A C G T buttons to enter the primer sequence. • Touch the arrow to delete the last character. • Use the < and > keys to scroll through the sequence. • Touch Back to return to the previous screen followed by OK. • Enter the final primer concentration in the PCR mix. • Enter the final monovalent salt concentration of the PCR mix. • Touch Calculate to calculate the Tm of the primer.
CREATE A NEW PROGRAM From the Home Screen, touch the New Program button. This will open a screen where you can build a program by adding stages and steps and define the temperatures and hold times. INSERT/DELETE A STAGE A stage is a section of a program that consists of a number of individual steps that can be cycled (repeated) a defined number of times. Insert a new stage • To insert a stage in a program, touch Insert a new stage. A stage with one step will be inserted.
Ramp rate • Touch the ramp rate setting to adjust the ramp rate. The range is 0.1ºC/s (minimum) to 3.0ºC/s maximum for heating and 2.1ºC/s for cooling. The value can be entered to 1 decimal place. Ramp rate will affect the heating or cooling rate from the previous step to the current step. • Once set, touch OK to return to the Programming Screen. Delete a stage • To delete a stage, touch the stage area to highlight it and then touch Delete.
THE MORE BUTTON The More button can be used to access the Program Options and Instrument Settings defaults for editing in the current program. Program Options • Touch this to view the program defaults as set up in the Settings module. Use this also to name the program and add a password to protect it from editing by other users. Settings • Touch this button to view the instrument defaults as set up in the instrument Settings module. Save • Touch this to save the program.
Initial denaturation, Final Extension and Final Hold • Touch the time and temperature buttons to edit these if required. • Use the Down arrow to scroll to further options. Pause and Hot Start • Touch On/Off to toggle between settings. • Set the temperature for Hot Start if required. Password A password can be created to protect the program from being edited and deleted by other users. The password will be requested if a user attempts to edit or delete the program.
SETTINGS • Touch the Settings button to view the instrument defaults as set up in the instrument Settings module. Any of these parameters can be edited by touching the appropriate button and will be saved for the current program only. • Touch Back twice to return to the programming screen.
RUN A PROGRAM From the Home Screen, touch the Run button. This will open a screen where you can select a program to run, edit, copy or delete. • Touch a program to select it. Use the arrow buttons to scroll down the list of stored programs. Once a program is selected, a series of options are displayed across the bottom of the screen: • Touch Run to send the program to the unit and proceed to the pre-run screen. • Touch Edit to open the program and allow editing.
RUN 3 Touching the Run button sends the selected program to the Prime, ready to start the run. The Pre-run screen This screen shows a step-by step representation of the program in a tile format. The program name is given at the top of the screen followed by the stage name. The first step tile is highlighted and enlarged in the centre of the screen. • Touch the arrows to scroll forwards and backwards through the program, or drag a finger across the screen. The step tiles show the set incubation temperature.
• Touch Temperature log to view the block temperatures. The previous two minutes of temperature readings can be viewed by scrolling across the screen using a finger. Note: Touch Program View to return to the program status. EDIT Editing existing programs • First select the required program and touch Edit. Any of the Program Options, Settings or thermal cycling parameters can be edited. • Once all the required changes have been made, touch Save. Note: this will overwrite the existing program.
Editing password protected programs If the edited program is password protected, touching Save will open the message box shown opposite. To save the changes either: • Touch the None button next to Password and enter the correct password followed by Save. Note: this will overwrite the existing program. or • Touch the None button next to New Program Name and enter a new name for the edited program, followed by Save as a New Program.
To copy a program file to or from a USB memory stick: • Insert a USB memory stick into the port on the front of the unit. A message screen will appear confirming that the USB memory stick has been inserted. • Touch Yes to view the files on the USB memory stick or touch Cancel to view the files saved on the 3 Prime. • Select a file to copy by touching the appropriate file button to highlight it. • Touch Copy.
SEARCH Programs saved on the unit can be searched by program name. • Touch Search followed by the button on the Search screen. • Enter a search term using the Text Entry screen. The first few characters of the program name are sufficient. • Touch Back to return to the previous screen followed by Search. All programs containing the search term will be listed. • Touch Clear Search to remove the search term.
UPDATING THE 3PRIME SOFTWARE 3 The Prime software can be updated by downloading the latest version from the Techne website www.techne.com. You will need a USB memory stick on which to save the update. Note that the update tool requires at least Windows XP SP2 and the Microsoft .Net Framework 3.5 SP1, which, if needed, can be downloaded from: http://www.microsoft.com/downloads/details.
UPGRADING FROM 3PRIMEX TO 3PRIMEG 3 3 The PrimeX thermal cycler can be easily and quickly upgraded to the gradient PrimeG version by purchasing the 3PRIMEX/USB upgrade. The upgrade consists of a license certificate printed with a unique upgrade code which allows gradient functionality to be installed on any non-gradient Techne 3 PrimeX thermal cycler.
FAQS Q1 A1 How do I adjust the pressure of the heated lid for my tubes or plates? For thermal cyclers with lid adjustment knobs, rotate the knob anticlockwise until there is no pressure on the consumable, then close the lid and latch it. To obtain the correct pressure gently rotate the knob clockwise until it is possible to just feel the pressure being applied. Finally, rotate the knob a further quarter of a turn; the lid is now at the correct pressure for use with the consumable.
TECHNICAL SUPPORT AND SERVICING If you require further technical or application assistance please contact Techne at: E-mail: technehelp@bibby-scientific.com. Phone: +44 (0)1785 810433 Fax: +44 (0)1785 810405 For servicing information please contact: Service Department Bibby Scientific Ltd. Beacon Road Stone Staffordshire ST15 0SA E-mail: service@bibby-scientific.com. Phone: +44 (0)1785 810475 Fax: +44 (0)1785 810405 In the USA please contact service@techneusa.com or call +1 609 589 2560.
ADDITIONAL INFORMATION USER MAINTENANCE 3 Before cleaning your unit, disconnect it from the power supply. The outer case of the Prime may be cleaned with a cloth dipped in water or ethanol (hexane or 50% methanol can also be used). No part of the case or cover should be immersed in the solvents. Do not use aggressive solvents such as acetone or abrasive cleaners. The block may be wiped with water, ethanol or propan-2-ol and may be decontaminated by wiping with 2% Neutracon or 1% bleach solution.
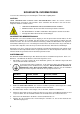
ACCESSORIES The following accessories can be obtained from Bibby Scientific Ltd. or your Techne distributor: Product code 3PRIMEX/USB Description 3 PrimeX gradient upgrade REPLACEMENT PARTS The following replacement parts can be obtained from Bibby Scientific Ltd. or your Techne distributor: Product code 3PRIMEBASE/02/B 3PRIMEBASE/05/B 3PRIMEX/02/B 3PRIMEX/05/B HH179(S) HH180(S) FCABLEUS Description 3 Prime block, 24 x 0.2ml 3 Prime block, 18 x 0.5ml 3 PrimeX block, 48 x 0.2ml 3 PrimeX block, 30 x 0.
53