Router-3G Mobile WiFi-N User Manual CONTENTS Introduction and Product Highlights………………………….. 2 Panel…………………………………………………………….. 3 Getting Started…………………………………………………. 4 Configuring via Web Browser…………………………………. 6 Setup the Router Mode…………………………………….. 8 LAN Settings………………………………………………… 9 Connect to Internet (3G Dialup)…………………………... 10 Connect to Internet (Gateway)……………………………. 11 WAN MAC Clone…………………………………………… 13 Dynamic DNS……………………………………………….. 14 Wireless Base Configuration……………………………….
Introduction The 3G Mobile WiFi-N Router is a combined wired/wireless network connection device designed specifically for small business, office, and home office networking requirements. It complies with the IEEE 802.11n (Draft 2.0) standard. It adopts MIMO as well as SST technologies. It also works well with other 11b/g and 11n protocol wireless products.
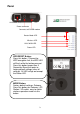
Panel LAN/WAN Port Power connector Connects to 3G USB modem Router Mode LED Wireless LED LAN / WAN LED Power LED WPS/RESET Button: Press this button 1 Second for WPS encryption link; the WPS LED will flash while the button pressed. Press this button longer than 5 Second for Reset the router to factory default settings (clear all settings). All LED will go out except the Power LED.
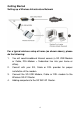
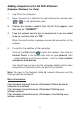
Getting Started Setting up a Wireless Infrastructure Network For a typical wireless setup at home (as shown above), please do the following: 1. You will need broadband Internet access (a 3G USB Modem or Cable, DSL-Modem + Subscriber line into your home or office). 2. Consult with your 3G, Cable or DSL provider for proper installation of the modem. 3. Connect the 3G USB Modem, Cable or DSL modem to the Wireless 3G-N1 Router Adding computers to the 3G WiFi-N1 Router. 4.
Adding computers to the 3G WiFi-N Router: (Example: Windows 7 or Vista) 1. Log ON to the computer. 2. Open Connect to a Network by right-clicking the network icon ( or ) in the notification area. 3. Choose the wireless network from the list that appears, and then click on “CONNECT”. 4. Type the network security key or passphrase if you are asked to do so, and then click on “OK”. When the confirmation message occures connection to the network. 5.
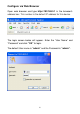
Configure via Web Browser Open web browser and type http://192.168.0.1 in the browser's address box. This number is the default IP address for this device. The login screen below will appear. Enter the “User Name” and “Password” and click “OK” to login. The default User name is “admin” and the Password is “admin”.
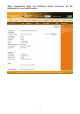
After successfully login, the following Router Summary will be displayed on your web browser: 7
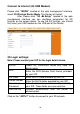
Setup the Router Mode Click on “MODE” located at the web management interface, the following message will be displayed on your web browser: 3G Wireless Router Mode Wireless and LAN port connect to local network; the 3G USB modem connect to internet. Wireless Router Mode (Gateway) Wireless connections to a local network, The LAN port connect to internet. Wireless AP Mode Wireless work for access point, LAN port connects to local network.
LAN Settings Click on “LAN Setup” located at the web management interface, the following message will be displayed on your web browser: IP Address: Subnet Mask: DHCP Type: Enter the IP address of your Router or reset it in dotted-decimal notation Wireless N Router (factory default: 192.168.0.1) An address code that determines the size of the network. Normally use 255.255.255.0 as the subnet mask.
Connect to Internet (3G USB Modem) Please click “MODE” located at the web management interface, select 3G Wireless Router Mode. The Router will restart. After Please click “3G Setup” located at the web management interface you can configure parameters for 3G function on the screen below. To use the 3G function, you should first insert your USB modem on the USB port of the Router. 3G Login settings: Note: Please contact your ISP for the login details below.
Connect to Internet (Gateway) Please click “MODE” located at the web management interface, select Wireless Router Mode (Gateway). The Router will reboot. After Please click “WAN Setup” located at the web management interface, following example is for “PPPoE (ADSL)” WAN setting. Note: Please contact your ISP for the login details below. Enter the “PPPoE Username” and “PPPoE Password” that ISP provided and leave the others.
If your ISP provides a static or fixed IP Address, Subnet Mask, Gateway and DNS setting, select “STATIC (fixed IP)”. Enter the IP address / Subnet Mask / Default Gateway / MTU / Primary / Secondary DNS in dotted-decimalnotation provided by your ISP. If your ISP provides the DHCP service, please choose “DHCP (Auto config)”, and the Router will automatically get IP parameters from your ISP.
WAN MAC Clone Click “WAN MAC-Clone” located at the web management interface, the following message will be displayed on your web browser: Some ISPs require that you register the MAC Address of your adapter, which is connected to your cable/DSL Modem during installation. If your ISP requires MAC register and you already have registered your MAC address, please follow the next step.
Dynamic DNS Click “WAN (3G) DDNS” located at the web management interface, the following message will be displayed on your web browser: The Router offers the DDNS (Dynamic Domain Name System) feature, which allows the hosting of a website, FTP server, or e-mail server with a fixed domain name (named by yourself) and a dynamic IP address, and then your friends can connect to your server by entering your domain name no matter what your IP address is.
Wireless Base Configuration Click on “Wireless Basic” located at the web management interface, the following message will be displayed on your web browser: You could configure the minimum number of Wireless settings for communication, such as Network Name (SSID) and Channel. The Access Point can be set simply with only the minimum setting items. Wireless Enabled Wireless On/Off 802.11 Mode Supports 1b/g mixed, 802.11b, 802.11g and 1b/g/n mixed modes. SSID Main Service Set Identifier.
Wireless Security Configuration Click on “Wireless Security” located at the web management interface, the following message will be displayed on your web browser: Setup the wireless security and encryption to prevent from unauthorized access and monitoring. Supports 64/128-bit WEP, WPA, WPA2 encryption methods. When finished, click on “APPLY”.
WPS: Enable / Disable WPS Mode PIN: If the new device supports Wi-Fi Protected Setup and the PIN method, you can add it to the network by PIN. WPS Mode PBC: If the wireless adapter supports Wi-Fi Protected Setup and the Push Button Configuration (PBC) Step 1: Press the WPS button on the Router. Step 2: Press and hold the WPS button of the adapter directly for 23 seconds. Step 3: Wait for a while until the next screen appears. Click Finish to complete the WPS configuration.
Settings Backup and Restore You can backup all Setting of this router to a file, so you can make several copied of router configuration for security reason.
Restore to Factory Default If you think the network performance is bad, or you found the behavior of the router is strange, you can perform a router reset; sometime it will solve the problem.
Technical Specifications IEEE 802.11n (Draft 2.0) IEEE 802.11g IEEE 802.11b 150/121.5/108/81/54/40.5/27/13.5Mbps, Wireless Signal 130/117/104/78/52/39/26/13Mbps, Rates for 11n 65/58.5/52/39/26/19.5/13/6.5Mbps 54/48/36/24/18/12/9/6M Wireless Signal Rates for 11g (dynamic) Standards Wireless signal rates for 11b 11/5.5/2/1M (dynamic) Frequency range 2.4 - 2.
Hints for Environment Protection Packages materials are raw materials and can be recycled. Separate the packages by types and put them to an adequate recycling on behalf of the environment. More detailed information you get from your official civil service. Do not disposal old devices into the domestic waste. Disposal old / defective devices professionally! The environment will be grateful for that. Information regarding places for disposal and opening hours you get from your official civil service.