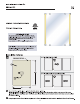
Installation Instructions for Mirror Kit 12 GENERAL PRODUCT INFORMATION: Suitable for damp locations. intertwine Install the Fixtures CARDBOARD TEMPLATE\ Dw.\ 3657 e e BB Ensure that the electrical box is located behind the mirror lactation For multiple mirror installations, an electrical box must be present behind the mirror which is the center of the group. -For multiple mirror installations with 00 ims/ft, two electrical boxes must be present behind each outer mirror to support the additional driver.
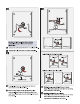
ED Place the fixtures on the marked location and mark the Sedation of the holes in the figure's mounting bracket. Note: Ensure that the brackets are located behind the mirror ED Ata bracket hole location, push the rancher inch the wail up to the threads BB screw the anchors in the rest of the way with a Phillips head screwdriver. I Repeat steps 4-5 for the other anchors. 03 FIXTURE: WIRE: TUCKED UNDER B Replace the fixtures and secure them by tightening the #8 screw it into the anchors.
EP connect the white driver wire to the neutral power ling. EP Connect the black driver wire fo the hot power line. D Properly place the driver, input wires, and wire nit connections into the electrical box. b Feed the fixture wires through the mounting plate center hole. Note: Ensure that the fixture wires from each figure remain separate and identifiable for power connections. SINGLE DRIVER & Tk ol SINGLE DRIVER] MIRROR Wit H 800 LT INSTALLATION.
MOUNTING PLATE 14 Properly place the wires and wire nut connections inside the electrical box. i 1f necessary, push any excess fixture wire into the electrical box through the mounting plate. i3 Attach the mounting plate to the electrical box using the two #8-32 screws provided. 8P ror 600 flimsy installations, repeat for the other electrical box.
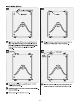
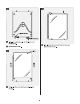
Install the Mirror e Her i i B Align the inner adj of the mirror bracket base to the edge of the mirror markings and mark the location of the holes in the mirror's mounting bracket base. Note: Ensure that the brackets are leveled and aligned vertically. B Replace the mirror bracket bases and secure them by tightening the #8 screw it into the anchors. m ANCHORS ED At a bracket hole location, push the anchor into the wail up to the threads.
ool /—anon BRACKET dj"ummk BRACKET = D install mirror bracts only into the lower mirror bracket bases. / P install the top mirror brackets into the bases and ED Tighten the set screws. tighten the set screws. E MIRROR 7 3 7 151 [ MD..M.