
Installation Instructions


3
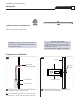
After installing the drywall, place the dressing plate on
the 2" electrical box. The dressing plate should cover the
plaster or open spaces around the 2" electrical box.
Replace the front cover.
Replace and tighten the four #6 screws on front cover
completely so that the spring tabs on the side of the 2"
electrical box push out against the drywall and secure
the box in place.
Skip to section 4.
FRONT COVER
DRESSING PLATE
DRY WALL
#6 SCREW
2E
2F
17
18
17
18
19
19
For Retrofit Installation
Mark a 1-13/16" square on the drywall where the 2"
electrical box is going to be located. The drawing above
can be used as a template.
Cut out the marked square with a sharp knife.
Loosen the two #4 screws on the back cover. Remove
the back cover.
Remove the two #6 screws on the "L" bracket. Remove
the "L" bracket.
#4 SCREW
BACK COVER
2" BOX
FLEXIBLE
CONDUIT
#6 SCREW
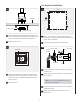
NOTE: The "L" bracket and adjustable bar are not
used for retrofit installations.
Remove the knockout from the back cover and mount
the flexible conduit.
Replace the back cover and #4 screws on the 2"
electrical box.
3A
1
2
3B
3
4
3
4
5
6
5
6
1-13/16”
ACTUAL SIZE
1-13/16"
1
2
20