
Installation Instructions


2
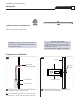
REAR HOLES
FOR 5/8"
DRYWALL
THICKNESS
For 1/2" drywall thickness mount the "L" bracket on the
2" electrical box by using the two front holes. For 5/8"
drywall thickness mount the "L" bracket to the 2"
electrical box by using the two rear holes.
FRONT HOLES
FOR 1/2"
DRYWALL
THICKNESS
"L" BRACKET
NUT
Remove the nut on the adjustable bar and place the "L"
bracket onto the nipple. Tighten the nut to secure the 2"
electrical box.
Loosen the flat head screw on the adjustable bar and
slide the 2" electrical box to the desired position. Tighten
the flat head screw to secure the 2" box in position.
Remove the four #6 screws on the front of the 2"
electrical box.
Remove the front cover.
Mark a 1-13/16" square on the drywall where the 2"
electrical box is going to be located.
Cut out the marked square with a sharp knife and install
the drywall.
ADJUSTABLE BAR
"L" BRACKET
2" ELECTRICAL
BOX
FLAT HEAD SCREW
#6 SCREW
FRONT COVER
2C
2D
10
10
11
12
13
14
15
16
11
12
13
14
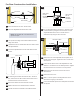
For New Construction Installation
Select the location for the 2" electrical box.
Place the adjustable bar between the studs.
ADJUSTABLE BAR
NOTE: The adjustable bar is for studs that are
spaced 16” apart.
Line up the front edge of the side brackets with front
edge of the studs.
Hammer the tabs on side brackets into the studs to hold
the adjustable bar.
Secure the adjustable bar into the studs with four #8
screws.
STUD
SIDE BRACKET
TAB
#8 SCREW
#8 SCREW
1
2A
2
2
3
4
5
3
4
5
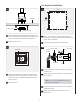
If mounting the conduit onto back of the 2" electrical
box, remove the two #4 screws from the back cover to
detach the back cover from the box.
Remove the knock out and mount the conduit.
Replace the back cover and #4 screws if removed.
Conduit can also be mounted on the side knockouts.
#4 SCREW
BACK COVER
2" BOX
CONDUIT
2B
6
7
8
9
6
7
8
9