
Installation Sheet

1.0
Installation Instructions for
Tellium LED
700FJTLM_LED
1
920FJTELLMD
H-LVEADS OW OLTAGE
CAUTION: To reduce the risk of a burn or electric
shock during accessory installation, disconnect the
power to the fixture.
1
GP I :ENERAL RODUCT NFORMATION
This product is ETL listed and suitable only for indoor dry
locations and approved for use at any height above the
finished floor.
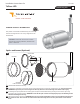
(OPTIONAL)
LENS ACCESSORY
2
3
4
OPTIC
LED HOUSING
1A
Unscrew and remove the .lens ring
If installing an optional lens remove the spacer ring and discard, then rest the lenses inside the lens ring. .(2 lenses maximum)
WARNING: Only use the spacer if not using lenses this may otherwise result in damage to the fixture and/or injury.
If installing the optic (replacement or existing) place the optic inside the LED housing ensuring it seats into the spacer ring
properly(as seen in the illustration). WARNING: ensure that the optic is seated and aligned properly to avoid damage to the
LED when installing the lens ring.
Gently screw the ring back on.lens WARNING:The lens ring must be tightened less than snug. Stop tightening the moment
any resistance is felt. The cover will not sit flush to the base when using lenses. Do not try to force the cover to become
flush.
Optics and Lenses (Optional)
LENS RING
SPACER RING
OR
3