
Installation Sheet


11
2
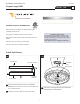
#8-32 SCREW
MOUNTING
PLATE
Properly place the driver and wire connections into the
electrical box.
Secure the mounting plate to the electrical box with 2
#8-32 screws, leaving the red driver wires accessible.
Ground the mounting plate to a suitable ground in
accordance with local electrical codes.
1D
6
7
7
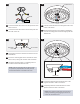
Connect the black driver wire to the hot power line wire
with a wire nut.
Connect the white driver wire to the neutral power line
wire with a wire nut.
1C
4
5
4
5
NOTE: Install the mounting plate so that the studs
are parallel or perpendicular to the walls, this will
ensure that the fixture is oriented to the room.
7
8
8
DRIVER
1E
Feed the red transformer wires through the hole in the
center of the fixture.
Mount the fixture base to the ceiling by reinstalling it
onto the mounting plate and secure it tightly with the
knurled nuts.
9
10
10
10
9
KNURLED NUT
1F
CONNECTOR
Completely install the blue transformer wire to the
negative terminal to make a connection.
Completely install the red transformer wire to the
positive terminal to make a connection.
11
NOTE: Ensure that the transformer wires have been
properly installed by gently tugging on the wire to
ensure the connection is firm.
12