
Installation Sheet

1
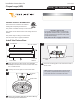
Install the Fixture Base
1A
1
2
#6-32 SET SCREWS
1/16 ALLEN
WRENCH
GLASS SHADE
FIXTURE BASE
While supporting the glass shade, loosen (Do Not
Remove) all the #6-32 set screws on fixture base with
the 1/16 Allen wrench.
Carefully remove the glass out of the fixture base.
1
2
1B
Remove the mounting plate from the fixture base by
unscrewing the two knurled nuts.
3
MOUNTING
PLATE
Installation Instructions for
Cirque Large ( )LED
920FMCIRQLGD
KNURLED NUT
CAUTION RISK OF FIRE-
This product must be installed in accordance with
the applicable installation code by a person familiar
with the construction and operation of the product
and the hazards involved.
Use minimum 90°c supply conductors.
GP I :ENERAL RODUCT NFORMATION
These fixtures are intended to be installed
utilizing compliant junction boxes.NEC
This product is suitable for damp or wet locations.
This product can be dimmed with a low-voltage electronic
dimmer.
This product may be ceiling or wall mounted.
This instruction shows a typical installation.
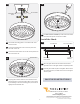
Secure the mounting plate to the electrical box with 2
#8-32 screws.
4
NOTE: Install the mounting plate so that the studs
are parallel or perpendicular to the walls, this will
ensure that the fixture is oriented to the room.
#8-32 SCREW
MOUNTING
PLATE
1C
4
4
1.9
700 _- 700 _-CQL LED, OWCQL LED