
Installation Instructions


InColor
™
Advanced Performance Grout Product Data
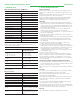
4. TECHNICAL DATA
ANSI 118.3 Chemical Resistance (ASTM C267)
InColor
TM
Advanced Performance Grout (575)
Chemical Name Typical Results
Acetic Acid, 3% Pass
Acetic Acid, 10% Pass
Ammonia Pass
Ammonium Chloride Pass
Citric Acid, 3% Pass
Citric Acid, 10% Pass
Lactic Acid Pass
Phosphoric Acid, 3% Pass
Phosphoric Acid, 10% Pass
Sulfamic Acid, 3% Pass
Sulfamic Acid, 10% Pass
Chlorine Water (Bleach) 5.25-6.5% Pass
Hydrochloric Acid, 3% Pass
Hydrochloric Acid, 10% Pass
Potassium Hydroxide, 3% Pass
Applicable Standard
Meets the listed performance characteristics for ANSI A118.6 and A118.3
Specifications for Ceramic Tile Grouts.
InColor
TM
Advanced Performance Grout (575)
Description
Typical Results
(ANSI A118.6 Modified**)
Compressive Strength
28 day cure
21 day cure, 7 day soak
28 day cure in grout joint
> 700 psi (4.83 MPa)
> 700 psi (4.83 MPa)
> 5000 psi (34.47 MPa)
Flexural Strength
28 day cure
> 400 psi (2.76 MPa)
Tensile Strength
28 day
> 300 psi (2.07 MPa)
Description Typical Results (ANSI A118.3)
Chemical Resistance (ASTM C267)
Pass
See Technical Data Chart on page 1 for list
of chemicals.
Greater than: > Greater than or equal to: ≥ Less than: < Less than or equal to: ≤
**Modified ANSI sample size.
Physical Properties
Description
Physical State Paste
Color Available in 17 standard colors
Light Foot Traffic [at 72°F (22°C)] 24 hours
Intermittent Water Exposure 3 days
Final Cure (full stain & water resistance) 7 days
VOC/Liter of Material 10 grams less water
Foot Traffic Rating (ASTM C627) Residential to heavy commercial
Storage
Store indoors in cool, dry location. Do
not store open containers. Freeze/thaw
stable to -10°F (-23°C).
Shelf Life
Maximum 18 months from date of
manufacture in properly stored, unopened
package.
5. INSTALLATION INSTRUCTIONS
Surface Preparation
Area must be clean, dry, free of dirt and dust. If you have a highly porous tile or
natural stone, pre sealing the tile is recommended. Grout joint should be free of
sealers.
If grouting in hot, dry conditions dampen the tile surface with a clean sponge. Do
not allow water to puddle on the tile or in the grout joints.
Isolate copper and brass surfaces that will come in contact with the grout by
applying a coat of TEC
®
Multipurpose Primer (undiluted). Allow to dry before
grouting. Do not coat any metal surfaces that are to remain exposed.
Application
1. Open the pail and stir to a smooth creamy consistency with a paint stick or
margin trowel. Be sure to re-blend in any liquid that may have separated to the
top of the container. Do not use an electric drill and mixing paddle. These can
entrain air into the grout. Air entrainment may decrease stain resistance and
increase the potential for cracking.
2. For best results, grout no more than 10 ft
2
(0.93 m
2
) at a time. In hot, dry
conditions it may be necessary to the reduce the size of this area.
3. Press grout diagonally into joints holding float at a 45-degree angle. Make sure
that joints are completely filled.
4. Remove all excess grout off tile by holding float at a 90-degree angle and
drawing diagonally across tile.
5. Immediately pat tile with damp sponge. Then, using a well wrung damp sponge,
clean tile and smooth joints in a circular motion. Rinse sponge frequently.
6. Turn sponge over to a clean side and draw diagonally across tiles to remove
any remaining film.
7. Do not wait longer than 15 minutes before starting clean-up. In hot, dry
conditions it may be necessary to decrease wait time.
8. If a light haze remains after cleaning, do not attempt to remove it with the
sponge. Instead, leave the haze on the surface and remove the next day with a
white scrub pad and common household glass cleaner. Haze will easily come
off of most tile surfaces. For large areas, a solution of 4 oz. (118 mL)
of ammonia mixed with one gallon (3.78 L) of clean water may be used in lieu
of household glass cleaner.
9. There is no need to seal InColor
TM
Grout.
NOTE: If excess water is used in the sponge during clean up, minor cracks or
pinholes can develop. If the grout is over-worked, it may appear to shrink down
into joint. Should any of these things occur, simply apply a second coat to the
affected areas. You must allow your initial application to cure for 24 hours prior to
your second application.
Instruction For Use Over Premixed and Cement-Based Grout
To install, existing premixed or cementitious grout must be clean, sealer free, and
1
⁄
8
" (3 mm) lower than tile surface. If not: Remove existing grout with a grout saw
to at least
1
⁄
8
" (3 mm) below the surface of the tile.
Make sure the joint is free of all dust and debris, then apply grout per instructions
above.
Cure Time
At 70°F (21°C) and 50% relative humidity allow 24 hours until light foot traffic,
and 3 days before intermittent water exposure, such as showers.
Allow 7 days before full water submersion and to achieve final cure which
includes hardness and stain resistance.
Lower temperatures and higher humidity will extend the required cure times. For
enclosed areas (such as small rooms or bathrooms), increase air circulation to
ensure proper cure.
Do not cover to protect from other trades traffic until grout develops sufficient
cure, typically in 24 to 72 hours, depending on conditions.
Exterior applications must be protected from rain and other wet conditions for at
least 3 days with temperature above 50°F (10°C). Protect the area with tenting at
least 1 foot (30 cm) above the finished surface to allow air flow.
Clean-up
Clean tools and hands with warm soapy water while grout is still wet.