
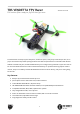
TBS Vendetta Manual


Quick Start Guide - BNF set
The following steps will get you setup and ready to fly quickly. It is a condensed version intended for
experienced pilots. Each step is elaborated in more detail in this manual if you are new to this.
You will need to mount the arms, install a R/C receiver, configure the flight control, potentially adjust VTX
frequency, insert the battery and install the propellers.
This section requires the following equipment.
● 5-channel R/C Radio transmitter and receiver with PPM/S-BUS/D-BUS, 5.8 GHz FPV receiver
system/display/goggles, PC for detailed configuration, and (optional) HD camera
Let’s go!
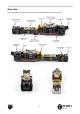
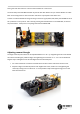
1. Remove the two screws on the front canopy and slide out the entire body assembly
2. Connect the SBUS/PPM receiver to the free POWERCUBE connector and mount the receiver
underneath the frame using two pieces of tape
3. Bind the receiver and radio, and set up the radio for a new VENDETTA configuration; throttle, yaw,
roll, pitch and flight mode is required (5 channels minimum)
4. Power on the VENDETTA and video receiver (VRX) system and display, tune into the right channel to
begin the software configuration, press the “Enter” key on the CORE PRO to cycle to S.BUS/PPM
5. Press and hold throttle down-left for 3 seconds to enter the CORE configuration menu, go to
“GENERAL”, press roll-right, “FLIGHT CONTROLLER”, “CALIBRATION”, “RC CALIBRATION”, and then “RC
CALIBRATION WIZARD”
6. With the receiver detected over SBUS or PPM, follow the wizard guide to set the control end-points
for all five channels, when complete, exit the menu and test the flight mode switch to make sure it
toggles between “ANGLE”, “HORIZON” and “ACRO”
7. Next, to set the video transmitter power, enter the menu configuration and go to “CALLSIGN” and
enter your own call sign, go back and to “GENERAL” and “VIDEO TRANSMITTER”, make your changes
to the desired band, channel and transmission power
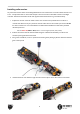
8. Adjust the camera angle and feed the receiver antenna through the gap in the middle section (the
carbon fiber body blocks radio frequencies), push the body back into the frame and re-attach the
canopy
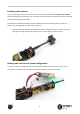
9. Find the pre-assembled arms and mount either on the sockets in the front and rear of the frame, use
four hex-screws per arm to lock it in place, finish by putting on the arm covers and tightening it down
with a single screw in the middle
10. Install the propellers on the motors; clockwise on the rear-right and front-left, and counterclockwise
on the other two, put on the provided lock-screws to secure them to the motors
11. Lastly, put the battery strap into the slots underneath the battery and strap it securely to the frame,
spin up by holding throttle down-right and turn off by holding throttle down-left
6