
TBS Vendetta Manual

In order to navigate the OSD menus using the radio sticks, the POWERCUBE needs to know which stick
(channel) corresponds to which action (throttle, roll, pitch, yaw).
1. The OSD will say “RC CALIBRATION REQUIRED”, to begin the process, keep both sticks on the radio in
the center position (including throttle).
2. A countdown will start (ignore the “waiting for xxx” message) and the calibration process begin
3. Complete all the steps as described on the display
Entering OSD configuration menu
After the initial calibration is done, the main OSD overlay will show and the VENDETTA is ready to be
configured.
1. To enter the OSD configuration menu, hold the throttle stick down-left for 4 seconds (mode 2)
2. A countdown will let you know that you are about to enter the OSD menu
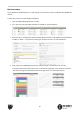
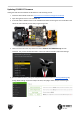
Changing VTX channel
The UNIFY PRO supports 24/40-channels and changes can be made “live” via the OSD.
1. Go into the OSD menu, then navigate down to “VIDEO TRANSMITTER” using the elevator-stick on your
radio, selecting it by moving the aileron-stick right
2. In this menu you can use the same navigation method to change the band and channel
3. Once preferred settings are set, use the aileron-stick to exit selection by moving to the left and
navigating out of the menu, only then will the new settings be made active on the UNIFY PRO VTX
This way of configuring the VTX this way is based on what we call SmartAudio. The CORE PRO uses the audio
channel from the UNIFY PRO as an exchange protocol to open a full duplex (back and forth) connection
between the VTX and the OSD. It is possible to change this behaviour via solder jumper on the CORE PRO so
you can either control the VTX channels and frequency via OSD, or just hear the sound from the mic.
22