
Team Black Sheep Crossfire RC System - Manual


Connection to a WiFi hotspot
Once your WiFi module is initiated, you can now connect to an external hotspot. The easiest way is to
connect it by the Web-UI:
● Connect the CROSSFIRE TX to your radio and power it up
● On your PC or phone search for a new WiFi network like “TBS_XF_AP_xxxxxx”
● Connect your pc/ phone with this network. On Windows machines, this can take up to one minute
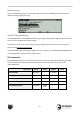
● Open your browser and enter IP in the address bar: 192.168.4.1
● Open the
WiFi
tab
● Click on Scan to search for available WiFi hotspot/ networks
● Click on the name of the found network you want to connect to - the name will be entered for you
● Enter your password and hit Connect/ Disconnect
● When you refresh the WebUI page after a few seconds, you will see the IP address assigned by the
WiFi network for CROSSFIRE TX
Note: if WiFi hotspot/ network has no internet connection, CLOUD-based features will not work.
Agent X/ M/ Lite menu works as well:
● Connect the CROSSFIRE TX to your radio and power it up
● Navigate in the CROSSFIRE menu to
WiFi/ General
● Hit
Scan
to search for available networks
● Under
SSID
you can select the found network
● Enter the password for the selected WiFi hotspot/ network in the
Password
option
● Select
Connect
to start the manual connection to the selected WiFi hotspot/ network
● Done
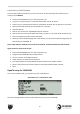
OpenTX setup for CROSSFIRE
If you own an OpenTX radio, you need to set up your model like this:
Internal RF: off and External RF: CRSF
Note: those settings need to be done on all models where you use your CROSSFIRE.
57