
User's Manual


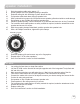
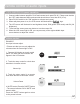

9. Strip speaker cable ends ½” and connect to speaker.
10. Observe speaker polarity: Connect (+) wire (with printed writing) to (+) terminal and (-) wire
(unprinted & textured) to the (-) terminal.
11. Route speaker cable to the receiver/amplier in a safe, least visible, tidy manner.
12. See “nal connection” section to nish installation.
15
speaker installation
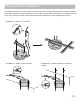
installing SP-2000 wall mount speakers
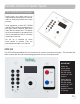
4. Install the mounting brackets on wall in the vertical (up/down) orientation.
5. Mount brackets using the appropriate hardware
6. Insert speaker with the tweeter in upper position.
7. Secure speaker in bracket with the hand fasteners.
8. Orient each speaker toward the center of that half of the listening area and tighten fasteners.
30’
20˚
33˚
45˚
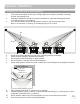
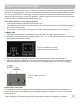
1. First observe the shape of the room: ceiling height, door locations, windows, mounting
surface, and seating area.
2. Ordinary installation would be to locate the speakers on each side wall approximately
even with the front row of listeners.
3. It is recommended to mount the speakers a minimum of 6 feet above the oor.
Note: In a room with 10’ ceilings, a mounting height of 9.5’ is ideal.
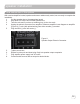
Front of Room
Receiver
Amplifier
Ceiling Sensor
Wall Speakers
Front of Room
Receiver
Amplifier
Ceiling Sensor
r
r
Wall Speakers
Front of Room
Ceiling Sensor
Listening Area
List
A
rea
Ceiling Speakers
Front of Room
Ceiling Sensor
Listening Area
Ceiling Speakers