
User's Manual

14
7. Strip the speaker cable ends, approx. ½".
8. Route speaker wire from speaker opening to amplier.
9. Reinstall ceiling tile with tile bridge in place above the hole.
10. Pull speaker cable back down through speaker hole.
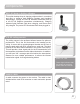
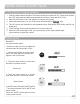
11. With a pointed tool or paper clip, lift up and remove speaker grill and set aside to avoid damage
12. Set speaker on top of ladder and connect speaker wire.
13. Observe speaker polarity, connect Red wire to (+) terminal and black wire to the (C) terminal.
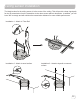
14. For locations where earthquake or a safety restraint is required, make the attachment to the
speaker and ensure it’s secure.
15. With the mounting clamps folded back, position speaker into speaker hole.
16. With a #2 Phillips screwdriver, tighten the quick clamps.
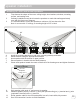
speaker installation
16. Reinstall speaker grille and remove any soil or ngerprints.
17. Repeat steps 7-16 for other speakers.
18. See “nal connection” section to nish installation.
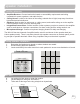
Mounting Screws
1. Lay ceiling tile face down on clean at surface.
2. Lay the SP-628L on the tile with at end (the opposite end of the integrated T-bar) ush with
the end of the tile.
3. Mark opposite end where you will make the cut. Mark the two opposite ends of the tile.
4. Take care to mark where the SP-628L integrated T-bar connects to the assebly.
5. Connect the marks with a level or at object to ensure you draw a straing line across the tile.
6. Cut the tile using a drywall saw.
7. Set speaker on top of ladder and connect speaker wire.
8. Place speaker in the ceiling ensuring it’s secure.
9. For locations where earthquake or a safety restraint is required, make the attachment to the
speaker and ensure it’s secure.
10. Replace ceiling tile.
11. See “nal connection” section to nish installation.
SP-628L